Showing posts with label Azure Active Directory. Show all posts

Tuesday, February 18, 2025

How to Obtain an Access Token for Azure Cost Management API Calls

In this article I will explain how to obtain an Access Token which will be used when calling Azure Cost Management APIs.

Following were the steps I used

Create an App Registration and Note the Tenant ID and Client ID


Next, generate a client secret and store it securely.


Our app registration is now successful. Next, we need to assign the service principal (app registration) the appropriate permissions to access cost data from our subscription.

Go to your Subscription, navigate to the Access Control (IAM) section, and click on 'Add role assignment.


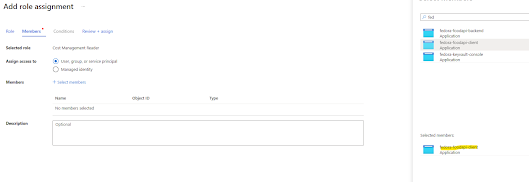
We will assign the Cost Management Reader permission


Next, select the App registration we created and complete the role assignment process.


That's all we have to do within Azure portal. Let's construct our API request using Postman client

#URL
https://login.microsoftonline.com/{Tenant ID}/oauth2/v2.0/token

#METHOD
POST

#X-WWW-FORM-URLENCODED
grant_type=client_credentials
&client_id={Client ID}
&client_secret={Client Secret}
&scope=https://management.azure.com/.default


Following is the response I get with the access token


Thursday, September 14, 2023

Resolve Azure Data Explorer error - Principal 'aaduser=xxx' is not authorized to perform operation 'VersionShowCommand'

When provisioning a new Azure Data Explorer cluster and navigating to the query section, you may receive an error message stating that the principal 'aaduser=xxx' is not authorized to perform the operation 'VersionShowCommand'.


To resolve the issue, you must grant the necessary permissions to the user principal referenced in the error message.

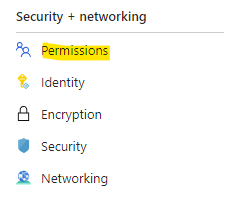
Begin by navigating to the Security + Networking section and selecting the Permissions menu.


Then, choose either AllDatabasesAdmin or AllDatabasesViewer based on your specific requirements.


Next, assign the user principal mentioned in the error message to grant the desired permission.


That's all you need to do. Now you can access the cluster


Sunday, March 6, 2022

Video - Govern SharePoint file upload with Azure Conditional Access

In this video I explained how Azure Conditional Access can be used with SharePoint Online and Defender for Cloud Apps policies


Blog post

Tuesday, March 1, 2022

Block file upload to SharePoint Online using Azure Conditional Access with custom policies

How can we restrict users uploading files with specific file name?

In this article I'll explain how to achieve that using Azure Conditional Access Policies and Defender for Cloud Apps policies

Steps in Conditional Access Policies

Step 01: Navigate to Azure AD and then to Security Section


Step 02: Navigate to Conditional Access Policies


Step 03: Create a new policy


Step 04: Assign Users. I've assigned all users


Step 05: Select SharePoint Online


Step 06: Navigate to Session section and select Use conditional access app control and use custom policy option


Then I will click on configure custom policy section. It will bring me to Microsoft Defender for Cloud Apps application.


Steps in Microsoft Defender for Cloud Apps

Step 01:  You can see SharePoint online in conditional access app control apps section, we created this in previous step in Azure AD


Step 02: Navigate to Control, Policies and create a new policy


Step 03: We will set Control file upload in Session control type drop down


Step 04: We will provide SharePoint Online as the Activity source


Step 05: Add a filter for the policy


Step 06: We will provide Block option in Actions section with a proper message


That's all we have to do. Let's try this out


Friday, February 18, 2022

Video - Azure Active Directory and Role Based Access Control (RBAC)

In this video I explained identity, scopes and roles concepts in Azure Active Directory. I demonstrated Azure AD Roles as well as Azure Roles.


Following is the presentation

Wednesday, September 8, 2021

Azure Privileged Identity Management (PIM) to grant Just in Time (JIT) access to resources

We always want to follow the least privilege security principle when granting permissions. Is role based access control alone sufficient to achieve this?

There are several challenges

  • If permission given indefinitely without an expiry, it will cause a risk
    • Such users may leave the organization
    • Projects may end
  • Having higher permission without a need at the moment is also a risk
    • Credentials can be compromised at any moment
    • You may do mistakes with higher permissions
Privileged Identity Management (PIM) is the solution for this. Microsoft Azure also provides a PIM facility which is an Azure AD premium (P2) feature. This article will provide an overview of Azure PIM features.

Azure PIM allows you to grant users and groups elevated privileges to Azure AD and Azure resources whenever necessary.

We will take a scenario to explain the concept.

Lat's take Contoso, which is a Financial organization which has its workloads in Microsoft Azure. John is a systems engineer who works in the same organization. Time to time the business requires to build new VM workloads and to modify existing VM resources. John should not have permanent contribute access due to prevailing audit and compliance requirements. What would be the solution?

What we can do is to use PIM, and assign John as eligible for VM Contribute role. As per this solution John will not have permanent access to the resource. Whenever he needs the access, John would navigate to PIM console and requests for the desired access. He might be asked to provide a strong authentication (MFA) and approval might also be required. After the granted time window is elapsed his elevated privilege will be revoked.

Existing privileges

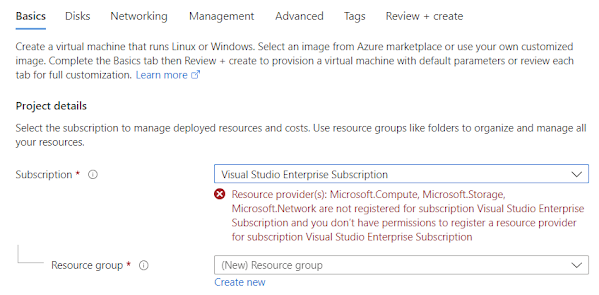
Currently John has read permission to the subscription. When he navigate to create a VM he will get following error message


Steps to gain Just in Time (JIT) privileges to perform desired actions

Step 1 : Administrator would log into  PIM and click on Azure Resources


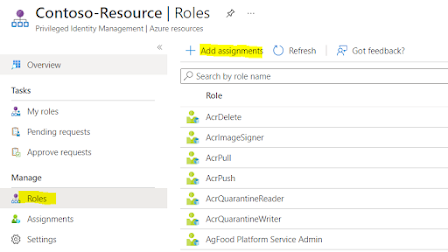
Step 2 : Click on Roles and click on add assignments


Step 3 : Select the role and select the user


Let's login to the PIM as John.

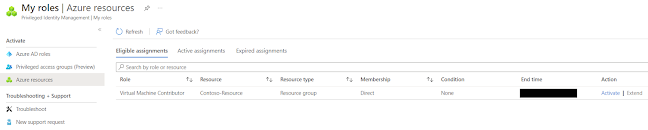
Step 1 : Navigate to My roles and Azure resources


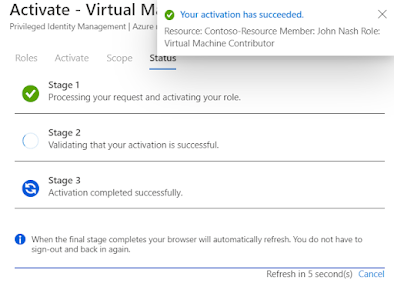
Step 2 : John will activate the privilege for 1 hour


Step 3 : Navigate to Active assignments in Azure resources blade in PIM


Now John should have access to VM resources, Let's see whether if he can create a VM.


Great!! Now we don't get the previous error. John's access will be revoked automatically after the expiry date or he can manually deactivate the elevated access.

Thursday, July 22, 2021

Azure Identity Protection to protect your credentials

With Azure Identity Protection (Azure AD P2 feature), Azure provides necessary precautions to protect and safeguard identities. 

Some of the common risks with identities are

  • Leaked credentials
  • Malware linked IP addresses
  • Unfamiliar sign-in properties
  • and many more,
As you can assume, it is very difficult to manually monitor each and every corner of the internet to check our credentials are compromised.

As a remedy Microsoft provides us with Identity Protection feature which has an automated detection of identity based risks. 

Identity Protection will provide remediation using different policies. We have two main policies to support us.


User risk policy
Azure will identity user accounts that may have compromised credentials. Policies will define what actions to be performed for such accounts

Based on the severity of the user risk, Azure will classify the riskiness as low, medium and high.

Following is the approach to configure User risk policy

Step 1 : Select target users


Step 2 : Select the risk level


Microsoft recommends to put the threshold to High.


Step 3 : Select the control


According to this setting in above diagram, user access will be blocked.


Sign-in risk policy
Azure will identify suspicious sign-in attempts of users. Policies will define what actions to be performed for such accounts

Based on the severity of the user risk, Azure will classify the riskiness as low, medium and high.

Following is the approach to configure Sign-in risk policy

Step 1: Select target users


Step 2 : Select the risk level


Microsoft recommends to put the threshold to Medium and Above.


Step 3 : Select the control


According to this setting in above diagram, user access will be blocked

After policies are set, administrators can refer various reports to obtain further insights.


Monday, April 20, 2020

Power BI - Consume on-premises data sources for external users with on-premises data gateway

In my previous post I illustrated how to use on-premises data gateway to expose on-premises data to Power BI.

I will show how external users can access those information.

Step 1: Ad external user to Azure Active Directory tenant


Step 2: Create a data source using the on-premises data gateway


Step 3: Create the data source in reports workspace


Step 4: Create test report


Step 5: Add permissions for external user


Let's try it out


By this way I was able to provide external user access to reports.