Showing posts with label SharePoint 2010. Show all posts

Wednesday, May 10, 2017

Presentation - Build real-time applications using SharePoint, Azure Service Bus and SignalR

I did a session on real-time applications with SignalR and Azure service bus for SharePoint Saturday Colombo 2017. I explained the concept and different technologies we can employ to build rich and real-time applications. Later I explained the approach to host such applications within SharePoint.

I will do a separate blog post explaining the steps required to a host real-time web application within SharePoint.

image

Following is the presentation I did

 
We had a room full of active participants Smile. It was nice to see some familiar faces after a long time.
 
DSC_0019   DSC_0059
DSC_0077 
We had a productive panel discussion as well.
DSC_0111

Friday, April 3, 2015

Deploy Advanced Search Box web part to SharePoint 2013 using module

We use Advanced Search Box to refine our search using keywords, managed properties and result types.This is very useful tool when the SharePoint environment contains a large amount of data.

image

There can be situations where you need to add this web part to custom web part pages programmatically. This task was very easy in SharePoint 2010 environments as this web part (AdvancedSearchBox.dwp) is available in web part gallery. Unfortunately this web part is no longer available in web part gallery in SharePoint 2013.

In this article I’ll show how to make that web part available in web part gallery so you can add it to pages later. Following are the steps I used to deploy the web part to the gallery

1. Navigate to the search center and execute sample query to get Advanced Search option

image

2. Edit the Advanced Search page and edit web part properties if required

image

3. After customizing properties, export the web part

image

4. Navigate to your visual studio solution and add a new Module. Include exported web part in that module

image

5. Modify Elements.xml as below

  1. <?xml version="1.0" encoding="utf-8"?>
  2. <Elements xmlns="http://schemas.microsoft.com/sharepoint/">
  3.   <Module Name="WebParts" Url="_catalogs/wp" RootWebOnly="TRUE">
  4.     <File Path="WebParts\AdvancedSearchBox.dwp" Url="AdvancedSearchBox.dwp" Type="GhostableInLibrary">
  5.       <Property Name="Group" Value="Default Web Parts"></Property>
  6.     </File>
  7.   </Module>
  8. </Elements>

6. Deploy and activate the feature. Now the web part should be available in web part gallery

image

After the web part is deployed to the gallery we can easily add it to pages programmatically by using current page’s Limited Web Part Manager (SPWeb.GetLimitedWebPartManager)

Saturday, March 14, 2015

Create managed properties and map to crawl properties programmatically using a feature

This is the second part of the article series, regarding explicitly creating crawl properties and later map in to managed properties.

In this article I will show how to create managed properties and map to explicitly created crawl properties using a custom feature.

1. Create classes for managed property and crawl property collections

  1. public class CrawlPropertyInfo
  2. {
  3.     public string Category { get; set; }
  4.     public string Name { get; set; }
  5.     public ManagedDataType Type { get; set; }
  6. }
  7.  
  8. public class ManagedPropertyInfo
  9. {
  10.     public string ManagedPropertyName { get; set; }
  11.     public ManagedDataType Type { get; set; }
  12.     public string Description { get; set; }
  13.     public List<CrawlPropertyInfo> CrawledProperties { get; set; }
  14. }

2. Create method to map crawl properties to managed properties

  1. public static void SetManagedPropMappings(List<ManagedPropertyInfo> managedPropertyList)
  2. {
  3. try
  4. {
  5.     SPServiceContext serviceContext =
  6.         SPServiceContext.GetContext
  7.         (SPServiceApplicationProxyGroup.Default, SPSiteSubscriptionIdentifier.Default);
  8.  
  9.     var searchProxy =  serviceContext.GetDefaultProxy(typeof(SearchServiceApplicationProxy))
  10.         as SearchServiceApplicationProxy;    
  11.  
  12.     SearchServiceApplicationInfo info = searchProxy.GetSearchServiceApplicationInfo();
  13.  
  14.     SearchServiceApplication application = SearchService.Service.SearchApplications.
  15.     GetValue<SearchServiceApplication>(info.SearchServiceApplicationId);
  16.  
  17.     SearchObjectOwner searchOwner = new SearchObjectOwner(SearchObjectLevel.Ssa);
  18.     Schema schema = new Schema(application);
  19.  
  20.     ManagedPropertyCollection properties = schema.AllManagedProperties;
  21.  
  22.     foreach (ManagedPropertyInfo managedPropertyInfo in managedPropertyList)
  23.     {
  24.         var prop = from pr in schema.AllManagedProperties
  25.                     where pr.Name == managedPropertyInfo.ManagedPropertyName
  26.                     select pr;
  27.  
  28.         ManagedProperty currentProperty = null;
  29.         //create if managed property is null
  30.         if (null == prop || prop.Count() == 0)
  31.         {
  32.             currentProperty = properties.Create(managedPropertyInfo.ManagedPropertyName, managedPropertyInfo.Type);
  33.         }
  34.  
  35.         foreach (CrawlPropertyInfo crawledProperty in managedPropertyInfo.CrawledProperties)
  36.         {
  37.             List<CrawledPropertyInfo> crawledProperties = application.GetAllCrawledProperties(crawledProperty.Name, crawledProperty.Category, 0, searchOwner);
  38.  
  39.             if (prop != null || prop.Count() > 0)
  40.             {
  41.                 currentProperty = prop.First();
  42.                 CrawledPropertyInfo ci = crawledProperties[0];
  43.                 MappingCollection mpc = currentProperty.GetMappings();
  44.  
  45.                 int i;
  46.                 for (i = mpc.Count - 1; i >= 0; i--)
  47.                 {
  48.                     mpc.RemoveAt(i);
  49.                 }
  50.                 currentProperty.Update();
  51.  
  52.                 Mapping map = new Mapping();
  53.                 map.CrawledPropertyName = ci.Name;
  54.                 map.CrawledPropset = ci.Propset;
  55.                 map.ManagedPid = currentProperty.PID;
  56.                 mpc.Add(map);
  57.                 currentProperty.SetMappings(mpc);
  58.                 currentProperty.Update();
  59.             }
  60.         }
  61.     }
  62. }
  63. catch (Exception ex)
  64. {
  65.     //handle error
  66. }
  67. }

3. From the feature activated in feature receiver, call above method with managed properties

  1. public override void FeatureActivated(SPFeatureReceiverProperties properties)
  2. {
  3.     SPSite site = properties.Feature.Parent as SPSite;
  4.     if (null != site)
  5.     {
  6.         List<ManagedPropertyInfo> managedPropertyList = new List<ManagedPropertyInfo>();
  7.         ManagedPropertyInfo testProperty = new ManagedPropertyInfo
  8.         {
  9.             ManagedPropertyName = "TestManagedProperty",
  10.             Type = ManagedDataType.Text,
  11.             CrawledProperties = new List<CrawlPropertyInfo> {
  12.                     new CrawlPropertyInfo{
  13.                         Name = "ows_TestCrawlProperty",
  14.                         Category = "SharePoint",
  15.                         Type = ManagedDataType.Text
  16.                     }
  17.             }
  18.         };
  19.  
  20.         managedPropertyList.Add(testProperty);
  21.         SetManagedPropMappings(managedPropertyList);
  22.     }
  23. }

4. After activating the feature you can see a managed property is created and mapped to a crawl property

image

Wednesday, March 4, 2015

SharePoint 2013 – Create custom Crawl Properties using PowerShell

Sometimes we need to create, custom site columns and some search related logic which requires above columns as managed properties within the same SharePoint solution (WSP). But as we all aware, following steps need to be done to map site columns to managed properties.
image
How can we do this without full crawl ?

As a solution, I create crawl properties using PowerShell prior to the solution deployment. Using the SharePoint solution I create managed properties and map them to crawl properties. Then after sometime, we can run full crawl to finish the process.

I split the article in to two section, to make it clear.
In this post I’ll discuss about creating Crawl Properties using PowerShell. Following are the steps used to create crawl properties

1. Get value for property set parameter from existing category. In my case I added the property to SharePoint category
  1. $searchapp = Get-SPEnterpriseSearchServiceApplication
  2. $cat = Get-SPEnterpriseSearchMetadataCategory -SearchApplication $searchapp -Identity SharePoint
  3. Get-SPEnterpriseSearchMetadataCrawledProperty -SearchApplication $searchapp -Category $cat -Limit 1

I got “00130329-0000-0130-c000-000000131346” as the result

2. Determine Crawl Property names
If your site column is ClientName, then the Crawl Property name will be ows_ClientName

3. Create Crawl Property using PowerShell
  1. New-SPEnterpriseSearchMetadataCrawledProperty -Category SharePoint -IsNameEnum $false -Name "ows_CustomClientName" -PropSet "00130329-0000-0130-c000-000000131346" -SearchApplication $searchapp -VariantType 72
  2.  
  3. New-SPEnterpriseSearchMetadataCrawledProperty -Category SharePoint -IsNameEnum $false -Name "ows_CustomProperty" -PropSet "00130329-0000-0130-c000-000000131346" -SearchApplication $searchapp -VariantType 72
  4.  
  5. New-SPEnterpriseSearchMetadataCrawledProperty -Category SharePoint -IsNameEnum $false -Name "ows_CustomCountry" -PropSet "00130329-0000-0130-c000-000000131346" -SearchApplication $searchapp -VariantType 72

4. That will create Crawl Properties in Search schema
image

Tuesday, February 17, 2015

Resolve error “The base type <Page> is not allowed for this page. The type <Type> could not be found or it is not registered as safe” when deploying application pages with code behind using a module to SharePoint

When we deploy application pages to SharePoint, sometimes we need to deploy them to libraries or root instead of “Layouts” folder and may be with some code behind. By default SharePoint will issue above error since it violates its derived Code Access Security principles.

image 

In this case we need to explicitly add the safe control entry to web.config file. There can be following concerns.

  • What if there are multiple modules ?
  • What if we need to fully automate the deployment process without anyone manually touching config files ?

Luckily, there is a solution provided by Visual Studio itself. We can add a safe control entry to module by following the steps given below.

1. Right click your module and click Properties

image 

2. Select Safe Control Entries and Expand to add one

image

3. Add new entry and fill content accordingly

image

4. Deploy the package again

Now the page renders as expected.

image

Sunday, December 28, 2014

Maintain multiple copies of same document effectively using “Manage Copies” feature

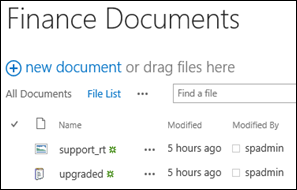
Sometimes we need to have copies of same document in multiple SharePoint sites. Let’s assume that each site should contain important documents as shown below.

image

Above setup prompts us following questions

Q1. Is it a good practice to upload documents manually in each site?

Q2. What if we have thousands of sites?

Q3. What if those documents need to be updated regularly?

Above valid questions leads us to keep those documents centrally and publish copies to whatever locations they need to be.

We can achieve above task using SharePoint search, but with few limitations

  • Original location of documents are visible to end users
  • Difficult to check amount of copies (in published sites) from the original document location
  • Difficult to publish a particular version only to a selected sites
  • and many more…

How can we overcome above limitations?

Instead of using search, we can use out of the box and heavily underrated “Manage Copies” feature.

Following are the steps to publish and share documents using “Manage Copies” feature

1. Store documents in a document library

image

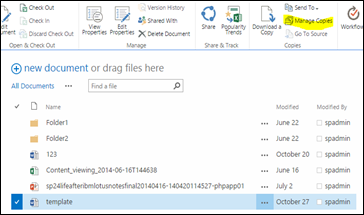
2. Select the document and click on “Manage Copies” icon
image

3. Click on “New Copy” link and provide the URL of the destination site

image

3. I prefer to click on “Update Copies” link to copy documents instantly

image

3. We can check destination libraries to see the success

image

As shown above we can maintain multiple copies of the same documents, where we can store the original document centrally.

As we have now solved half of the problem, let’s focus on how to update copies of a particular document.

Let’s say that there is an amendment to the leave policy and we have thousands of project sites those having copies of that leave policy. How can we reflect the change to those sites? It’s very easy. Following are the steps

1. Check Out the document in the original document library

image

2. Do the change to the document

image

3. Save the document and Check In. Remember to select “Update copies of this document with the new version” option

image

4. This will prompt another window showing all the copies of that document. If we don’t want the update to reflect on a particular site we can leave it by not checking the checkbox.

image

5. We can check destination libraries to see the success

image

In this article I explained the usage of “Manage Copies” feature to effectively manage copies of important documents.

Hope this helps someone Smile

Tuesday, September 2, 2014

Open a div in SharePoint modal dialog

Sometimes we need to load a div in modal popup instead of a page. Following is an example code that we can use in such scenarios.

In this scenario I use a modal popup to load file upload control in the same page.

  1. function Opendialog(ctType) {
  2.   SP.SOD.executeOrDelayUntilScriptLoaded(function () {
  3.     var element = document.createElement('div');
  4.     element.innerHTML = '<input type="file" id="documentUpload" accept="*" /><input id="btnUpload" type="button" value="Upload" onclick="UploadFile(\'' + ctType + '\')"; />';
  5.  
  6.     SP.UI.ModalDialog.showModalDialog({
  7.      html: element,
  8.      title: 'Document Upload',
  9.      allowMaximize: false,
  10.      showClose: true,
  11.      dialogReturnValueCallback : Function.createDelegate(null, CloseCallback),
  12.      autoSize: true
  13.     });
  14.    }, "SP.js");
  15. }
  16.  
  17. function CloseCallback(result, target) {
  18.    location.reload(true);
  19. }

Sunday, April 20, 2014

Programmatically display all items in SharePoint document library as a flat list without folders

Let’s assume that we have a document library with a deep folder structure. Sometimes it’s very hard and time consuming to locate documents under those folders.

image

Is there a way to display all files as a flat list without folders? It’s very simple, we only need to do some modifications to the view

image

If we have to automate the behavior, we can use either C# or PowerShell to do the needful. In both cases we need to update SPView.Scope property.

C# 

  1. var viewCollection = newDocLib.Views;
  2. const string viewName = "File List";
  3. var viewFields = new StringCollection
  4.          { "Type", "LinkFilename", "Modified", "Editor" };
  5. var filesOnlyView = viewCollection.Add(viewName, viewFields, string.Empty, 5, true, false);
  6. filesOnlyView.Scope = SPViewScope.Recursive;
  7. filesOnlyView.Update();
  8. newDocLib.Update();

PowerShell

Following script will create the view for all document libraries in all site collections within a specific web application

  1. Get-SPSite -WebApplication "http://sp13:8080" -limit All | ForEach-Object {  
  2. foreach ($w in $_.AllWebs){
  3. foreach($docLib in $w.Lists | where {$_.BaseTemplate -eq "DocumentLibrary"})
  4.   {
  5.     #create list view
  6.     $viewCollection = $docLib.Views
  7.     $viewName = "File List"
  8.     $fields = $docLib.Views["All Documents"].ViewFields.ToStringCollection()
  9.     $itemOnlyView = $docLib.Views.Add($viewName, $fields,"", 30, $True, $False)
  10.     $itemOnlyView.Scope = "Recursive"
  11.     $itemOnlyView.Update()
  12.     $docLib.Update()        
  13.   }
  14. }
  15. }

This will create a new view called “File List” which displays all files in the library without folders

image

Wednesday, April 2, 2014

Create SharePoint site using provisioning provider

In most cases, when we provision a site collection, we expect some customizations also to be created along with that site collection. Customizations can be branding, web parts, event receivers, etc..

There are several techniques to provision customized sites in SharePoint. Mostly important techniques are

  • Site definitions
  • Web templates
  • Provisioning Providers

Let’s assume we need to create a site collection programmatically with few web parts positioned in the home page. What do we normally do ? There are 2 approaches

The wrong way

We may use following steps to create the site

  1. Create a web service or console application to create site collection using built in template
  2. Add each web part to the page sequentially
  1. var spWebApp = SPWebApplication.Lookup(new Uri(appUrl));
  2. using (var site = spWebApp.Sites.Add
  3.     (siteUrl, siteTitle, "", 1033, "STS#0", login, userName, ""))
  4. {
  5.     //Add webpart 1
  6.     //Add webpart 2
  7. }

What is the problem with this approach?

The issue is that the Sites.Add method executes asynchronously. Hence we might be trying to add web parts or other customizations to a site which is still being provisioned.

The correct way

The best practice is to provision such site collection using a provisioning provider. Following are the steps in creating a site using provisioning provider.

     1. Create custom behavior using new class extending SPWebProvisioningProvider

  1. public override void Provision(SPWebProvisioningProperties props)
  2. {
  3.   var web = (SPWeb)props.Web;
  4.   web.ApplyWebTemplate("ContosoSites#1");
  5.   //Change the description to demonstrate
  6.   web.Description = "created by provisioning provider";
  7.  
  8.   //Add webpart 1
  9.   //Add webpart 2
  10.   web.Update();
  11. }
 

    2. Create site definition

Site definition contain 2 files, namely “Onet.xml” and “webTemp.xml”. Following is a sample “Onet.xml” file

image

   3. Specify ProvisionAssembly and ProvisionClass elements in web template file

  1. <Templates xmlns:ows="Microsoft SharePoint">
  2.   <Template Name="ContosoSites" ID="10002">    
  3.     <Configuration ID="0"
  4.                    Title="Contoso HR Site"
  5.                    Hidden="FALSE"
  6.                    ImageUrl="/_layouts/images/CPVW.gif"
  7.                    ProvisionAssembly="STSTest, Version=1.0.0.0, Culture=neutral, PublicKeyToken=ec660d77d5010c78"
  8.                    ProvisionClass="STSTest.ContosoProvisioningProvider"
  9.                    Description="Contoso HR Site"
  10.                    DisplayCategory="Contoso Sites">
  11.     </Configuration>
  12.     <Configuration ID="1"
  13.                    Title="Contoso HR Site"
  14.                    Hidden="True"
  15.                    ImageUrl="/_layouts/images/CPVW.gif"
  16.                    Description="Contoso HR Site"
  17.                    DisplayCategory="Contoso Sites">
  18.     </Configuration>
  19.   </Template>
  20. </Templates>

You may notice that, we’ve created two configuration elements for same “Contoso HR Site”. This is to avoid circular reference when applying the template from the provisioning provider.

In addition to the configuration which attaches the provisioning provider we will create a hidden configuration as well. From the provisioning provider we will apply the hidden configuration. By doing that we can avoid the circular reference

   4. Deploy the solution

   5. Create new site

         image

Tuesday, March 18, 2014

Group SharePoint site templates within a site definition using configuration elements

An organization may require multiple site templates designed for each department or team. Each template may contain it’s own navigation, libraries and features associated with them. To build such templates we normally tend to create multiple site definitions.

But that’s not the best approach to fulfill the requirement. Instead of multiple site definitions, we can create multiple configuration items within the same site definition.

Following scenario shows the onet.xml file of a site definition which contains two configurations created for HR department and Finance department.

image

Given below is the configuration section for ContosoHR which contains custom lists and some features

  1. <Configuration ID="0" Name="ContosoHR">
  2.       <Lists>
  3.         <List
  4.         FeatureId="00BFEA71-E717-4E80-AA17-D0C71B360101"
  5.         Type="101"
  6.         Title="HR Documents"
  7.         Url="$Resources:core,shareddocuments_Folder;"
  8.         QuickLaunchUrl="$Resources:core,shareddocuments_Folder;/Forms/AllItems.aspx" />
  9.       </Lists>
  10.       <SiteFeatures>
  11.         <!-- BasicWebParts Feature -->
  12.         <Feature ID="00BFEA71-1C5E-4A24-B310-BA51C3EB7A57" />
  13.         <!-- Three-state Workflow Feature -->
  14.         <Feature ID="FDE5D850-671E-4143-950A-87B473922DC7" />
  15.       </SiteFeatures>
  16.       <WebFeatures>
  17.         <!-- TeamCollab Feature -->
  18.         <Feature ID="00BFEA71-4EA5-48D4-A4AD-7EA5C011ABE5" />
  19.         <!-- MobilityRedirect -->
  20.         <Feature ID="F41CC668-37E5-4743-B4A8-74D1DB3FD8A4" />
  21.         <!-- WikiPageHomePage Feature -->
  22.         <Feature ID="00BFEA71-D8FE-4FEC-8DAD-01C19A6E4053" />
  23.       </WebFeatures>
  24.       <Modules>
  25.         <Module Name="DefaultBlank" />
  26.       </Modules>
  27.     </Configuration>

Then we need to modify the web template file (webTemp_ContosoSites.xml file in this example) to include our custom configurations.

  1. <?xml version="1.0" encoding="utf-8"?>
  2. <Templates xmlns:ows="Microsoft SharePoint">
  3.   <Template Name="ContosoSites" ID="10002">
  4.     <Configuration ID="0"
  5.                    Title="Contoso HR Site"
  6.                    Hidden="FALSE"
  7.                    ImageUrl="/_layouts/images/CPVW.gif"
  8.                    Description="Contoso HR Site"
  9.                    DisplayCategory="Contoso Sites">
  10.     </Configuration>
  11.     <Configuration ID="1"
  12.                    Title="Contoso Finance Site"
  13.                    Hidden="FALSE"
  14.                    ImageUrl="/_layouts/images/CPVW.gif"
  15.                    Description="Contoso HR Site"
  16.                    DisplayCategory="Contoso Sites">
  17.     </Configuration>
  18.   </Template>
  19. </Templates>

After deploying the site definition, we can see multiple templates available under “Contoso Sites” section

image

By doing this we can properly group our site templates. Furthermore this is the way how SharePoint groups it’s default site templates (e.g.: Team Site, Blank Site, etc..)