Following is the presentation I did at Microsoft Student Champs Monthly Meeting- February 2018
Showing posts with label Workflows. Show all posts
Showing posts with label Workflows. Show all posts
Friday, February 16, 2018


Wednesday, September 17, 2014
SharePoint 2013 Visual Studio based workflow - customize task approval email to include link to respective task
In SharePoint 2013 workflow architecture is drastically changed when compared with SharePoint 2010. Some new activities like “HttpSend” are introduced to the platform and some activities are improved a lot. On the other hand some scenarios became very hard to implement.
Let’s assume that we have a SharePoint 2013 Visual Studio based workflow and need to assign a task to a user. We expect the notification email to contain the link to respective task. isn’t it ?
In SharePoint 2010 it was very easy to include the task url in the mail. But that is not the case anymore. It’s not possible to include the task url in the default mail. Instead it is sent like below which is not user friendly.

In this post I’ll show a workaround to resolve the problem. Following are the steps we need to perform
1. Add “SingleTask” activity and configure necessary parameters

2. Modify WaitForTaskCompletion property to false
This will avoid the “SingleTask” activity to wait until the approval. Furthermore change “WaiveAssignmentEmail” property value to “Yes” which avoids the notification email.

3. Compose an email manually
In this email I’ll include a link to assigned task. To get the guid of task list, I will use “GetTaskListId” activity. Furthermore I’ll get the task id from “SingleTask” activity output.
From those elements I’ll construct the url of the assigned task
e.g.: “http://sp13/sites/dev/DOAApprovalForm.aspx?List="+taskListId.ToString()+"&ID="+taskItemId+"
Then I’ll construct the email body as I wish
- "<html><body style='font-size:11pt;font-family:Segoe UI Light,sans-serif;color:#444444;'><div>Contract comment is : " + contractComment+ " </br>Please approve this <a href="+siteUrl + "SitePages/DOAApprovalForm.aspx?List="+taskListId.ToString()+"&ID="+taskItemId+">Task</a></div></body></html>"
4. Handle Approve or Reject actions using a “Pick” activity
We will use “WaitForFieldChange” activity to pause the workflow until user presses Approve or Reject buttons. Since there are two possible values in the pausing field we need to use a “Pick” activity

5. As mentioned earlier, we will use “WaitForFieldChange” activities on both branches, configured for “TaskOutcome” field.

For the first “WaitForFieldChange” activity, the FieldValue is set to “Approved” and for the other one it is “Rejected”
6. I’ll update the taskOutcome with respective values to continue the workflow

This will allow us to modify email as we wish and pause the workflow until the task is approved or rejected

Friday, July 25, 2014
Cross site collection data access via HTTP web service for a SharePoint 2013 designer workflow. Resolving Unauthorized exception
Recently I created a SharePoint 2013 approval workflow where I had to take approvers from a list located at a different SharePoint site collection.
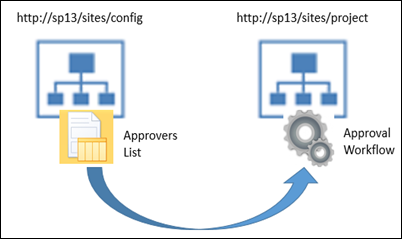
In this example I have two site collections named Config and Project where I have created the workflow in the Project site collection using SharePoint Designer. In the Config site collection I have a list called Approvers where I store relevant information regarding approvers.
Following diagram shows the scenario I described.
To get relevant information from Config site collection, I will use SharePoint api web services. For an example I could use following service to return all items in that list.
Although I have followed the steps correctly, I was getting an “Unauthorized” exception all the time. I’ve given necessary permissions to the list and web application but still I was getting the same error.
Later I figured out that we need to provide permissions to the workflow explicitly if we need to access resources beyond the current site. Following are the steps I followed to configure permissions to the workflow
1. Activate “Workflows can use app permissions” site feature in the site where I create the workflow (http://sp13/Sites/project )
Since we are accessing beyond the current site collection, we will use “http://sharepoint/content/tenant” as the scope. More information on app permission and available scopes can be found on this article.
6. Finally we will trust the workflow
In this example I have two site collections named Config and Project where I have created the workflow in the Project site collection using SharePoint Designer. In the Config site collection I have a list called Approvers where I store relevant information regarding approvers.
Following diagram shows the scenario I described.

To get relevant information from Config site collection, I will use SharePoint api web services. For an example I could use following service to return all items in that list.
“http://sp13/Sites/config/_api/web/lists/getbytitle('Approvers')/items”Calling a HTTP web service through a SharePoint 2013 Designer based workflow is straight forward. I have explained that in this blog post.
Although I have followed the steps correctly, I was getting an “Unauthorized” exception all the time. I’ve given necessary permissions to the list and web application but still I was getting the same error.
Later I figured out that we need to provide permissions to the workflow explicitly if we need to access resources beyond the current site. Following are the steps I followed to configure permissions to the workflow
1. Activate “Workflows can use app permissions” site feature in the site where I create the workflow (http://sp13/Sites/project )
2. Navigate to Site Settings –> Site app permissions where you can see an item called workflow

3. Copy the client section of the App Identifier as shown below

4.Navigate to <site url>/_layouts/15/appinv.aspx to configure permissions. Then add the client section of the App Identifier in the App Id section and click Lookup to populate content.

5. Then we need to specify App’s Permission Request XML

<AppPermissionRequests>
<AppPermissionRequest Scope="http://sharepoint/content/tenant" Right="FullControl" />
</AppPermissionRequests>
6. Finally we will trust the workflow
This will allow our workflow to access resources beyond the current site collection.

Monday, July 14, 2014
SharePoint 2013 Workflow-Check if required documents are available inside a Document Set prior to the approval process
We can use SharePoint Designer workflows to author an approval process. Sometimes the approval process can be complex where we need to create advanced workflows. In SharePoint 2013 workflows we can use HTTP web services and loops to assist such instances.
Recently I created an approval workflow to a library which stores document sets. Following is the pre-condition to the approval.
Each document set has two allowed content types named “Policy Document” and “Policy Checklist”. The approval process proceeds if the document set contain at least one document from each document set. Otherwise the approval process terminates.
Following are the questions we need to address
- How can we access documents within a document?
- How can we get the content type ID of each document?
We will call two web service methods to obtain relevant information and will use built in loop to assist the process. Following are the steps I used to answer above questions
1. Construct the server relative URL for document sets
Let’s assume our document set is located at “https://sp13/sites/dev/Shared Documents/DocumentSet1”. Below activity will remove “https://sp13/sites/dev/” component and assigns “Shared Documents/DocumentSet1” to a variable named “itemFolder”

2. Prerequisites to call SharePoint REST API
As I mentioned earlier, SharePoint 2013 workflows can call RESTful services by default. In this case we will use services provided in “_api/web”. Since those services provide xml output we have convert them to JSON.
To do that we will create a dictionary. For both “Accept” and “Content-Type” variables provide “application/json;odata=verbose” as the value


3. Call web service to get all items within the document set
To get items under a document set we will use GetFolderByServerRelativeUrl() method. Following is a sample service call
https://sp13/sites/dev/_api/web/GetFolderByServerRelativeUrl('Shared Documents/Set1')/Files
If you need further information on this method you can refer this blog post. To call the service using workflow we will use Call HTTP web service activity as shown below.
Following are the sub steps
A. When constructing the url, we will use the sever relative path created in step 1

B. Create an empty dictionary variable named JSONResults
C. Edit properties of the activity to assign “Header” and “JSONResults” dictionaries to RequestHeaders and ReseponseContent parameters.

Finally the activity looks like below

Unfortunately this service doesn’t return Content Type ID property. As a result we will get a property from this service which can be input to our second service to obtain Content Type Id. We will call the second service in step 8.
4. Store results to a separate dictionary called allItems

5. Get count of items to start the loop

6. Store variable to hold content type IDs

7. Create a loop to iterate each item we have in allItems dictionary
Create an integer variable named index.

Then we will get the ServerRelativeUrl property from the item and assign it to variable serverRelativeUrl

8. Call the second web service to get content type id.
Since “GetFolderByServerRelativeUrl()/Files” method does not return the content type of items. As a result we need to execute another service to do so. We will use the ServerRelativeUrl property returned from step 7 as an input to the second service
This time we will call GetFileByServerRelativeUrl() method. Following is a sample of the service call.
https://sp13/sites/dev/_api/Web/GetFileByServerRelativeUrl('/sites/dev/Shared Documents/Set1/3.txt')/ListItemAllFields
If you need further information on this method you can refer this blog post as well.
As we did for the first method we will call HTTP web service activity as shown below


9. Get ContentTypeId property of the item
This service returns just a single item. So it is easy to get the value

10. Create Boolean variables to store content type availability
Since we have two content types, we have two Boolean variables named “ct1IsAvailable” and “ct2IsAvailable”

11. Set Boolean value true if the content type was found

12. Specify Termination condition at the end of the loop

13. Conditionally allow or restrict the approval

14. Terminate the workflow

Summary
In the above article I explained how to use http web services available in “_api/web” within SharePoint 2013 workflows. A practical scenario was also explained where we need to check at least one document from each content type available in the document set.
Monday, May 12, 2014
Could not establish trust relationship for the SSL/TLS secure channel–multi server environment with self-signed certificate for SharePoint 2013 workflow manager
Let’s assume that we have a multi server SharePoint 2013 farm and we need to setup workflow manager in one of them. Following is a sample scenario

If we need the workflow management site over HTTPS we need to configure a SSL certificate. The easiest option would be to configure a self-signed certificate. But it may not work as the certificate is issued by the same server (app server) which is not registered as a valid certificate authority.

When the workflow management site is accessed internally by the WFE Server it throws following error as the certificate is not trusted.
System.Net.WebException: The underlying connection was closed: Could not establish trust relationship for the SSL/TLS secure channel. ---> System.Security.Authentication.AuthenticationException: The remote certificate is invalid according to the validation procedure.
at System.Net.TlsStream.EndWrite(IAsyncResult asyncResult)
at System.Net.ConnectStream.WriteHeadersCallback(IAsyncResult ar)
--- End of inner exception stack trace ---
at Microsoft.Workflow.Common.AsyncResult.End
So how can we resolve the error?
The solution is to use a domain certificate instead of self-signed certificate. To do that we need to ensure “Active Directory Certificate Services” role is deployed in one server within the domain.
If “Active Directory Certificate Services” is available we can use following steps to request a domain certificate
1. In App Server go to Microsoft Management Console and add snap-in for Certificates

2. Select computer account


3. Navigate to Personal > Certificates

4. Click Request new certificate

5. Use this certificate for workflow manager configuration
Thursday, May 8, 2014
Access is denied due to invalid credentials – When accessing SharePoint 2013 workflow manager via host named URL
When we configure workflow manager for a SharePoint 2013 farm with publically accessible sites, following can be requirements for the workflow management site
- Availability via HTTPS
- Host named URL to match the trusted certificate
After configuring above features, the workflow management site was inaccessible via the host named URL. Although the credentials I provided were accurate, it wasn’t allowing me to access the site.

This error is caused by the loopback check security feature of Windows. If you need to check more on loopback check and workarounds you can refer to this KB article.
Following are summarized steps to resolve the error.
1. Navigate to following windows registry key
HKEY_LOCAL_MACHINE\SYSTEM\CurrentControlSet\Control\Lsa\MSV1_0
2. Create a new Multi-String value named BackConnectionHostNames

3. Modify the Multi-String value and add the host name

That’s all we need to do. Now the workflow management site is available via the host named URL as below

Subscribe to:
Posts (Atom)