Showing posts with label PowerShell. Show all posts

Tuesday, January 10, 2023

How to generate a self-signed code signing certificate

A Code Signing Certificate is a digital certificate that is used to verify the identity of the software publisher and to ensure the integrity of the software code. The certificate is used to sign the software code, providing a cryptographic signature that confirms the code has not been tampered with or altered in any way.

You can ensure that the component you are installing comes from a trusted source.

Code Signing Certificates work by using public key cryptography. When a software publisher signs their code, they use their private key to create a digital signature. This digital signature is then embedded in the code, along with the public key of the software publisher.

Following is the PowerShell script to generate self-signed code signing certificate

$cert = New-SelfSignedCertificate 
	-Type CodeSigningCert 
	-certstorelocation cert:\localmachine\my 
	-dnsname Test.LOCAL 
	-NotAfter "03/12/2035" 
	-FriendlyName "Test.LOCAL" 
$pwd = ConvertTo-SecureString -String ‘’ -Force -AsPlainText
$path = 'cert:\localMachine\my\' + $cert.thumbprint 
Export-PfxCertificate -cert $path -FilePath C:\Code\Cert\Test.LOCAL.pfx -Password $pwd

When a user downloads and installs the software, the operating system checks the digital signature against the public key of the software publisher to verify the authenticity of the software. If the signature is valid, the operating system will allow the software to run. If the signature is not valid, the operating system will warn the user that the software may be malicious and should not be installed.

Following is a sample error message you might get


Friday, March 20, 2020

How to periodically send IIS Logs with custom fields to SQL Server database

Recently I wanted to push IIS logs to SQL database for analytics purpose.

Following are the steps I used

Step 1: Configurations at IIS side


Add custom fields as shown below


Step 2: Create a table in SQL Server database with following columns


Step 3: Construct following PowerShell scripts


a. RemoveLogs.ps1 - This will remove existing logs in working directory and clean up for new logs

$ErrorActionPreference = "Stop"
 
Import-Module Pscx -EA 0
 
function RemoveLogFiles
{
    Write-Host "Removing log files..."
    Remove-Item ($httpLogPath1)
}
 
function Main
{   
 
    [string] $httpLogPath1 = "E:\TempLogs\*.log"
     
    RemoveLogFiles 
 
    Write-Host -Fore Green "Successfully removed log files."
}

b. CopyLogs.ps1 - This will copy Logs from IIS log file location to our logs directory. I'm copying everything created during last two days

$Date = Get-Date
$Date = $Date.adddays(-2)
$Date2Str = $Date.ToString("yyyMMdd")
 
$Files1 = gci "\\IIS-01\LogFiles\W3SVC4"
ForEach ($File in $Files1){
     $FileDate = $File.creationtime
     $CTDate2Str = $FileDate.ToString("yyyyMMdd")
     if ($CTDate2Str -eq $Date2Str) {Copy-Item $File.Fullname "E:\TempLogs"}
}

c. CopyLogsToDB.ps1 - This will import logs to our SQL Server database table

$ErrorActionPreference = "Stop"
 
Import-Module Pscx -EA 0
 
function ImportLogFilesServer(
    [string] $httpLogPath)
{
    If ([string]::IsNullOrEmpty($httpLogPath) -eq $true)
    {
        Throw "The log path must be specified."
    }
 
    [string] $logParser = "${env:ProgramFiles(x86)}" `
        + "\Log Parser 2.2\LogParser.exe "
 
    [string] $query = `
        [string] $query = `
        "SELECT" `
            + " LogFilename" `
            + ", RowNumber" `
            + ", TO_TIMESTAMP(date, time) AS EntryTime" `
            + ", s-ip AS ServerIpAddress" `
            + ", cs-method AS Method" `
            + ", cs-uri-stem AS UriStem" `
            + ", cs-uri-query AS UriQuery" `
            + ", s-port AS Port" `
            + ", username  AS Username" `
            + ", c-ip AS ClientIpAddress" `
            + ", cs(User-Agent) AS UserAgent" `
            + ", pageurl AS Referrer" `
            + ", sc-status AS HttpStatus" `
            + ", sc-substatus AS HttpSubstatus" `
            + ", sc-win32-status AS Win32Status" `
            + ", time-taken AS TimeTaken" `
            + ", storename  AS StoreName" `
        + " INTO IISLog" `
        + " FROM $httpLogPath"

 
    [string] $connectionString = "Driver={SQL Server Native Client 11.0};" `
        + "Server=DB-01;Database=IISLogs;Trusted_Connection=yes;"
 
    [string[]] $parameters = @()
 
    $parameters += $query
    $parameters += "-i:W3C"
    $parameters += "-e:-1"
    $parameters += "-o:SQL"
    $parameters += "-createTable:ON"
    $parameters += "-oConnString:$connectionString"
 
    Write-Debug "Parameters: $parameters"
 
    Write-Host "Importing log files to database..."
    $logParser 
    $parameters
    & $logParser $parameters

}
 
 
function Main
{
    [string] $httpLogPath = "E:\TempLogs\*.log"
 

    ImportLogFilesServer $httpLogPath
 
#Repeat above for all other server
 
    Write-Host -Fore Green "Successfully imported log files."
}
 
Main

Step 4: Apply a schedule using Task Scheduler


This will upload latest logs including custom fields to SQL Server database.

Sunday, July 10, 2016

SharePoint 2013 in Azure IaaS–Map public url to internal DNS

One of my SharePoint environments was recently deployed in Microsoft Azure IaaS. I have following servers in that environment

  • Active Directory
  • SQL Server
  • Analysis Services Server
  • SharePoint Server

I have deployed the farm accordingly and created host named site collection using public URL “portal.contoso.com”.

I used following command to create the host based site collection

New-SPSite 'https://portal.contoso.com' -HostHeaderWebApplication 'https://portal.contoso.com' -Name 'Portal' -Description 'Portal' -OwnerAlias 'SP\SP_Admin' -language 1033 -Template 'BLANKINTERNETCONTAINER#0'

Then I mapped the public IP of the SharePoint server with my external DNS. Thereafter my SharePoint site is accessible from outside as below

But the public URL was not accessible within my server farm (e.g SharePoint server, or Analysis Services Server), And I need to have a more concrete solution than host files.

Following are the steps I used

1. Log in to domain controller and navigate to DNS Manager. Right click on Forward Lookup Zones and create new

image


image

image

image

image

2. Create new A record to SharePoint server

image

image

3. Test the connectivity

First clear the DNS cache

  • ipconfig /flushdns

image

That’s all we have to do. In the same way I had to map public URLs of my analysis services as well.

Tuesday, May 24, 2016

Microsoft Azure resource manager portal - check the core limit using PowerShell

Recently I had to work on a new Azure tenant in resource manager portal. Unfortunately there was an issue when creating new virtual machines. It gave me an error saying that cores are not sufficient.

bce9ff21-e598-497a-8e9e-a7193521ff4d

I needed to verify the core availability.

In Azure classic portal I can easily navigate to my subscription and check available resources like below.

image

Let’s try to check the same with Azure resource manager portal.

image

Oops. I couldn’t find any place in new portal to check the resource usage. specifically number of cores available versus utilized.

But there is a way to check that. We can use Azure PowerShell.

First you need to download Azure PowerShell module. Following are the commands we need to use.

Login-AzureRmAccount

Get-AzureRmSubscription –SubscriptionName "Pay-As-You-Go" | Select-AzureRmSubscription

Get-AzureRmVMUsage -Location "australiaeast"

8478a723-d9d1-4d32-9840-667345c82b92

Monday, January 11, 2016

Configure Kerberos for SharePoint 2013–PowerShell Scripts

Recently I had to reconfigure an existing web application to use Kerberos authentication. The objective was to allow my Business Intelligence environment to use impersonation account for row level security.

In my environment I had a Domain Controller server, SQL Server, Analysis Server configured in Tabular mode and a SharePoint server

Following were the steps I used to perform the configuration

1. Prepare service accounts.

Following were my service accounts

  • SP\SP_C2WTS
SharePoint Claims to windows token service service account
  • SP\SP_Farm
SharePoint farm account
  • SP\SP_Services
ExcelServices app pool account
  • SP\SP_Services
PowerPivot app pool account
  • SP\SP_PortalAppPool
Web Application app pool account
  • SP\SP_Admin   
SharePoint installation account
  • SP\SP_UnattendedService
Excel services data refresh account

2. Add “SP\SP_C2WTS” Account to local administrator group in the SharePoint server

3. Set accounts in local security policy

image

image

image

image

4. Start the Claims to Windows Token Service in SharePoint

image

5. We have to change the service account for Claims to Windows Token Service.

$ct = "SP\SP_C2WTS"
$Identity = $ct
$ServiceTypeName = "Claims to Windows Token Service"

$Service = (Get-SPFarm).services | where {$_.typename -eq $ServiceTypeName}
$IdentityManagedAcct = Get-SPManagedAccount -Identity $Identity

$SvcProcessIdentity = $Service.ProcessIdentity
$SvcProcessIdentity.CurrentIdentityType = [Microsoft.SharePoint.Administration.IdentityType]::SpecificUser
$SvcProcessIdentity.Username = $IdentityManagedAcct.UserName
$SvcProcessIdentity.Update()
$SvcProcessIdentity.Deploy()

6. Create SPN Records

Setspn -S SP/C2WTS SP\SP_C2WTS
Setspn -S SP/Excel SP\SP_Services
Setspn -S SP/PowerPivot SP\SP_Services
   

7. Set SPN records for Web Applications

Setspn -S HTTP/portal.contoso.com SP_PortalAppPool
Setspn -S HTTP/my.contoso.com SP_ProfilesAppPool

8. Set SPN for SQL Server

Setspn -S MSSQLSvc/sql.contoso.com:1433 SP\SQL_Admin

9. Set SPN for Analysis Server Tabular

Setspn -S MSOLAPSvc.3/sql.contoso.com SP\SQL_OLAP_Admin

10. Set SPN for SQL browser

Setspn -S MSOLAPDisco.3/pivot.contoso.com SP\SQL_OLAP_Admin

11. Trust SharePoint Server for delegation

Navigate to Domain Controller and Active Directory Users and Computers

image[36]

image

12. Change Web Application settings

image

That’s all we have to do.

Tuesday, September 1, 2015

SharePoint 2013 - Remove faulty Cache Host which is in “Unknown” state from a cache cluster

One of my SharePoint environments had some servers removed from that farm. Unfortunately they were not removed properly where, some configuration items still remained.For an example, my distributed cache service prompted me with multiple errors due to invalid configuration.

When I try to remove the unresponsive CacheHost, using PowerShell “Unregister-CacheHost” it gave me following error
Unregister-CacheHost : ErrorCode<UnspecifiedErrorCode>:SubStatus<ES0001>:No such host is known
When I execute the simplest command Get-CacheHost, that too gave me an error
image
I tried to unregister or remove the Unknown host using PowerShell commands but i was not that lucky.

Finally SharePoint gods decided to let me finish my task :)
I found a solution using “Export-CacheClusterConfig” and “Import-CacheClusterConfig” commands

Following are the steps I follow
Use-CacheCluster
Export-CacheClusterConfig -File "F:\Cache\CacheConfig.xml"
My configuration file had the hosts section as below. I removed the faulty host from the config file.

  1. <hosts>
  2.   <host replicationPort="22236"arbitrationPort=22235clusterPort=22233 hostId=99833size=800leadHost=true account=dev\svcuser
  3.       cacheHostName=AppFabricCachingService name=testserver1
  4.       cachePort=22233 />
  5.   <host replicationPort=22236arbitrationPort=22235clusterPort=22233 hostId=34355size=400leadHost=true account=dev\svcuser
  6.       cacheHostName=AppFabricCachingService name=testserver2
  7.       cachePort=22233 />
  8.   <host replicationPort=22236arbitrationPort=22235clusterPort=22233 hostId=67893size=400leadHost=true account=dev\svcuser
  9.          cacheHostName=AppFabricCachingService name=testserver3
  10.          cachePort=22233 />
  11. </hosts>

Then I ran the following command
Import-CacheClusterConfig -File "F:\Cache\CacheConfig.xml"
That solved my problems.

Wednesday, March 4, 2015

SharePoint 2013 – Create custom Crawl Properties using PowerShell

Sometimes we need to create, custom site columns and some search related logic which requires above columns as managed properties within the same SharePoint solution (WSP). But as we all aware, following steps need to be done to map site columns to managed properties.
image
How can we do this without full crawl ?

As a solution, I create crawl properties using PowerShell prior to the solution deployment. Using the SharePoint solution I create managed properties and map them to crawl properties. Then after sometime, we can run full crawl to finish the process.

I split the article in to two section, to make it clear.
In this post I’ll discuss about creating Crawl Properties using PowerShell. Following are the steps used to create crawl properties

1. Get value for property set parameter from existing category. In my case I added the property to SharePoint category
  1. $searchapp = Get-SPEnterpriseSearchServiceApplication
  2. $cat = Get-SPEnterpriseSearchMetadataCategory -SearchApplication $searchapp -Identity SharePoint
  3. Get-SPEnterpriseSearchMetadataCrawledProperty -SearchApplication $searchapp -Category $cat -Limit 1

I got “00130329-0000-0130-c000-000000131346” as the result

2. Determine Crawl Property names
If your site column is ClientName, then the Crawl Property name will be ows_ClientName

3. Create Crawl Property using PowerShell
  1. New-SPEnterpriseSearchMetadataCrawledProperty -Category SharePoint -IsNameEnum $false -Name "ows_CustomClientName" -PropSet "00130329-0000-0130-c000-000000131346" -SearchApplication $searchapp -VariantType 72
  2.  
  3. New-SPEnterpriseSearchMetadataCrawledProperty -Category SharePoint -IsNameEnum $false -Name "ows_CustomProperty" -PropSet "00130329-0000-0130-c000-000000131346" -SearchApplication $searchapp -VariantType 72
  4.  
  5. New-SPEnterpriseSearchMetadataCrawledProperty -Category SharePoint -IsNameEnum $false -Name "ows_CustomCountry" -PropSet "00130329-0000-0130-c000-000000131346" -SearchApplication $searchapp -VariantType 72

4. That will create Crawl Properties in Search schema
image

Sunday, January 11, 2015

Change existing application pool identity of a SharePoint web application

Following is the PowerShell script I used to change current application pool identity to a different managed account.

  1. $web = Get-SPWebApplication "http://sp13"
  2. $account = Get-SPManagedAccount -Identity "dev\portalapppool"
  3. $web.ApplicationPool.ManagedAccount = $account
  4. $web.ApplicationPool.Update()
  5. $web.ApplicationPool.Deploy()

That’s all I had to do :)

I described how to change application pools for service applications in this article. It has answers to your questions like, “Why can’t I change the application pool identity directly from the IIS itself?”.

Sunday, April 20, 2014

Programmatically display all items in SharePoint document library as a flat list without folders

Let’s assume that we have a document library with a deep folder structure. Sometimes it’s very hard and time consuming to locate documents under those folders.

image

Is there a way to display all files as a flat list without folders? It’s very simple, we only need to do some modifications to the view

image

If we have to automate the behavior, we can use either C# or PowerShell to do the needful. In both cases we need to update SPView.Scope property.

C# 

  1. var viewCollection = newDocLib.Views;
  2. const string viewName = "File List";
  3. var viewFields = new StringCollection
  4.          { "Type", "LinkFilename", "Modified", "Editor" };
  5. var filesOnlyView = viewCollection.Add(viewName, viewFields, string.Empty, 5, true, false);
  6. filesOnlyView.Scope = SPViewScope.Recursive;
  7. filesOnlyView.Update();
  8. newDocLib.Update();

PowerShell

Following script will create the view for all document libraries in all site collections within a specific web application

  1. Get-SPSite -WebApplication "http://sp13:8080" -limit All | ForEach-Object {  
  2. foreach ($w in $_.AllWebs){
  3. foreach($docLib in $w.Lists | where {$_.BaseTemplate -eq "DocumentLibrary"})
  4.   {
  5.     #create list view
  6.     $viewCollection = $docLib.Views
  7.     $viewName = "File List"
  8.     $fields = $docLib.Views["All Documents"].ViewFields.ToStringCollection()
  9.     $itemOnlyView = $docLib.Views.Add($viewName, $fields,"", 30, $True, $False)
  10.     $itemOnlyView.Scope = "Recursive"
  11.     $itemOnlyView.Update()
  12.     $docLib.Update()        
  13.   }
  14. }
  15. }

This will create a new view called “File List” which displays all files in the library without folders

image

Thursday, April 17, 2014

SharePoint : Open documents in browser for Office Web Apps using PowerShell

Recently we configured Office Web Apps in a SharePoint 2013 farm. But it didn’t work for most of the site collections as office documents were downloading instead of opening in the browser.

image

This is because it is set to open documents in client application. You can see it in the library settings in each document library.

image

If we change the setting back to “Open in the browser”, documents will open in Office Web Apps as expected. Is there any easier way to do the change for every site instead of change it at library level?

Luckily there is an easier way. The Open in client application behavior is enabled by a site collection feature.

image

If we deactivate the feature the setting will revert back to “Open in the browser” option.

We used following PowerShell to deactivate above feature for all site collections in the farm

  1. $clientFeature = "8A4B8DE2-6FD8-41e9-923C-C7C3C00F8295"
  2.  
  3. Get-SPSite -WebApplication "http://525256-wfe2013:5003/" -limit ALL | ForEach-Object {
  4. if ($_.Features[$clientFeature] -ne $null) {
  5.    Disable-SPFeature -Identity $clientFeature -url $_.URL -Confirm:$false
  6. }
  7. }

That’s all we have to do

image

Saturday, April 12, 2014

PowerShell : count occurrences of specific character in a string

Recently I wanted to count the occurrences of specific character in a string.

As an example, let’s say we want to count number of  ‘/’ characters in a given url . Following is a sample PowerShell to get the result.

  1. $url = "http://sp13/sites/1/2/3"
  2. $charCount = ($url.ToCharArray() | Where-Object {$_ -eq '/'} | Measure-Object).Count
  3. Write-Host $charCount

Tuesday, April 8, 2014

Extend SharePoint Host-named site collection using different url

In SharePoint there are two types of site collections namely Host-Named sites and Path based sites. Although path based site collections (e.g.: http://sp13/sites/hr) were the commonly used practice in previous versions of SharePoint, host-named site collections (e.g.: http://hr.sp13) are the preferred method in SharePoint 2013.

One advantage of host-named site collections is the ability to map multiple urls to such site collections. It is somewhat similar to extending a web application to a different zone. But in this case we can extend only a site collection to have multiple urls (up to 5).

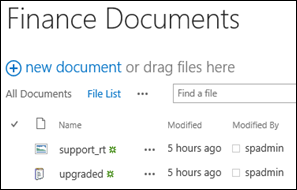
Let’s take following scenario. I have a web application with 3 site collections. I need to extend only the HR site to our partners through a different url. How can we do that ?

image
If we used the web application extend approach, all site collections will be available in extended url although they are not required. So the best practice would be to create those site collections as host-named site collections and map another url.

Following are the steps to create a host-named site collection and map to different urls

1. Create host-named site collection

We can use following PowerShell statement to create the site collection. “HostHeaderWebApplication” switch allows us to create host-named site instead of a path based site

  1. New-SPSite 'http://hr.kiwi.com' -HostHeaderWebApplication 'http://sp13/’ -Name 'HR' -Description 'Portal Site' -OwnerAlias 'dev\spadmin' -language 1033 -Template 'STS#0'

2. Map urls to host-named site collection

To map new urls to the site we will use Set-SPSiteUrl command

  1. Set-SPSiteUrl -Identity http://hr.kiwi.com -Url https://hr.kiwiportal.com

If we want to position the new url at a different zone, we can use optional “–Zone” switch. Otherwise the url will be created at the Default zone.

  1. Set-SPSiteUrl -Identity http://hr.kiwi.com -Url https://hr.kiwiportal.com -Zone Internet

According to the best practice, a SharePoint farm should have only one web application and one zone. Limiting to one web application and one zone has some advantages

  • One application pool, which preserves resources in most cases
  • Keeping one zone in a web application helps us to easily deploy apps. Otherwise if we have multiple zones and Alternate Access Mappings (AAMs) it’s not possible to deploy SharePoint apps.

Because of that it is advisable to create external urls in the Default zone as well

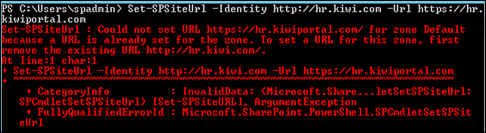
If our SharePoint farm is equipped with RTM version we will encounter following error while adding multiple urls to same zone

image

Unfortunately to avoid the error we have to upgrade SharePoint into latest version.

Saturday, March 15, 2014

Best practice for using configuration values in SharePoint

If we need to keep configuration values for SharePoint customizations, the easiest way is to store them in AppSettings section in configuration file (web.config, owstimer.exe.config, etc..). Following is a sample of the usage.
<appSettings>
    <add key="ConfigSite" value="/sites/config" />
    <add key="AppPoolUser" value="dev\spadmin" />
    <add key="ProjectList" value="Projects" />
</appSettings>

But there are some limitations in that approach
  • Settings are not stored in any database. Hence If we stop the “Microsoft SharePoint Foundation Web Application” service in multi server environment web applications will be automatically created in another server but without configuration values.
  • We have to set configuration values in all WFE servers.
  • Modification of configuration files is always risky
To overcome above limitations we can choose from two alternative solutions. One is to use SPWebConfigModification object to programmatically set configuration values.

But I personally prefer the next approach, which is to use web application properties. It is very simple and the best approach to handle external values within the web application. Furthermore we can simply set and modify those values from a PowerShell interface.

Following is the way to set web application properties

  1. $webApp = "http://sp2013/"
  2. $app = Get-SPWebApplication $webApp

  3. $app.Properties.Add("ConfigSite","/sites/config")
  4. $app.Properties.Add("AppPoolUser","dev\spadmin")
  5. $app.Properties.Add("ProjectList","Projects")
  6. $app.Update();

Following is a sample usage of web application properties within an event receiver

  1. public override void FeatureActivated(SPFeatureReceiverProperties properties)
  2. {
  3.   var web = properties.Feature.Parent as SPWeb;
  4.   var webApplication = web.Site.WebApplication;
  5.   var leftNavOrder = webApplication.Properties["ProjectList"].ToString();

Saturday, February 15, 2014

Create application pool without the password of its user identity

There are certain scenarios where we need to host external services in SharePoint WFE servers. If those services access SharePoint resources, we may need to configure privileged account as the application pool account. But unfortunately we don’t have passwords of those accounts except a farm admin account. Is there anyway to configure application pool without the password of its identity?

In this scenario managed accounts will come to our rescue. There are two ways to create application pool with managed accounts

  1. Create web application in central administration and delete it
  2. Create application pool using PowerShell

      In the first option we will create a new application pool using desired managed account as well. When it’s created we will delete the web application including it’s content database.

      image

      But this option is not recommended as it will not delete all information from configuration database.

      Best approach is to use a PowerShell script as given below

      1. $service = [Microsoft.SharePoint.Administration.SpWebService]::ContentService
      2. $appPool = New-Object Microsoft.SharePoint.Administration.SPApplicationPool "WCF App Pool", $service
      3. $appPool.CurrentIdentityType = "SpecificUser"
      4. $account = Get-SPmanagedAccount "dev\spserviceapp"
      5. $processAcct = [Microsoft.SharePoint.Administration.SPProcessAccount]::LookupManagedAccount($account.Sid)
      6. $appPool.ProcessAccount = $processAcct
      7. $appPool.Provision()

      If we want to modify application pools for service applications, we can use SPServiceApplicationPool. You can read more from this article.

      Wednesday, January 29, 2014

      Change application pool of an existing service application

      This is the 4th post of the article series regarding service applications

      As I mentioned in a previous post, If we create a new service application an application in IIS is also created. That allows us to isolate service applications by providing different application pools. In this article I will show how to assign a new application pool to an existing service application.

      Can we manually create an application pool with a proper identity in IIS and assign it to the service application ? It is the wrong way of assigning the application pool

      The wrong way

      To demonstrate above fact I created a new Managed Metadata Service application and associated it with an existing application pool named MMS2 using central administration.

      Then I’ll go to IIS Manager and create a new application pool manually and associate it with our service application as below

      image

      Although IIS allows us to associate application with new application pool, SharePoint does not know the change. To show that we will use following PowerShell commands.

      1. $app = Get-SPMetadataServiceApplication -Identity 796cb0d5-b8cf-4e0c-a03b-1d8cc285efe3
      2. $app.ApplicationPool

      Following is the result I got

      image

      To stress the point further, I will stop the “Managed Metadata Web Service” in services on this server section. Then all Managed Metadata Service related applications in IIS will be deleted. Once I start the service again those applications will be recreated in IIS. As you can see the application pool of the service application is reverted back to MMS12 (with it’s Guid) and no longer “MMS2AppPool”

      image

      The correct way

      The first thing to not is that, service applications need to be associated with an instance of SPServiceApplicationPool. Following is the way to do that.

      1. #Create new application pool
      2. $managedAccount = Get-SPManagedAccount -Identity "dev\spserviceapp"
      3. $servicePppPool = New-SPServiceApplicationPool -Name MetadataApplicationPool -Account $managedAccount
      4.  
      5. #Assign application pool to service application
      6. $app = Get-SPMetadataServiceApplication -Identity 796cb0d5-b8cf-4e0c-a03b-1d8cc285efe3
      7. $app.ApplicationPool = $servicePppPool
      8. $app.Update()

      Following is the result I got

      image

      Now it doesn’t matter if I stop and start the service instance, the application pool remains the same.