Presentation at Microsoft Student Champs on Introduction to SharePoint
Tuesday, July 23, 2013
Monday, July 22, 2013
Timeline Feature in SharePoint 2013
We can have SharePoint timelines in 2 places.
1. Tasks List
When we create a new task list, an empty timeline is created by default.

Let’s add few tasks

Quite surprisingly, tasks are not displayed in the timeline. It took sometime to figure out that those tasks need to be added manually. I think it would’ve been better if it’s automatically added when we create a new task. Anyway this is what we have out of the box. In a next blog post I’ll explain a workaround to automatically add tasks to the timeline.
To add tasks to timeline, we need to either go to open menu (…) and click on “Add to Timeline” or go to ribbon and click on “Add to Timeline” button.
 |  |
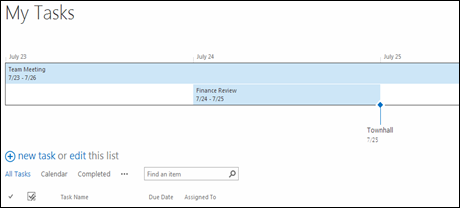
But that is not all. If you check carefully you would notice that there is a new “Timeline” tab in the ribbon. Using the options in that tab we can do various modifications to the presentation of timeline.

Let me give an effective scenario of using the timeline tab to enhance the experience. Let’s say that there is a large task and few other tasks scheduled in same time frame. Then it would be better if I just have labels for smaller tasks rather than displaying them as new bars. To do that select the task, go to the timeline tab and click on “Display as Callout”.
 |  |
2. Timeline WebPart
Tasks list is not the only place where we can use timeline feature. There is a separate timeline webpart. We can provide a tasks list which reside either in same site or a different sub site as the data source. Timeline webpart resides in the Content Rollup category.
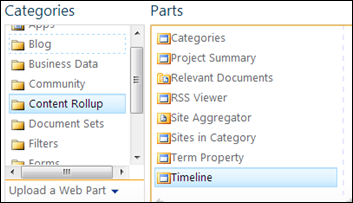
After adding the webpart, we need fill required parameters to set the data source. The Type and Source dropdowns are populated according to the url provided. Since I’m having a few tasks lists in the given url, It populates the type as “List” and it gives me a list of Task Lists in source dropdown. I’ll select one tasks list from that.
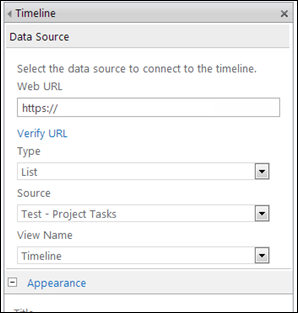
This is what I’ll finally get after I complete all those configurations.
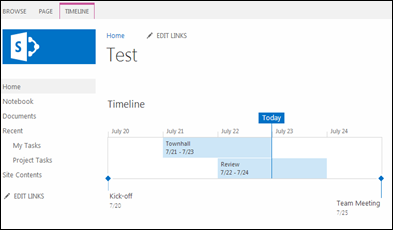
As you can see, I have the timeline tab in the ribbon here as well. So I can do various modifications to the presentation.
I believe that this will be a must have feature for a project site.
Tuesday, July 16, 2013
Perform eDiscovery exercise in SharePoint 2013
In a previous post we discussed what eDiscovery is and what is its place within SharePoint 2013. I will explain how to exercise an eDiscovery task using features provided by SharePoint. Before we begin, let’s break the features in to 4 components.
1. eDiscovery site Templates
If we take a scenario of an organization, which can have multiple litigation related cases, audit exercises, etc.. it can have a site collection created from the template “eDiscovery Center” to manage all. You need to keep in mind that the eDiscovery Center template is available for Enterprise license only. After you create a site collection based on eDiscovery Center template, you can centrally manage all your eDiscovery related cases.
To create individual cases, We have another template called “eDiscovery Case”. If we create a case using this template it will be created as a sub web.
Each case is equipped with sections called eDiscovery sets,Queries, Exports. Furthermore record managers and others in legal team (site users) can use normal collaboration features from document libraries, calendars, task lists etc..
2. In-Place hold (In-Place preservation)
As we discussed in earlier post in-place hold is a mechanism to preserve content for litigation. Using eDiscovery features in SharePoint 2013 we can preserve content in SharePoint itself, Exchange mailboxes and Lync content. Hold can be placed either at the site or mailbox level, or can use query-based preservation.
Once you create a eDiscovery case, you can create eDiscovery sets to discover (find) and hold specific content. To preserve content, first we need to click on new item in eDiscovery sets.
It allows us to add multiple sources (SharePoint 2013 sites or Exchange mail boxes)
After selecting the source, we can click on Enable In-Place Hold radio button to preserve the content.
Lets assume you have thousands or millions of records in the site collection, It’ll be very difficult and expensive to process all of those content by the legal team. Gartner mentioned that, discovering right content accounts 35% of total litigation costs in USA. It sums up to billions. So to make our lives easier we can filter contents using queries.
We can filter content in 2 ways.
a) Apply filter from eDiscovery set
We can do that while we create the eDiscovery set or by editing an existing eDiscovery set. Let’s assume I have a large set of documents, and I need only content within a specific time frame and content that relate to “Research”. So I would apply a filter as below
b) Add queries to the content from Query and Export section/
Lets assume that I' have multiple data sources, so I create multiple eDiscovery sets to easily manage the eDiscovery process. Then I figure out the content is still too large for the litigation process. eDiscovery query section comes very handy at that point as I can apply filters to a specific eDiscovery set, all or multople discovery sets.
3. eDiscovery Export
Once we discover the content by above means we need to download the content so we can produce them to legal team for review. To do that there is an export tool.
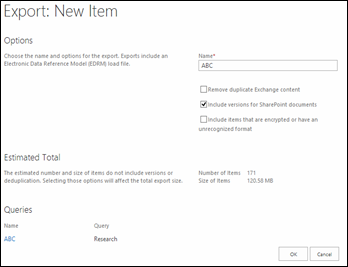
To export the content we need to go to search and export section and click on export button
We can either download content or download the content.
The export tool download documents and lists items as well. Furthermore it generates a manifest file with metadata which complies Electronic Discovery Reference Model (EDRM). This itself is a very important feature. Let’s assume the litigation team has a 3rd party tool which they use to proof read the discovered content and it can input EDRM compliant content. Then we can directly input the exported package to that system. So as you can see there can be various interactions with other systems.
4. eDiscovery API
We can use the eDiscovery API to extend default features using components of Microsoft,Office.Server.Discovery namespace.
Above is a brief intro on how to use eDiscovery features in SharePoint. You can find further info by referring following resources
Sunday, July 14, 2013
Presentation–eDiscovery in SharePoint 2013
Recently I did a presentation at Sri Lanka SharePoint forum regarding eDiscovery features in SharePoint 2013 and how to carryout an eDiscovery exercise.
You can find more information on eDiscovery in this post
Thursday, July 11, 2013
Introduction to eDiscovery in SharePoint 2013
Enterprise Content Management in SharePoint
Enterprise Content Management (ECM) practice was introduced to SharePoint with SharePoint 2007.From that point onwards various new ECM features were added. There were notable additions and dramatic improvements in SharePoint 2010 ECM features. SharePoint 2013 also have added some important features to the ECM stack.
Although few eDiscovery features were available in earlier versions, I would say the complete eDiscovery solution is introduced with SharePoint 2013. Before we discuss how eDiscovery features are implemented in SharePoint, it’s better to understand the eDiscovery concept.
eDiscovery
According to the definition, eDiscovery is the prrocess of discovering electronically stored information that is relevant to legal matters such as litigation, audits and investigations. As you would correctly assume, eDiscovery is not a concept introduced by SharePoint. SharePoint has implemented the concept electronically to make record managers and other stakeholders life easier and to save the huge costs involved with the litigation process.
Generally an eDiscovery exercise consist of following steps.
Simply put, eDiscory process starts with discovering (finding) relevant content and preserve that content so end users can’t modify them. After that, preserved content will be filtered to select only relevant information. Finally it is processed by legal/audit team to produce final outcome.
eDiscovery in SharePoint 2013
As I mentioned earlier, some eDiscovery features were available in earlier SharePoint versions, but with limitations. For an example SharePoint 2007 has an ability to put records (content) on hold where users can’t do modifications on them. SharePoint 2010 introduced major improvements by allowing site level holds and introduced the concept of search based discovery.
But there were few limitations in SharePoint 2010 version of eDiscovery. Mainly it could discover content located only in SharePoint farm. Furthermore once content is on hold they become read only. If we take a real world scenario of litigation, which might take few months to complete, would result in disruption in business operations as relevant documents are read only.
In SharePoint 2013, above 2 limitations have being addressed successfully. First limitation is addressed allowing eDiscovery to discover content from SharePoint 2013, Exchange 2013 and Lync 2013. You can get a better understanding from the diagram given below.
The second limitation is eliminated by allowing end users to modify preserved content. But this will confuse readers as our objective is to preserve hold content to avoid modification. That’s true. but SharePoint implemented this in a smarter way.
Let’s check how it works. If a document is on hold stage and an end user modifies the content, original version of the document is moved to another library called “Preservation Hold Library”. when the same content is required for litigation, original document from preservation hold library will be provided. By doing this, it gives business users two benefits.
- Avoid disruptions in business process by allowing users to edit
- Save storage space as documents are not copied to different place
You can check how to do an eDiscovery exercise in SharePoint 2013 from this post
