Thursday, July 31, 2014

Get the display name of a value in person of group field from SharePoint 2013 "_api/web/lists" service

Let’s assume that we need to access a SharePoint list using built in web services. To do the task we can use a service like below.
http://sp13/sites/dev/_api/web/lists/getbytitle('Regions')/items 
What happen if we have a “Person or Group” column in the list? We would get a result like below.

image

As you can see we get only the User Id instead of other properties like login name or display name.
To get those properties, we just need to expand respective properties as shown below.
http://sp13/sites/dev/_api/web/lists/getbytitle('Regions')/items?$select=Area_x0020_General_x0020_Manager/Name,Area_x0020_General_x0020_Manager/Title&$expand=Area_x0020_General_x0020_Manager/Id
Following is the result I got, which is what I expected

image

Friday, July 25, 2014

Cross site collection data access via HTTP web service for a SharePoint 2013 designer workflow. Resolving Unauthorized exception

Recently I created a SharePoint 2013 approval workflow where I had to take approvers from a list located at a different SharePoint site collection.

In this example I have two site collections named Config and Project where I have created the workflow in the Project site collection using SharePoint Designer. In the Config site collection I have a list called Approvers where I store relevant information regarding approvers.

Following diagram shows the scenario I described.

image
To get relevant information from Config site collection, I will use SharePoint api web services. For an example I could use following service to return all items in that list.
http://sp13/Sites/config/_api/web/lists/getbytitle('Approvers')/items
Calling a HTTP web service through a SharePoint 2013 Designer based workflow is straight forward. I have explained that in this blog post.

Although I have followed the steps correctly, I was getting an “Unauthorized” exception all the time. I’ve given necessary permissions to the list and web application but still I was getting the same error.

Later I figured out that we need to provide permissions to the workflow explicitly if we need to access resources beyond the current site. Following are the steps I followed to configure permissions to the workflow

1. Activate “Workflows can use app permissions” site feature in the site where I create the workflow (http://sp13/Sites/project )
image
2. Navigate to Site Settings –> Site app permissions where you can see an item called workflow
image
3. Copy the client section of the App Identifier as shown below
image
4.Navigate to <site url>/_layouts/15/appinv.aspx to configure permissions. Then add the client section of the App Identifier in the App Id section and click Lookup to populate content.
image
5. Then we need to specify App’s Permission Request XML
<AppPermissionRequests>
    <AppPermissionRequest Scope="http://sharepoint/content/tenant" Right="FullControl" />
</AppPermissionRequests>
Since we are accessing beyond the current site collection, we will use “http://sharepoint/content/tenant” as the scope. More information on app permission and available scopes can be found on this article.

6. Finally we will trust the workflow
image
This will allow our workflow to access resources beyond the current site collection.

Monday, July 14, 2014

SharePoint 2013 Workflow-Check if required documents are available inside a Document Set prior to the approval process

We can use SharePoint Designer workflows to author an approval process. Sometimes the approval process can be complex where we need to create advanced workflows. In SharePoint 2013 workflows we can use HTTP web services and loops to assist such instances.

Recently I created an approval workflow to a library which stores document sets. Following is the pre-condition to the approval.

Each document set has two allowed content types named “Policy Document” and “Policy Checklist”. The approval process proceeds if the document set contain at least one document from each document set. Otherwise the approval process terminates.

Following are the questions we need to address

  • How can we access documents within a document?
  • How can we get the content type ID of each document?

We will call two web service methods to obtain relevant information and will use built in loop to assist the process. Following are the steps I used to answer above questions

1. Construct the server relative URL for document sets

Let’s assume our document set is located at “https://sp13/sites/dev/Shared Documents/DocumentSet1”. Below activity will remove “https://sp13/sites/dev/” component and assigns “Shared Documents/DocumentSet1” to a variable named “itemFolder

image

2. Prerequisites to call SharePoint REST API

As I mentioned earlier, SharePoint 2013 workflows can call RESTful services by default. In this case we will use services provided in “_api/web”. Since those services provide xml output we have convert them to JSON.

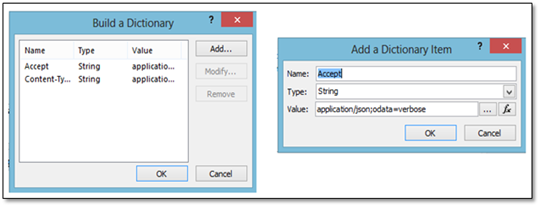
To do that we will create a dictionary. For both “Accept” and “Content-Type” variables provide “application/json;odata=verbose” as the value

image 

image

3. Call web service to get all items within the document set

To get items under a document set we will use GetFolderByServerRelativeUrl() method. Following is a sample service call

https://sp13/sites/dev/_api/web/GetFolderByServerRelativeUrl('Shared Documents/Set1')/Files

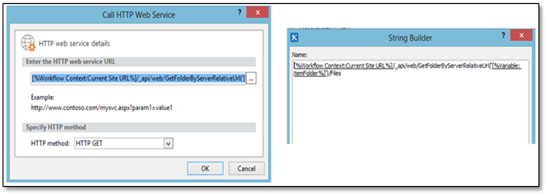
If you need further information on this method you can refer this blog post. To call the service using workflow we will use Call HTTP web service activity as shown below.

Following are the sub steps

A. When constructing  the url, we will use the sever relative path created in step 1
image

B. Create an empty dictionary variable named JSONResults

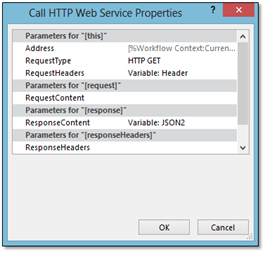
C. Edit properties of the activity to assign “Header” and “JSONResults” dictionaries to RequestHeaders and ReseponseContent parameters.
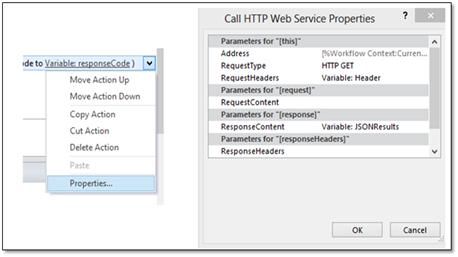
image

Finally the activity looks like below

image

Unfortunately this service doesn’t return Content Type ID property. As a result we will get a property from this service which can be input to our second service to obtain Content Type Id. We will call the second service in step 8.

4. Store results to a separate dictionary called allItems

image

5. Get count of items to start the loop

image

6. Store variable to hold content type IDs

image

7. Create a loop to iterate each item we have in allItems dictionary

Create an integer variable named index.

image

Then we will get the ServerRelativeUrl property from the item and assign it to variable serverRelativeUrl

image

8. Call the second web service to get content type id.

Since “GetFolderByServerRelativeUrl()/Files” method does not return the content type of items. As a result we need to execute another service to do so. We will use the ServerRelativeUrl property returned from step 7 as an input to the second service

This time we will call GetFileByServerRelativeUrl() method. Following is a sample of the service call.

https://sp13/sites/dev/_api/Web/GetFileByServerRelativeUrl('/sites/dev/Shared Documents/Set1/3.txt')/ListItemAllFields

If you need further information on this method you can refer this blog post as well.

As we did for the first method we will call HTTP web service activity as shown below

image

image

9. Get ContentTypeId property of the item

This service returns just a single item. So it is easy to get the value

image

10. Create Boolean variables to store content type availability 

Since we have two content types, we have two Boolean variables named “ct1IsAvailable” and “ct2IsAvailable”
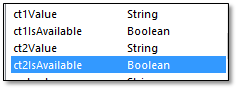
image

11. Set Boolean value true if the content type was found
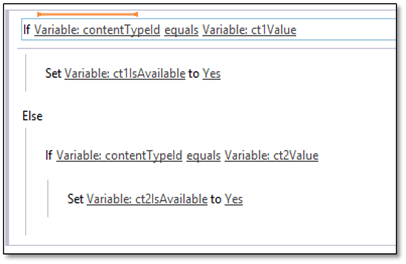
image

12. Specify Termination condition at the end of the loop

image

13. Conditionally allow or restrict the approval
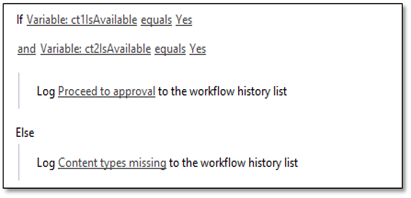
image

14. Terminate the workflow

image

Summary

In the above article I explained how to use http web services available in “_api/web” within SharePoint 2013 workflows. A practical scenario was also explained where we need to check at least one document from each content type available in the document set.

Tuesday, June 24, 2014

Presentation–Site provisioning techniques including site provisioning providers for SharePoint 2013

Recently I did a presentation on site provisioning providers at Sri Lanka SharePoint forum. In that session I described about other site provisioning techniques as well.

10393838_10152318026097530_3673986027299882108_n

There are many site provisioning techniques including Site Definitions, Feature Stapling, Web Templates, Site Provisioning Provider (SPWebProvisioningProvider) etc.. If we need to obtain full control over the provisioning process we may need to select the Site Provisioning Provider approach.

You can find some sample codes I used in demo from this location.

Sunday, June 15, 2014

Set result source and item display template programmatically to SharePoint 2013 search ResultScriptWebPart

Sometimes we need to programmatically set search result source and a custom item display template to a search web part.

Following is a sample code segment to do the needful

  1. //Get the instance of web part
  2. var homePage = web.GetFile("SitePages/Home.aspx");
  3. using (var webPartManager = homePage.GetLimitedWebPartManager(PersonalizationScope.Shared))
  4. {
  5. var recentDocs = webPartManager.WebParts.Cast<WebPart>().FirstOrDefault
  6.         (wp => wp.Title.Equals("Recent Documents")) as ResultScriptWebPart;
  7. var querySettings = new DataProviderScriptWebPart
  8.         {
  9.            PropertiesJson = recentDocs.DataProviderJSON
  10.         };
  11.  
  12. //Get the search service application proxy
  13. var settingsProxy = SPFarm.Local.ServiceProxies.GetValue
  14.         <SearchQueryAndSiteSettingsServiceProxy>();
  15. var searchProxy = settingsProxy.ApplicationProxies.GetValue
  16.         <SearchServiceApplicationProxy>("Search Service Application");
  17. var siteOwner = new SearchObjectOwner(SearchObjectLevel.SPSite, web);
  18.  
  19. //Set the result source. I set the default for demonstration
  20. var siteResultSource = searchProxy.GetResultSourceByName("Local SharePoint Results", siteOwner);
  21.  
  22.  
  23. querySettings.Properties["SourceName"] = siteResultSource.Name;
  24. querySettings.Properties["SourceID"] = siteResultSource.Id;
  25. querySettings.Properties["SourceLevel"] = siteOwner.Level;
  26.  
  27.  
  28. //Set the item display template
  29. recentDocs.ItemTemplateId = "~sitecollection/_catalogs/masterpage/Display Templates/Search/Item_Contoso.js";
  30. recentDocs.DataProviderJSON = querySettings.PropertiesJson;
  31.  
  32. webPartManager.SaveChanges(recentDocs);
  33. }
  34. homePage.Update();

That’s all we need to do.

Saturday, June 7, 2014

Programmatically upload and use SharePoint 2013 Item Display Templates

This is the third post of a series of blog posts on SharePoint 2013 search display templates.

In previous posts I explained about Display Templates in general and about creating new Item Display Templates. But in some scenarios we can’t upload display templates manually through mapped network drives or design manager. Following are few scenarios where we require a programmatic approach to deploy search Item Display Templates.

Let’s assume that we have thousands of site collections in our environment and we have a search web part in each home page. Can we manually update each site? It is not feasible, isn’t it.

Another scenario is where we have a custom site template where all web parts, libraries, master pages, etc.. are provisioned when we create the site. In that situation, the expectation is to apply custom Display Templates automatically if available.

Following are the steps to deploy a search Item Display Template programmatically

1. Create the custom Item Display Template

In the previous post I explained about creating a custom Display Template. In this scenario we use a test site collection to create the template.

2. Create Visual Studio solution

We will create an empty SharePoint solution and add a module to host the Display Template

image

We need to deploy only the JavaScript file. But to make the solution complete we will include the html version also in the module. By the way, html file is helpful when we need to do changes in future. In that case we will perform following tasks

  • Do the modification in html file
  • Upload that file in to the test site
  • Get the generated JavaScript file and replace current file in the module with that file
  • Deploy the project

3. Update the Feature

Update the scope of the feature to be “Site”

image 

3. Update the element.xml file

  1. <Elements xmlns="http://schemas.microsoft.com/sharepoint/">
  2.   <Module Name="DisplayTemplates" Url="_catalogs/masterpage/Display Templates/Search" RootWebOnly="TRUE">
  3.     <File Path="DisplayTemplates\Item_Contoso.js"
  4.           Url="Item_Contoso.js"
  5.           Type="GhostableInLibrary"
  6.           Level="Published"
  7.           ReplaceContent="TRUE">
  8.       <Property Name="Title" Value="Contoso Item" />
  9.       <Property Name="TargetControlType" Value=";#SearchResults;#Content Web Parts;#" />
  10.       <Property Name="DisplayTemplateLevel" Value="Item" />
  11.       <Property Name="TemplateHidden" Value="FALSE" />
  12.     </File>
  13.   </Module>
  14. </Elements>

4. Deploy the solution

Finally we will deploy the solution to make the template available for search web parts

image

Following is the link to the source code

Monday, June 2, 2014

Create SharePoint 2013 Item Display Template overriding RenderBody

This is the second post of a series of blog posts on SharePoint 2013 search display templates.
I’ve given an introduction on Display Templates in previous post, Where I mentioned different types and their relationships. In this post I’ll discuss on Item Display Templates.
If we navigate to the mapped network drive for Display Templates (“<Site URL>_catalogs/masterpage/Display Templates/Search”) we can find available Display Templates.  Let’s take Item_Word.html file as the example.
image
As shown in above diagram, Item Display Template has following main areas
1. Title
This is the title of the Display Template which will be shown in the settings area of the web part.
2. CustomDocumentProperies
This contains some properties about the Display Template itself. Most important of them is the ManagedPropertyMapping section. Within that section we can include any managed property those are accessed within the Item Display Template.
3. RenderBody (ctx)
As you can see from the diagram, “ctx” object is filled with data (e.g.: Icon, HoverUrl, etc..). Then we will call the RenderBody method which will call Item_CommonItem_Body template to generate the search result item.
By using above facts we can create our own Display Templates. As an example we will use following scenario.
Below is an out of the box search web part. We will create a new Display Template just to remove the path component
image
We need to follow the steps given below.
1. Create new template based on existing item template (e.g.: Item_Word)
image
2.Open the Item_Contoso.html and change Titles accordingly
image
3. Test the Display Template with a web part
image
It is working as expected. Now we need to customize the template.
Creating a “Result Type” is not mandatory as we want this Display Template to be available on this web part only.
4. Override RenderBody (ctx)
Since I need to remove the path (URL component displayed in green color) from our web part, I have two options to consider
  • Remove the managed property “Path” from our template
  • Remove the HTML component that renders the path.
Since managed property “Path” is referred by other places, it is not the best practice to remove it. So I will remove the HTML component that renders the path. How can I find the source of that HTML?
As I mentioned in my earlier post, when a Display Template calls RenderBody method it will call Item_CommonItem_Body template. The rendering part happens there. But can we directly modify that template according to our requirement?
It’s not the correct approach as that template is referred by all Item Display Templates. Instead I will copy necessary code segment from Item_CommonItem_Body template and insert that in our template
image
5. Find the code that renders the path and remove that component
Following is the code that renders the path.
image
We will remove _#= truncatedUrl =#_ element and save the template. If we need we can do necessary modifications as well. Final result looks like below
image
Following is the final Display Template
  1. <html xmlns:mso="urn:schemas-microsoft-com:office:office" xmlns:msdt="uuid:C2F41010-65B3-11d1-A29F-00AA00C14882">
  2.   <head>
  3.     <title>Contoso Item</title>
  4.  
  5.     <!--[if gte mso 9]><xml>
  6. <mso:CustomDocumentProperties>
  7. <mso:TemplateHidden msdt:dt="string">0</mso:TemplateHidden>
  8. <mso:MasterPageDescription msdt:dt="string">Displays a result tailored for a Microsoft Word document.</mso:MasterPageDescription>
  9. <mso:ContentTypeId msdt:dt="string">0x0101002039C03B61C64EC4A04F5361F385106603</mso:ContentTypeId>
  10. <mso:TargetControlType msdt:dt="string">;#SearchResults;#</mso:TargetControlType>
  11. <mso:HtmlDesignAssociated msdt:dt="string">1</mso:HtmlDesignAssociated>
  12. <mso:ManagedPropertyMapping msdt:dt="string">'Title':'Title','Path':'Path','Description':'Description','EditorOWSUSER':'EditorOWSUSER','LastModifiedTime':'LastModifiedTime','CollapsingStatus':'CollapsingStatus','DocId':'DocId','HitHighlightedSummary':'HitHighlightedSummary','HitHighlightedProperties':'HitHighlightedProperties','FileExtension':'FileExtension','ViewsLifeTime':'ViewsLifeTime','ParentLink':'ParentLink','FileType':'FileType','IsContainer':'IsContainer','SecondaryFileExtension':'SecondaryFileExtension','DisplayAuthor':'DisplayAuthor','ServerRedirectedURL':'ServerRedirectedURL','SectionNames':'SectionNames','SectionIndexes':'SectionIndexes','ServerRedirectedEmbedURL':'ServerRedirectedEmbedURL','ServerRedirectedPreviewURL':'ServerRedirectedPreviewURL'</mso:ManagedPropertyMapping>
  13. <mso:HtmlDesignConversionSucceeded msdt:dt="string">True</mso:HtmlDesignConversionSucceeded>
  14. <mso:HtmlDesignStatusAndPreview msdt:dt="string">http://sp13:8080/sites/4750/_catalogs/masterpage/Display%20Templates/Search/Item_Contoso.html, Conversion successful.</mso:HtmlDesignStatusAndPreview>
  15. </mso:CustomDocumentProperties>
  16. </xml><![endif]-->
  17.   </head>
  18.   <body>
  19.     <div id="Item_Contoso">
  20.       <!--#_
  21.         if(!$isNull(ctx.CurrentItem) && !$isNull(ctx.ClientControl)){
  22.             var id = ctx.ClientControl.get_nextUniqueId();
  23.             var itemId = id + Srch.U.Ids.item;
  24.             var hoverId = id + Srch.U.Ids.hover;
  25.             var hoverUrl = "~sitecollection/_catalogs/masterpage/Display Templates/Search/Item_Word_HoverPanel.js";
  26.             $setResultItem(itemId, ctx.CurrentItem);
  27.             ctx.CurrentItem.csr_Icon = Srch.U.getIconUrlByFileExtension(ctx.CurrentItem);
  28.             ctx.CurrentItem.csr_OpenApp = "word";
  29.             ctx.currentItem_ShowHoverPanelCallback = Srch.U.getShowHoverPanelCallback(itemId, hoverId, hoverUrl);
  30.             ctx.currentItem_HideHoverPanelCallback = Srch.U.getHideHoverPanelCallback();
  31. _#-->
  32.       <div id="_#= $htmlEncode(itemId) =#_" name="Item" data-displaytemplate="ContosoItem" style="padding: 0; margin: 0;" class="ms-srch-item" onmouseover="_#= ctx.currentItem_ShowHoverPanelCallback =#_" onmouseout="_#= ctx.currentItem_HideHoverPanelCallback =#_">
  33.  
  34.         <!--#_
  35.         var id = ctx.CurrentItem.csr_id;
  36.         var title = Srch.U.getHighlightedProperty(id, ctx.CurrentItem, "Title");
  37.         if ($isEmptyString(title)) {title = $htmlEncode(ctx.CurrentItem.Title)}
  38.         var appAttribs = "";
  39.         if (!$isEmptyString(ctx.CurrentItem.csr_OpenApp)) { appAttribs += "openApp=\"" + $htmlEncode(ctx.CurrentItem.csr_OpenApp) + "\"" };
  40.         if (!$isEmptyString(ctx.CurrentItem.csr_OpenControl)) { appAttribs += " openControl=\"" + $htmlEncode(ctx.CurrentItem.csr_OpenControl) + "\"" };
  41.         var showHoverPanelCallback = ctx.currentItem_ShowHoverPanelCallback;
  42.         if (Srch.U.n(showHoverPanelCallback)) {
  43.             var itemId = id + Srch.U.Ids.item;
  44.             var hoverId = id + Srch.U.Ids.hover;
  45.             var hoverUrl = "~sitecollection/_catalogs/masterpage/Display Templates/Search/Item_Default_HoverPanel.js";
  46.             showHoverPanelCallback = Srch.U.getShowHoverPanelCallback(itemId, hoverId, hoverUrl);
  47.         }
  48.         var displayPath = Srch.U.getHighlightedProperty(id, ctx.CurrentItem, "Path");
  49.         if ($isEmptyString(displayPath)) {displayPath = $htmlEncode(ctx.CurrentItem.Path)}
  50.         var url = ctx.CurrentItem.csr_Path;
  51.         if($isEmptyString(url)){
  52.             var useWACUrl = !$isEmptyString(ctx.CurrentItem.ServerRedirectedURL);
  53.             if(ctx.ScriptApplicationManager && ctx.ScriptApplicationManager.states){
  54.                 useWACUrl = (useWACUrl && !ctx.ScriptApplicationManager.states.openDocumentsInClient);
  55.             }
  56.             if(useWACUrl)
  57.             {
  58.                 url = ctx.CurrentItem.ServerRedirectedURL;
  59.             } else {
  60.                 url = ctx.CurrentItem.Path;
  61.             }        
  62.         }
  63.         ctx.CurrentItem.csr_Path = url;
  64.         var pathLength = ctx.CurrentItem.csr_PathLength;
  65.         if(!pathLength) {pathLength = Srch.U.pathTruncationLength}
  66.  
  67.         var maxTitleLengthInChars = Srch.U.titleTruncationLength;
  68.         var termsToUse = 2;
  69.         if(ctx.CurrentItem.csr_PreviewImage != null)
  70.         {
  71.             maxTitleLengthInChars = Srch.U.titleTruncationLengthWithPreview;
  72.             termsToUse = 1;
  73.         }
  74.  
  75.         var clickType = ctx.CurrentItem.csr_ClickType;
  76.         if(!clickType) {clickType = "Result"}        
  77. _#-->
  78.         <div id="_#= $htmlEncode(id + Srch.U.Ids.body) =#_" class="ms-srch-item-body" onclick="_#= showHoverPanelCallback =#_">
  79.           <!--#_
  80.             if (!$isEmptyString(ctx.CurrentItem.csr_Icon)) {
  81. _#-->
  82.           <div class="ms-srch-item-icon">
  83.             <img id="_#= $htmlEncode(id + Srch.U.Ids.icon) =#_" onload="this.style.display='inline'" src="_#= $urlHtmlEncode(ctx.CurrentItem.csr_Icon) =#_" />
  84.           </div>
  85.           <!--#_
  86.             }
  87.             var titleHtml = String.format('<a clicktype="{0}" id="{1}" href="{2}" class="ms-srch-item-link" title="{3}" onfocus="{4}" {5}>{6}</a>',
  88.                                           $htmlEncode(clickType), $htmlEncode(id + Srch.U.Ids.titleLink), $urlHtmlEncode(url), $htmlEncode(ctx.CurrentItem.Title),
  89.                                           showHoverPanelCallback, appAttribs, Srch.U.trimTitle(title, maxTitleLengthInChars, termsToUse));
  90. _#-->
  91.           <div id="_#= $htmlEncode(id + Srch.U.Ids.title) =#_" class="ms-srch-item-title">
  92.             <h3 class="ms-srch-ellipsis">
  93.               _#= titleHtml =#_
  94.             </h3>
  95.           </div>
  96.           <!--#_
  97.             if (!$isEmptyString(ctx.CurrentItem.HitHighlightedSummary)) {
  98. _#-->
  99.           <div id="_#= $htmlEncode(id + Srch.U.Ids.summary) =#_" class="ms-srch-item-summary">_#= Srch.U.processHHXML(ctx.CurrentItem.HitHighlightedSummary) =#_</div>
  100.           <!--#_
  101.             }
  102.             var truncatedUrl = Srch.U.truncateHighlightedUrl(displayPath, pathLength);
  103. _#-->
  104.           <div id="_#= $htmlEncode(id + Srch.U.Ids.path) =#_" tabindex="0" class="ms-srch-item-path" title="_#= $htmlEncode(ctx.CurrentItem.Path) =#_" onblur="Srch.U.restorePath(this, '_#= $scriptEncode(truncatedUrl) =#_', '_#= $scriptEncode(ctx.CurrentItem.Path) =#_')" onclick="Srch.U.selectPath('_#= $scriptEncode(ctx.CurrentItem.Path) =#_', this)" onkeydown="Srch.U.setPath(event, this, '_#= $scriptEncode(ctx.CurrentItem.Path) =#_', '_#= $scriptEncode(truncatedUrl) =#_')" >
  105.  
  106.           </div>
  107.         </div>
  108.         <!--#_
  109.         if (!$isEmptyString(ctx.CurrentItem.csr_PreviewImage))
  110.         {
  111.             var altText = Srch.Res.item_Alt_Preview;
  112.             if(!$isEmptyString(ctx.CurrentItem.csr_PreviewImageAltText)){
  113.                 altText = ctx.CurrentItem.csr_PreviewImageAltText;
  114.             }
  115.  
  116.             var onloadJS = "var container = $get('" + $scriptEncode(id + Srch.U.Ids.preview) + "'); if(container){container.style.display = 'inline-block';}" +
  117.                            "var path = $get('" + $scriptEncode(id + Srch.U.Ids.path) + "'); if (path) { Srch.U.ensureCSSClassNameExist(path, 'ms-srch-item-preview-path');}" +
  118.                            "var body = $get('" + $scriptEncode(id + Srch.U.Ids.body) + "'); if (body) { Srch.U.ensureCSSClassNameExist(body, 'ms-srch-item-summaryPreview');}";
  119.  
  120.             var previewHtml = String.format('<a clicktype="{0}" href="{1}" class="ms-srch-item-previewLink" {2}><img class="ms-srch-item-preview" src="{3}" alt="{4}" onload="{5}" /></a>',
  121.                                         $htmlEncode(clickType), $urlHtmlEncode(url), appAttribs, $urlHtmlEncode(ctx.CurrentItem.csr_PreviewImage), $htmlEncode(altText), onloadJS);
  122. _#-->
  123.           <div id="_#= $htmlEncode(id + Srch.U.Ids.preview) =#_"class="ms-srch-item-previewContainer">
  124.           _#= previewHtml =#_
  125.         </div>
  126.         <!--#_
  127.         }
  128. _#-->
  129.  
  130.  
  131.  
  132.  
  133.         <div id="_#= $htmlEncode(hoverId) =#_" class="ms-srch-hover-outerContainer"></div>
  134.       </div>
  135.       <!--#_
  136.         }
  137. _#-->
  138.     </div>
  139.   </body>
  140. </html>
That’s all we need to do.