Wednesday, July 21, 2021

Resolving the error: The directory currently selected differs from this key vault's directory

Recently after a migration, I could see a warning message in one of my Azure Key Vaults. It says,

The directory <Logged in directory> currently selected differs from this key vault's directory. Some actions will be disabled. Click for more details


If you can see, the directory name is empty. And the directory id is also different. We need to map the Key Vault to the correct tenant. How can we do it?

It is very easy. Use Azure Cloud Shell and execute following statements.

az account set --subscription "Visual Studio Enterprise Subscription"
$tenantId=$(az account show --query tenantId)                               
az keyvault update -n  --remove Properties.accessPolicies 
az keyvault update -n  --set Properties.tenantId=$tenantId

This resolved the issue.

Wednesday, June 16, 2021

Protect your Azure hosted applications with Front Door, WAF and OWASP

You can have your applications hosted in Azure. How can you ensure that they are protected from various attacks?

We are safe if we can use an intelligent Firewall in front of our applications and ensure common attacks are addressed with the guidance of well recognized body, Isn't it.

We can use Azure Front Door and Open Web Application Security Project (OWASP) rules to achieve the above.

Let me explain how to do it.

We can implement a custom WAF policy and apply it to frontends in Azure Front Door.

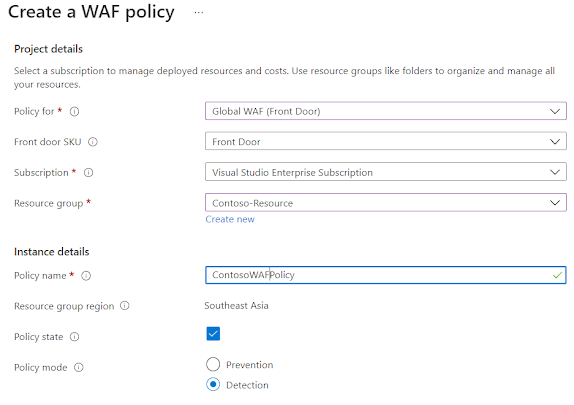
Step 1: Create a WAF policy


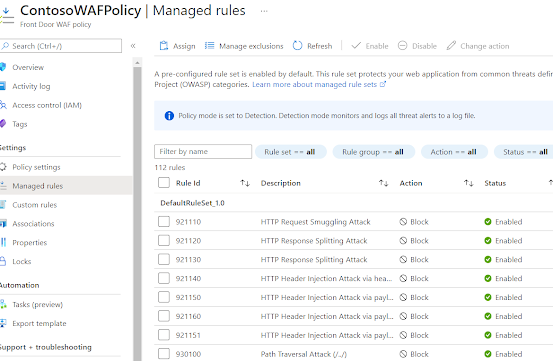
Step 2: Navigate to Manage rules section. OWASP rules are enabled by default. You can disable certain rules if you don't need them


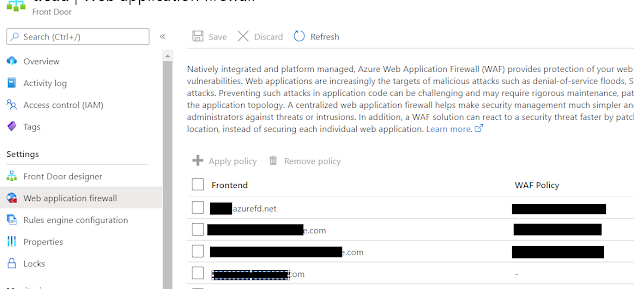
Step 3: You can apply the policy to Frontends in Azure Front Door easily by navigating to Azure Front Door instance


That's it. For any attacks the firewall will provide 403 response now.

Azure Bastian - Safer way to access your Virtual Machines

Remember the way we used to login to VMs hosted in our cloud platforms. 

We open RDP ports (3389) from the interface and indefinitely allow users to RDP. 


We might limit the source of the IP, but we have directly opened connectivity to our VMs over the internet.

What are the risks associated with the traditional approach?

  • Malicious parties can get access to VMs as RDP ports and protocol is well known
  • There is no audit of the activity users are performing
  • VM is directly opened to the internet
So, what were the work arounds we have being using so far?
  • Change the RDP port to a custom port
  • RDP jump box (Users RDP to jump box server and again RDP to desired VM)
Is there any permanent solution? Azure Bastion is the way to go

What is Azure Bastion?

Azure Bastion is a managed service provided by Microsoft Azure. We can add Bastion to our Virtual Network. Then it will work as a Network Virtual Appliance (NVA). 

This solution allows users to RDP or SSH to virtual machines without exposing those VMs to the internet. So they will not require public IPs.

Azure Bastian will provide RDP or SSH sessions within the Azure Portal itself over HTTPS.

How it works?

When you create a Azure Bastian service, it will create a Virtual Machine Scale Set (VMSS) in a predefined subnet (AzureBastianSubnet). Since we have a VMSS, it can scale itself based on the RDP requests it needs to cater.

When a user selects to connect to a VM using Azure Bastian
  • It will receive the request over HTTPS
  • Bastian will create RDP/SSH session internally to the desired VM (uses Private IP of the VM)
  • Response is sent over HTTPS to the user

Thursday, May 20, 2021

Azure - Availability Sets and Availability Zones for Virtual Machines

Microsoft Azure Infrastructure as a Service (IaaS) provides Virtual Machines (VMs) workload with powerful resiliency features.

Those features will help you to make your Virtual Machine workloads available during planned maintenance or unplanned failures.

Following are the availability options Azure provides


Availability Sets

We can implement an Availability Set and place multiple virtual machine nodes in order to make them available despite rack level or host level failures. There are two important concepts to consider.

Fault Domain : Group of virtual machines that share a common power source and network switch. Essentially that is the server rack.

Update Domain :  Group of virtual machines and underlying physical hardware that can be rebooted at the same time. Essentially that is the physical server in a rack. Microsoft might reboot the server after a planned maintenance.


If we had all of our virtual machine nodes in a single update domain, the resource will not be available during a planned maintenance activity. 

And if we had all of our virtual machines in a single fault domain, our resource will be unavailable during a rack level failure.

We can place our resources in maximum 3 Fault Domains and 20 Update Domains in order to avoid such down times.


Availability Zones

Availability Sets is not the only availability option we have. Availability set will help us during rack level or server level failures and maintenance. What would happen if the entire data center goes down.

Availability Zones will come to the rescue! 

Many regions support the concept of Zones. That means, a specific region supports multiple data centers. In a situation where even an entire data center goes down you have another set of data centers to support your workloads.

You can distribute your virtual machine workloads up to 3 data centers


I will discuss the concept of Virtual Machine Scale Sets (VMSS) in a separate post

Wednesday, April 21, 2021

Introduction to Azure Resource Graph

Azure cloud is a container of resources.

Your resources can be spread across multiple subscriptions and you may have resources from various resource providers (e.g Disks, VMs, Networks, etc..) 

How can you get an aggregated or nested query result of your azure resources? Yes, you can do it with Azure PowerShell with some effort. Is there any easier and rich alternative.

Azure Resource Graph will come to your rescue.

What is Azure Resource Graph?
  • Azure Resource Graph itself is a resource provider
  • Resource Graph periodically scan Azure Resource Manager (ARM) for any changes to resources and imports those changes to its internal database
  • Scheduled changes of resources are notified to Azure Resource Graph (Change Notification)
  • This is a free service (hence a user quota is applied)
  • This can be considered as a powerful inventory system for Azure resources.
Okay, What is the usage of Resource Graph?

Inquire information

As I mentioned earlier, this is an inventory of Azure resources. We can query even across multiple subscriptions.
In order to query, you need to navigate to Azure Resource Graph Explorer
We can use Kusto Query Language (KQL) to query.


As you can see there is a link to pin query results to a dashboard


Since this is very powerful, Azure uses Resource Graph to populate information in Azure Portal.


You can load the Graph query by navigating to Open query link


Another important feature of Resource Graph is that we can scope our queries to different levels. Following are the options available
  • Directory
  • Management Group
  • Subscription
Once your query is completed, you can save queries in private or shared galleries' and consume whenever necessary.

Change Tracking

Whenever there is a change of a resource, it will be notified to Azure Resource Graph. We can use Application Change Analysis feature of Azure to check the change history of a resource.

Application Change Analysis uses Azure Resource Graph in order to obtain history of changes


Wednesday, April 7, 2021

Take actions based on IOT telemetry with IOT Hub, Event Grid and Logic App

This article is a continuation of my previous Post

With this article I'll explain how to notify users when a metric has reached a threshold value. In this example I will fire an email when the temperature exceeds 25c.

For this example also I'm using Raspberry Pi Azure IoT Online Simulator. (Kudos to the developers !!) 

In order to accomplish the task I need to cover following area

  • Configuration of IOT Hub to receive telemetry (Covered in previous post)
  • Creation of logic app to filter out relevant telemetry and notify
  • Connect IOT hub to Event Grid which uses WebHook to transfer IOT telemetry

Will start with the first part. Following are the steps I used create the logic app

Creation of Logic App

Step 1: Select when a HTTP request is received trigger

Click on Use sample payload to generate the schema link

Since we are expecting the telemetry payload, provide the following. You can get more information Here


{
    "body": [
        {
            "id": "a68df6bc-0fa3-16b1-fbfb-0f00c7677708",
            "topic": "/SUBSCRIPTIONS/AFC2F241-D12F-45C5-9791-72A633F51345/RESOURCEGROUPS/CONTOSO-RESOURCE/PROVIDERS/MICROSOFT.DEVICES/IOTHUBS/CONTOSO-HUB",
            "subject": "devices/iot-test",
            "eventType": "Microsoft.Devices.DeviceTelemetry",
            "data": {
                "properties": {
                    "temperatureAlert": "false"
                },
                "systemProperties": {
                    "iothub-connection-device-id": "iot-test",
                    "iothub-connection-auth-method": "{\"scope\":\"device\",\"type\":\"sas\",\"issuer\":\"iothub\",\"acceptingIpFilterRule\":null}",
                    "iothub-connection-auth-generation-id": "637795588618116304",
                    "iothub-enqueuedtime": "2022-02-05T14:02:38.4880000Z",
                    "iothub-message-source": "Telemetry"
                },
                "body": "eyJtZXNzYWdlSWQiOjkwLCJkZXZpY2VJZCI6IlJhc3BiZXJyeSBQaSBXZWIgQ2xpZW50IiwidGVtcGVyYXR1cmUiOjI2LjY2NDI1NDk5NDIyNzg1NywiaHVtaWRpdHkiOjY0LjQ2NDk5OTA1NjMwMDY3fQ=="
            },
            "dataVersion": "",
            "metadataVersion": "1",
            "eventTime": "2021-02-05T14:02:38.488Z"
        }
    ]
}


Step 2: This payload is retrieved as an array. We need to get the first item from the array in order to process

First we will initialize a variable and set value from the output from our POST Body.


Step 3: Again we will initialize a variable and use previously created variable and get the first element


Step 4: We will use the Parse JSON activity, and parse Body_Param variable. We use following JSON body to generate the schema


{
    "id": "a68df6bc-0fa3-16b1-fbfb-0f00c7677708",
    "topic": "/SUBSCRIPTIONS/AFC2F241-D12F-45C5-9791-72A633F51345/RESOURCEGROUPS/CONTOSO-RESOURCE/PROVIDERS/MICROSOFT.DEVICES/IOTHUBS/CONTOSO-HUB",
    "subject": "devices/iot-test",
    "eventType": "Microsoft.Devices.DeviceTelemetry",
    "data": {
        "properties": {
            "temperatureAlert": "false"
        },
        "systemProperties": {
            "iothub-connection-device-id": "iot-test",
            "iothub-connection-auth-method": "{\"scope\":\"device\",\"type\":\"sas\",\"issuer\":\"iothub\",\"acceptingIpFilterRule\":null}",
            "iothub-connection-auth-generation-id": "637795588618116304",
            "iothub-enqueuedtime": "2022-02-05T14:02:38.4880000Z",
            "iothub-message-source": "Telemetry"
        },
        "body": "eyJtZXNzYWdlSWQiOjkwLCJkZXZpY2VJZCI6IlJhc3BiZXJyeSBQaSBXZWIgQ2xpZW50IiwidGVtcGVyYXR1cmUiOjI2LjY2NDI1NDk5NDIyNzg1NywiaHVtaWRpdHkiOjY0LjQ2NDk5OTA1NjMwMDY3fQ=="
    },
    "dataVersion": "",
    "metadataVersion": "1",
    "eventTime": "2021-02-05T14:02:38.488Z"
}


Step 5: The telemetry field is in "body" field. Now we need to retrieve it. Again we will initialize another variable to hold the field


Step 6: Now we need to work with the telemetry string. Which is also a JSON. In order to do it first initialize a new variable. We need this to hold the later decoded value


Step 7: Our telemetry field is base64 encoded. for an example we get a value like this


"body": "eyJtZXNzYWdlSWQiOjkwLCJkZXZpY2VJZCI6IlJhc3BiZXJyeSBQaSBXZWIgQ2xpZW50IiwidGVtcGVyYXR1cmUiOjI2LjY2NDI1NDk5NDIyNzg1NywiaHVtaWRpdHkiOjY0LjQ2NDk5OTA1NjMwMDY3fQ=="

We can use an online base64 decoder to check


We can use expression to to decode 


Step 8:  Then we will parse the telemetry JSON string.

We can use following to generate the schema


{
  "messageId":90,
  "deviceId":"Raspberry Pi Web Client",
  "temperature":26.664254994227857,
  "humidity":64.46499905630067
}


Step 9: Now comes to the interesting part. Now we will evaluate the value of the temperature. If it is larger than 25, we need to send an alert. We use If/Else branch to evaluate the condition


Step 10: We can use an email service to send an email. I use Gmail provider. We can construct the body of the email as we wish


That's all we have to do from Logic App side. Let's save it

Connect IOT Hub to Event Grid and use WebHook to connect to Logic App

Step 1: Navigate to IOT Hub and click on Events. Then click on Event Subscription


Step 2: Create Event Grid Subscription and Select 

  • Device Telemetry event type
  • WebHook for the endpoint


What would be the url of our endpoint. Easy! We will navigate to our logic app and HTTP request action. Our endpoint URL is there


We will specify that URL for the WebHook


That's it.

Let's try this out


We can check from our logic app overview to see if it succeeded


Great!! Let's see if I got any email alert


That's all. Hope I covered everything here :)

Wednesday, March 24, 2021

Testing IOT Hub with Raspberry Pi Azure IoT Online Simulator

Internet of Things (IOT) is a hot topic these days. 

However, you might need to do a lot of groundwork in order to configure and maintain such service. Like creating the backend, hosting it somewhere and device management.

Furthermore what are you going to do with the telemetry data? You need to provide applications (Warehouse, Triggered functionality, etc..) separately based to your need.

That's where Azure IOT hub comes into the picture. It's a PaaS solution which is highly scalable and able to integrate with many other cloud resources.

IOT hub is designed to provide two way communication between the backend and your IOT devices.

Let's test this.

You can easily use Raspberry Pi Azure IoT Online Simulator to test the functionality without any physical device


Let's first create our IOT hub


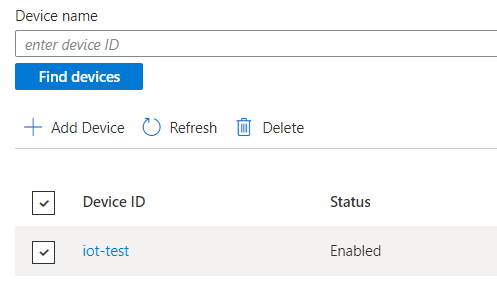
Navigate to Devices and click on Add Device


Click on the newly created device

Select the primary connection string


Paste the connection string on Raspberry Pi Azure IoT Online Simulator code


Now click on run to test


Great!! It is sending messages to Azure

Let's test it on the Azure side. I'm using Azure cloud shell to test

  • az extension add --name azure-iot
  • az iot hub monitor-events --hub-name contoso-hub

I'm getting response from the other side as well


What else can we do with this.

I wrote an article which extends this.