Saturday, February 15, 2014

Create application pool without the password of its user identity

There are certain scenarios where we need to host external services in SharePoint WFE servers. If those services access SharePoint resources, we may need to configure privileged account as the application pool account. But unfortunately we don’t have passwords of those accounts except a farm admin account. Is there anyway to configure application pool without the password of its identity?

In this scenario managed accounts will come to our rescue. There are two ways to create application pool with managed accounts

  1. Create web application in central administration and delete it
  2. Create application pool using PowerShell

      In the first option we will create a new application pool using desired managed account as well. When it’s created we will delete the web application including it’s content database.

      image

      But this option is not recommended as it will not delete all information from configuration database.

      Best approach is to use a PowerShell script as given below

      1. $service = [Microsoft.SharePoint.Administration.SpWebService]::ContentService
      2. $appPool = New-Object Microsoft.SharePoint.Administration.SPApplicationPool "WCF App Pool", $service
      3. $appPool.CurrentIdentityType = "SpecificUser"
      4. $account = Get-SPmanagedAccount "dev\spserviceapp"
      5. $processAcct = [Microsoft.SharePoint.Administration.SPProcessAccount]::LookupManagedAccount($account.Sid)
      6. $appPool.ProcessAccount = $processAcct
      7. $appPool.Provision()

      If we want to modify application pools for service applications, we can use SPServiceApplicationPool. You can read more from this article.

      Monday, February 10, 2014

      Sort results programmatically for Search Results webpart

      We can sort search results based on available managed properties.For an example, if we want to sort our results based on last modified date of the content, we need to identify the mapped managed property and provide the sort rule for the webpart.

      After we find the managed property (in this case it’s “LastModifiedTime”) we need to construct the available sort orders JSON array. we can add multiple sorts within the array. But for the simplicity we add only one sort order. It has following format

      image

      Then we can change the existing sort order by modifying webpart properties as shown below.

      image

      But, how can we do this programmatically? It is very simple, we just need to update AvailableSortsJson property for the webpart. Following is a sample.

      1. //create search results webpart
      2. var resultsWebPart = new ResultScriptWebPart();
      3. resultsWebPart.Title = "Team Search Results";
      4.  
      5. //modify the sort order - descending order based on modified date
      6. resultsWebPart.AvailableSortsJson =
      7.     "[{'name':'LastModifiedTime','sorts':[{'p':'LastModifiedTime','d':1}]}]";
      8.  
      9. //TODO:add webpart to page
      That’s all we need to do Smile

      Saturday, February 8, 2014

      Upgrade SharePoint 2010 site collections to SharePoint 2013 mode

      Migrating content from SharePoint 2010 to SharePoint 2013 normally performed as a two step process.
      In this post I’ll present high level steps to upgrade site collections those were migrated from a SharePoint 2010 environment. According to official documentation, site collection upgrade is a responsibility of particular site collections administrators. But this will be handled by farm administrator using scheduled scripts to make the farm consistent.

      By the way, site collection administrators will see a notification stating that their site collections are ready to be upgraded to 2013 mode. Furthermore if we create a new site collection, it will be created in 2013 mode by default. To avoid this we can restrict our web application to use only 2010 mode until farm administrator starts the site collection upgrade. To learn more you can refer to this post

      1. Deploy upgraded farm solutions

      Although we’ve already deployed server side customizations during content database migration, it’s important to remember that those solutions were designed for SharePoint 2010 environment. Hence they were deployed to the 14 hive instead of 15 hive. Upgrading those solutions is beneficial due to following reasons
      • Redesign solutions to include new features of SharePoint 2013
      • Include new features of .Net framework 4.5
      • Review and refactor the code base
      • User experience to suit new SharePoint 2013
      After the upgrade, we’ll retract existing farm solutions and deploy upgraded solutions.

      We could’ve deployed upgraded solutions when we migrate content databases as a one time task. But most of the time users will find it difficult to cope up with the change. So we will minimize the impact by gradually executing each parts of the upgrade when users are comfortable.

      2. Backup content databases

      We’ll backup content databases prior to the site upgrade. This is because site upgrade action is irreversible. If something goes wrong the backup will come to the rescue. It is the best practice to make the database read only until the backup completes.

      4. Export list of site collections to a text file

      It is possible to upgrade all site collections in a content database using single PowerShell statement. But if we have large site collections in our content databases, that operation might not fit in to our maintenance window. Hence we will export list of site collections to a text file and break that list in to parts for the upgrade.
      $backupPath = "D:\Upgrade\"
      $contentDB = Read-Host 'Content Database'
      $filePath = $backupPath + $contentDB + ".txt"
      Get-SPSite -Limit All  -ContentDatabase $contentDB | select url | Format-Table –AutoSize | Out-String -Width 4000 > $filePath

      5. Test site collections for errors and warnings

      Let’s assume that we will upgrade only 50 sites per job. Before  the upgrade we will test site collections using following PowerShell statements. We will input only selected site urls to text file (e.g.: sites.txt)
      $sitesFile = "D:\Upgrade\sites.txt"
      $sites = Get-Content $sitesFile
      foreach ($site in $sites) {
          Test-SPSite -Identity $site 
      }

      If there are errors we can use Repair-SPSite command to fix those errors

      6. Upgrade site collections

      Then we can schedule selected sites for the upgrade. This avoids the hassle of manual site upgrade.
      $sitesFile = "D:\Upgrade\sites.txt"
      $sites = Get-Content $sitesFile
      foreach ($site in $sites) {
          Upgrade-SPSite $site -VersionUpgrade -QueueOnly
      }

      This will queue selected sites for the upgrade. To check the upgrade status we can use following PowerShell statements
      $sitesFile = "D:\Upgrade\sites.txt"
      $firstElement = Get-Content $sitesFile -totalcount 1
      $firstSite = Get-SPSite $firstElement
      $cd = $firstSite.ContentDatabase
      Get-SPSiteUpgradeSessionInfo -ContentDatabase $cd -ShowInProgress -ShowCompleted -ShowFailed |ft

      We have to do the above for all content databases in that particular web application.

      Wednesday, February 5, 2014

      Migrate SharePoint 2010 content databases to SharePoint 2013

      Migrating content from SharePoint 2010 to SharePoint 2013 normally performed as a two step process.

      In this post I’ll present high level steps to migrate a SharePoint 2010 content databases to SharePoint 2013. This will be the first step of our SharePoint farm migration

      1. Plan for downtime and communicate to users

      We need to make content databases read only in SharePoint 2010 environment which is the production version at the moment. It’s important to notify users about the maintenance activity and establish a maintenance window

      2. Setup SharePoint 2013 farm

      SharePoint 2010 supports In-Place upgrade as well as Database attach upgrade methodologies to upgrade from SharePoint 2007 to SharePoint 2010. But SharePoint 2013 supports only the database attach method. Because of that we need to setup a new SharePoint 2013 farm.

      We need to configure service applications as well. We can migrate certain service applications as well (e.g. Managed Metadata Service) . But in this post I’ll not going to talk about service application migration. You can read an overview of service application upgrade by referring to this post

      3. Create web application in SharePoint 2013 farm

      Creation of web applications is straight forward. But the approach changes if our SharePoint 2010 farm uses classic mode authentication. If that is the case we need to follow the steps given below

      a. Create web application using classic mode in SharePoint 2013

      1. $acc = Get-SPManagedAccount "dev\spserviceapp"
      2. New-SPWebApplicationname "Web App"Port 8081ApplicationPool "ClassicAppPool"ApplicationPoolAccount $acc

      b. Follow all the steps given below (4 to 7) and convert the web application to use claims based authentication

      1. Convert-SPWebApplicationIdentity "http://sp13:8081"To Claims -RetainPermissions -Force

      4. Backup and Restore content databases from SharePoint 2010 farm to 2013 farm

      Let’s assume we have a medium or large SharePoint 2010 farm. Most probably there will be more than one content database in our web applications. It’s better to backup and restore one database at a time to make other databases available for read/write operations.

      Before take the backup we make the content database read only. It is important to note that we keep it as it is until the migration complete. This is because we need to avoid users adding new content during the migration period.

      image

      Then we’ll copy databases to SharePoint 2013 environment and attach them in SQL Server.

      image

      If our web application contain multiple content dbs, we need to attach the content db which contains the root site collection first.

      5. Setup server side customizations

      Before we mount the database to the web application, we need to deploy any customizations(e.g.: site definitions, web parts, etc..) those are being used by sites. It’s important to note that, those customizations ( wsp packages) will be deployed to 14 hive by default.

      It’s better to upgrade customizations using newer features in .Net framework 4.5. But for the time being we will deploy same packages and upgrade them later. We’ll discuss that point in a our next post

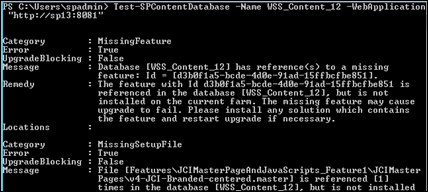
      6. Test the content database to identify missing components

      We can use Test-SPContentDatabase command to check if there are any further server side customization to deploy in SharePoint 2013 environment
      image

      7. Upgrade content databases

      Finally we will mount the databases to web application using Mount-SPContentDatabase command

      image

      This will successfully migrate sites as shown below. As you can see site collections still hold the SharePoint 2010 look and feel. I’ll explain the steps to upgrade those sites to SharePoint 2013 mode in a separate post 

      site12

      8. Test migrated sites

      It is always better to verify migrated sites prior to UAT. If there are too many sites, it’s possible to take a sample site set (e.g. 20%) from each content db for the test. We need to focus on following areas when doing the test

      • Service applications (e.g.: If we migrate or created Managed Metadata Service, test if taxonomy columns, metadata navigation in migrated sites working properly)
      • Server side customizations (e.g.: web parts, workflows, etc..)
      • Missing images, styles and scripts
      • Site count
      • Content count
      • Users and permissions

      Tuesday, February 4, 2014

      Add search query text programmatically for Search Results webpart - SharePoint 2013

      When we programmatically add a Search Results web part, it is often a requirement to provide the search query text dynamically. Search query text is used to obtain a relevant set of search results based on the query provide. Keyword Query Language (KQL) is used to build the query text. You can learn more on building the query text by referring this article.

      I used following code block within an event receiver to do the task. In this example my search query is such that all documents except .aspx web pages within the site are returned.

      1. var web = properties.Feature.Parent as SPWeb;
      2. //create search results webpart
      3. var resultsWebPart = new ResultScriptWebPart();
      4. resultsWebPart.Title = "Team Search Results";
      5. var querySettings = new DataProviderScriptWebPart
      6. {
      7.     PropertiesJson = resultsWebPart.DataProviderJSON
      8. };
      9.  
      10. //setting the search query text
      11. querySettings.Properties["QueryTemplate"] =
      12.    "(IsDocument:True) Path:{Site.URL} -FileName:*.aspx";
      13. resultsWebPart.DataProviderJSON = querySettings.PropertiesJson;
      14.  
      15. //add the search results webpart to the page
      16. var homePage = web.GetFile("SitePages/Home.aspx");
      17. using (var webPartManager = homePage.GetLimitedWebPartManager(PersonalizationScope.Shared))
      18. {
      19.     webPartManager.AddWebPart(resultsWebPart, "Left", 0);
      20.     homePage.Update();
      21. }

      This will add the webpart with expected results as below

      image

      Wednesday, January 29, 2014

      Change application pool of an existing service application

      This is the 4th post of the article series regarding service applications

      As I mentioned in a previous post, If we create a new service application an application in IIS is also created. That allows us to isolate service applications by providing different application pools. In this article I will show how to assign a new application pool to an existing service application.

      Can we manually create an application pool with a proper identity in IIS and assign it to the service application ? It is the wrong way of assigning the application pool

      The wrong way

      To demonstrate above fact I created a new Managed Metadata Service application and associated it with an existing application pool named MMS2 using central administration.

      Then I’ll go to IIS Manager and create a new application pool manually and associate it with our service application as below

      image

      Although IIS allows us to associate application with new application pool, SharePoint does not know the change. To show that we will use following PowerShell commands.

      1. $app = Get-SPMetadataServiceApplication -Identity 796cb0d5-b8cf-4e0c-a03b-1d8cc285efe3
      2. $app.ApplicationPool

      Following is the result I got

      image

      To stress the point further, I will stop the “Managed Metadata Web Service” in services on this server section. Then all Managed Metadata Service related applications in IIS will be deleted. Once I start the service again those applications will be recreated in IIS. As you can see the application pool of the service application is reverted back to MMS12 (with it’s Guid) and no longer “MMS2AppPool”

      image

      The correct way

      The first thing to not is that, service applications need to be associated with an instance of SPServiceApplicationPool. Following is the way to do that.

      1. #Create new application pool
      2. $managedAccount = Get-SPManagedAccount -Identity "dev\spserviceapp"
      3. $servicePppPool = New-SPServiceApplicationPool -Name MetadataApplicationPool -Account $managedAccount
      4.  
      5. #Assign application pool to service application
      6. $app = Get-SPMetadataServiceApplication -Identity 796cb0d5-b8cf-4e0c-a03b-1d8cc285efe3
      7. $app.ApplicationPool = $servicePppPool
      8. $app.Update()

      Following is the result I got

      image

      Now it doesn’t matter if I stop and start the service instance, the application pool remains the same.

      Saturday, January 25, 2014

      How to plan Service Applications in SharePoint 2013

      This is the 3rd post of the article series regarding service applications

      When we setup a new SharePoint environment, we should plan service applications properly. There are certain factors and best practices to consider before we configure any service application. In this article I will provide few points which will be important to consider when we do service application provisioning.

      1. What are the service applications I need?

      If we use configuration wizard to setup the SharePoint farm, it’ll setup all selected service applications with default settings. By default all service applications except “Lotus Notes Connector” are selected.

      image

      Although this will setup almost all service applications, we may not need most of them. On the other hand we may need to specify different settings when configuring (e.g.: different managed accounts).

      To overcome above limitations, the best practice is to use a scripted installation which will setup and configure service applications those are required.

      Let’s assume that we need only Search, Managed metadata and User profile service applications for an environment. In that scenario we may not configure other service applications like Excel services, Access services, PerformancePoint services, etc..

      By provisioning only relevant service applications, we can reserve resources like processing power, memory etc.. as well as we can focus on maintenance and administrative activities of those applications only

      2. What is the service application topology which suits the business requirement?

      There are two main types of topologies to consider

      1. Single farm service application topologies
        • Single farm with single application proxy group

        This is the most basic topology where all web applications use the same service applications 

        • Single farm with multiple application proxy groups

        In this topology we do have unique service application requirement for certain web applications (e.g.: departments). In that case we will create new proxy groups probably with new service applications

        • Single farm with multiple application proxy groups and multiple application pools

        In this topology we are focusing on isolating certain service applications from others. As we mentioned in an earlier post that when we create a new service application, an application in IIS also created. So we can specify different application pools with probably different identities as execution accounts,

      2. Cross farm service application topologies
        • We can share following service applications across farms
          • Business data connectivity
          • Managed metadata
          • User profile
          • Search
          • Machine translation
          • Secure store

      3. What are the resources I need?

      When provision a service application we need to allocate resources for that application in forms of processing power, memory, disk space as well as separate servers. There are some resource-intensive service applications like Search service, Excel services, Visio services, etc..

      Some service applications require databases to store its data. For an example user profile service require 3 databases to store it’s content. Namely Profile, Social and Sync databases. Apart from that, creation of My Sites will also create content databases. This will definitely increase the storage requirement. Following are the types and storage requirement for service application databases

      image

      On the other hand Search service require storage space to physically store it’s index files. This can be very large depending on the searchable content. Roughly it’s between 5% to 20% of the searchable content that is being crawled. If the percentage of text is larger on those searchable content, the index space will also be increased.

      It’s generally a best practice to utilize separate servers to resource-intensive applications like Search index. This is because Search service constantly crawl the content which require high amount of memory and processing power.

      4. Do we need to consider high availability?

      If we have multiple servers in the farm, we can start multiple instances of same service application on those servers. We don’t need to worry about load balancing as it’s handled by SharePoint itself.

      In order to implement high availability on Search service, we need to modify the search topology to include search index replica and partitions. We need to increase partitions and replicas based on items that are being indexed by the search service.