Wednesday, January 15, 2025

Mocking Custom Responses with Azure API Management – Custom Mock Response from External Files

This article is the third part of a multi-part series. In this section, I will explain how to render custom mock responses from JSON files stored in a storage container. Below are the different parts of this article series.

As discussed in the second part of this series, we can embed JSON responses directly within the policy. However, this approach can become messy and difficult to modify or maintain over time if you have many mock scenarios.

Custom mock responses from external files

As an improvement, we can store mock responses externally and retrieve them based on the request using APIM policies. An added advantage is that we can better organize our mock responses in external storage, where we can leverage features like versioning, enhanced availability, and more efficient management.

Here’s the approach I used:


I provisioned an Azure Storage Account and created a Blob Container. Then, I organized my mock responses within a dedicated folder inside the container.


Following is the content of a JSON file

{
    "id": 1,
    "name": "Introduction to Azure",
    "category": "Cloud Computing",
    "description": "A beginner-friendly course covering the fundamentals of Microsoft Azure.",
    "duration": "4 weeks",
    "instructor": "John Doe"
}


Next, I generated a Shared Access Signature (SAS) token with Read permissions and obtained the Blob SAS URL to securely access the mock responses.


Then, I navigated to the APIM instance, selected the Inbound Processing section, and opened the Policy Editor.


Following is the extract of the policy
<inbound>
        <base />
        <choose>
            <when condition="@(context.Request.Url.Query.GetValueOrDefault("id") == "1")">
                <send-request mode="new" response-variable-name="response" timeout="10" ignore-error="false">
                    <set-url>@($"https://rgstoragefedora001.blob.core.windows.net/data/Subject/1.json?sp=r&st=2024-03-08T12:01:42Z&se=2024-03-08T20:01:42Z&spr=https&sv=2022-11-02&sr=b&sig=DrqWZJxGP38PNJYFKCoMgIqn6AjNC71nw0x%2FjITu4aM%3D")</set-url>
                    <set-method>GET</set-method>
                </send-request>
                <return-response>
                    <set-status code="200" reason="OK" />
                    <set-header name="Content-Type" exists-action="override">
                        <value>application/json</value>
                    </set-header>
                    <set-body>@(new JObject(((IResponse)context.Variables["response"]).Body.As<JObject>()).ToString())</set-body>
                </return-response>
            </when>
            <when condition="@(context.Request.Url.Query.GetValueOrDefault("id") == "2")">
                <send-request mode="new" response-variable-name="response" timeout="10" ignore-error="false">
                    <set-url>@($"https://rgstoragefedora001.blob.core.windows.net/data/Subject/2.json?sp=r&st=2024-03-08T12:34:15Z&se=2024-03-08T20:34:15Z&spr=https&sv=2022-11-02&sr=b&sig=OVhf3uGIASMHWHtg8F%2BypQzLatI9DeEzqoFns2iGOUk%3D")</set-url>
                    <set-method>GET</set-method>
                </send-request>
                <return-response>
                    <set-status code="200" reason="OK" />
                    <set-header name="Content-Type" exists-action="override">
                        <value>application/json</value>
                    </set-header>
                    <set-body>@(new JObject(((IResponse)context.Variables["response"]).Body.As<JObject>()).ToString())</set-body>
                </return-response>
            </when>
            <otherwise>
                <return-response>
                    <set-status code="404" reason="Not Found" />
                    <set-header name="Content-Type" exists-action="override">
                        <value>application/json</value>
                    </set-header>
                    <set-body>{
                            "error": "Student ID not found"
                        }</set-body>
                </return-response>
            </otherwise>
        </choose>
    </inbound>


That's all we need to configure within the policy. Next, I navigated to the Test console to verify the response. I have to specify the query string as below


Following is the response I got as expected


Tuesday, December 24, 2024

Mocking Custom Responses with Azure API Management – Custom Mock Response

This article is the second part of a three-part series. We will discuss how to render custom mock responses using APIM policy. Below are the different parts of this article series.

Custom mock responses

Often, we need more than just a 200 OK response without a body. Instead, we require comprehensive responses formatted as JSON messages. Adding to the complexity, the response often needs to vary based on specific query string parameters.

Here’s the approach I used to generate custom mock responses in Azure API Management based on varying query string parameters.

Navigate to your API Management instance and select the specific API operation you want to configure.


Click on the Inbound Processing section and open the Policy Code Editor.


We will modify the inbound section of the policy. We will add a policy segment to dynamically generate the response body based on a specified query string parameter.

Here is the code I used


<inbound>
        <base />
        <choose>
            <when condition="@(context.Request.Url.Query.GetValueOrDefault("id") == "1")">
                <return-response>
                    <set-status code="200" reason="OK" />
                    <set-header name="Content-Type" exists-action="override">
                        <value>application/json</value>
                    </set-header>
                    <set-body>{
                        "studentId": "1",
                        "name": "Jane Smith",
                        "grade": "B"
                    }</set-body>
                </return-response>
            </when>
            <when condition="@(context.Request.Url.Query.GetValueOrDefault("id") == "2")">
                <return-response>
                    <set-status code="200" reason="OK" />
                    <set-header name="Content-Type" exists-action="override">
                        <value>application/json</value>
                    </set-header>
                    <set-body>{
                        "studentId": "2",
                        "name": "Jane Smith",
                        "grade": "B",
                    }</set-body>
                </return-response>
            </when>
            <otherwise>
                <return-response>
                    <set-status code="404" reason="Not Found" />
                    <set-header name="Content-Type" exists-action="override">
                        <value>application/json</value>
                    </set-header>
                    <set-body>{
                            "error": "Student ID not found"
                        }</set-body>
                </return-response>
            </otherwise>
        </choose>
    </inbound>

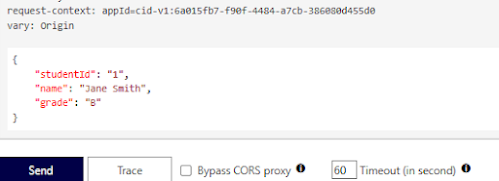
You can test the outcome by navigating to the Test console and specifying the appropriate query string parameter, as shown below.


Then, submit the request to verify that the appropriate response is returned based on the specified query string parameter.


Tuesday, December 17, 2024

Ensuring Static IP for Azure App Service When Accessing External APIs Over the Internet

Azure App Service assigns a range of outbound IPs when accessing external resources. However, if the external resource requires IP whitelisting, the default configuration may not be practical. This article outlines the steps to ensure that the external API is accessed using a static public IP.

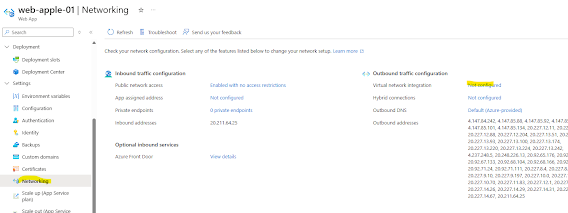
Following is the default configuration. With this setting, the external API may be called with any of the IPs within the range


To achieve this objective, I chose to use NAT Gateway and related components. we need to complete the following tasks in order to implement the solution:
  • Integrate the Web App with a Subnet in a Virtual Network
  • Create a Public IP
  • Create and Configure a NAT Gateway
  • Associate the Web App with the NAT Gateway
  • Test

If we had the external API or resource within a private network (e.g On-Premises) we could've used Hybrid Connections.

Let's discuss the implementation of each item

1. Integrate the Web App with a Subnet in a Virtual Network

Create a virtual network and a subnet or consume an existing virtual network


Next, navigate to your Web App, go to the Networking section, and enable Virtual Network Integration to connect it to the designated subnet.


2. Create a Public IP


3.Create and Configure a NAT Gateway


Specify Outbound IP. We can specify multiple public IP addresses if we want once NAT Gateway is configured


Specify the Subnet


4.Associate the Web App with the NAT Gateway

Since resources are within the same network, the NAT Gateway will be automatically configured with your Web App


5. Test

Let's test the solution. To validate the setup, I deployed a sample .NET API that calls an external service, which returns the calling IP address. 


    [ApiController]
    [Route("api/[controller]")]
    public class GatewayTestController : ControllerBase
    {
        private readonly HttpClient _httpClient;
        public GatewayTestController(HttpClient httpClient)
        {
            _httpClient = httpClient;
        }

        [HttpGet]
        public async Task GetOutboundIp()
        {
            // Call external API over internet
            var response = await _httpClient.GetAsync("https://httpbin.org/ip");
            if (!response.IsSuccessStatusCode)
            {
                return StatusCode((int)response.StatusCode, "Failed to get outbound IP");
            }

            var callerIP = await response.Content.ReadAsStringAsync();
            return Ok(callerIP);
        }
    }

Following is the response I get. This matches exactly with the Public IP I provisioned


Monday, December 9, 2024

Structured Approach to a Successful Azure Integration Services Implementation

Implementation of integration solutions using Azure Integration Services (AIS) components is quite common. It can harness the benefits of an Integration Platform as a Service (iPaaS). While the integration process may appear straightforward, it requires careful governance. Typically, the implementation timeline is tight, and the presence of multiple moving parts adds to the complexity of the process.

The following activities are recommended for a successful AIS engagement:

Planning & Discovery
  • Project Plan Development: Establish the project’s scope, objectives, timelines, budget, and deliverables. This foundational task involves identifying stakeholder requirements and defining a roadmap for successful implementation.
  • Discovery Workshop(s): Engage stakeholders in collaborative sessions to gather requirements, align expectations, and document business processes to ensure the integration aligns with organizational goals.
Deliverables: Project Plan Document, Discovery Workshop Artifacts, Open Communication Channel (e.g MS Teams)

Design
  • Develop High-level Architecture: Define the overall architectural vision, including system components and their interactions, to serve as the blueprint for detailed designs.
  • Develop Low-level Architecture: Provide a granular view of individual components, interfaces, and data flows to guide development and implementation teams.
  • Design Documentation: Compile detailed design specifications, architectural diagrams, and decision logs to serve as reference material for all stakeholders.
  • Design Walk-Through Workshop(s): Present the architecture and design plans to stakeholders for validation, feedback, and alignment before moving to implementation.
  • Proof of Concept: Build a small-scale prototype to validate critical components, test assumptions, and mitigate risks before full-scale development begins.
Deliverables: High-level Architecture Document, Low-level Architecture Document, Consolidated Design Document, Workshop Notes, Proof of Concept

Implementation
  • Integration Environment Readiness: Set up environments, such as staging and testing platforms, to support development and ensure readiness for system integration. It is essential to ensure that both source and target environments are prepared for implementation. If the environments are in different locations (e.g., cloud vs. on-premises), the team must exercise extra caution regarding security and access management.
  • Landing Zone Configuration: Establish a secure and scalable Azure foundation, ensuring compliance with best practices for networking, identity, and governance.
  • DevOps Environment Configuration: Set up CI/CD pipelines, repositories, and automated workflows to streamline development and deployment processes.
  • Specific AIS Component Configuration: Configure Azure Integration Services components like Logic Apps, Service Bus, and API Management as per the design.
  • Development of Components: Build custom integrations, workflows, and connectors required for the solution based on detailed designs. Most of the development will be conducted using Azure Functions and Logic App workflows. It is crucial to follow a well-structured solution design that incorporates appropriate cloud components. Additionally, adopting a "shift-left" approach to security is highly recommended to address potential risks early in the development lifecycle
  • Implement Disaster Recovery & High Availability: Establish redundancy, failover mechanisms, and recovery processes to ensure resilience and minimal downtime.
  • Data Migration: Plan, map, and execute the migration of legacy data to the new system, ensuring data integrity and minimal disruption.
Deliverables: Integration Environment Readiness Confirmation, Landing Zone Configuration Document, DevOps Environment Configuration Document, AIS Component Configuration in Infrastructure as Code (IaC) in repository , Developed Components in repository, Disaster Recovery & High Availability Plans, Data Migration Report

Testing
  • Unit Testing: Validate individual components or modules to ensure they meet functional requirements and perform as expected.
  • Integration Testing: Assess the system as a whole to verify that all components communicate and function seamlessly together.
  • Vulnerability Assessment & Penetration Testing: Identify security vulnerabilities and test the system’s ability to withstand potential threats or breaches.
  • User Acceptance Testing: Engage end-users to validate the system against business requirements and ensure it meets their needs.
Deliverables: Unit Testing Report, Integration Testing Report, Security Testing Report, User Acceptance Testing Deliverables

Deployment
  • Configure CI/CD Pipelines: Finalize and optimize pipelines to automate deployment processes, enhancing efficiency and consistency.
  • Deployment to Non-Prod Environments: Deploy the solution to development and staging environments for final validation and testing.
  • Deployment to Prod Environments: Execute the live deployment of the solution in production, ensuring minimal downtime and proper configuration.
  • Post-Deployment Verification: Validate the deployment success by verifying all functionalities, data, and integrations are working as intended.
Deliverables: CI/CD Pipeline Configuration Files, Non-Production Deployment Validation, Production Deployment Plan, Post-Deployment Verification Report

Closure
  • Establish Monitoring & Logging: Configure monitoring tools and logging mechanisms to ensure ongoing visibility into system performance and health.
  • Issue Resolution: Address any post-deployment issues or bugs, ensuring the system operates smoothly and meets expectations.
  • Project Closure Documentation: Prepare final documentation, including lessons learned, handover details, and user manuals, to conclude the project formally.
Deliverables: Monitoring & Logging Configurations, Issue Resolution Logs, Project Closure Documentation

Friday, November 29, 2024

Presentation - Enterprise Integration Solutions with Azure Integration Services

I had the privilege of delivering a lightning talk at the Perth Azure Group on Enterprise integration Solutions using Azure Integration Services.

Following is the presentation I conducted.


Following are few snaps from the event


The following resources are excellent starting points for anyone interested in learning more.

Wednesday, November 27, 2024

Mocking Custom Responses with Azure API Management – Simple Mock Response

Mocking API responses is often essential to support the quality assurance team and enable development testing activities. Azure API Management (APIM) provides a comprehensive solution for this, allowing us to mock responses with specific status codes and even craft custom response messages. This is achieved by leveraging custom policies within APIM, enabling greater flexibility and control over simulated API behavior.

This article is the first of a three-part series. In this article, I will cover simple mock responses, while the rest in the series will discuss on crafting custom response messages. Below are the different parts of this article series.


Simple mock responses

Let's assume we need to send a 200 OK response to an API that has no backend service connected. Here are the steps you need to follow:

Navigate to the API operation and select "Add Policy" in the Inbound Processing section.


Select the "Mock responses" policy.


Next, select the desired response. In this case, choose "200 OK."


That's it! When you navigate to the test console and execute the API, you will receive a 200 OK response, even though no backend service is configured.


Wednesday, November 20, 2024

Securely Access Azure Key Vault Secrets from an On-Premises Application: A First Step in Cloud Migration

Cloud adoption and modernization are often complex processes. Consequently, organizations typically migrate their workloads to the cloud in phases. To maximize business value, it is crucial to identify the most suitable use case. One promising candidate is migrating valuable secrets to the cloud, where robust security measures have been proven effective. You can emphasize this as a security enhancement and an improvement in compliance adherence.

In this article, I’ll explain how to keep your applications within your on-premises environment while securely migrating credentials, such as database connection strings and encryption keys to an Azure Key Vault instance.

Following would be the design we follow


For this example, I will use a simple C# console application to represent an enterprise application. Additionally, I will use a self-signed certificate to illustrate the process. However, when implementing this in your organization, you should use a properly issued certificate to ensure security and compliance.

Following are the steps I followed:

Navigate to your Entra ID instance and create a new App registration. Provide default values for parameters.


Next, generate a self-signed certificate for this example. If your organization already has an issued certificate, you may reuse that. We will generate both a .pfx file (containing the private key) and a .cer file (containing the public key). The .pfx file can be securely stored in Azure Key Vault.

# Generate the self-signed certificate
$cert = New-SelfSignedCertificate -CertStoreLocation Cert:\CurrentUser\My -Subject "CN=ConsoleKeyVault" -KeySpec KeyExchange

# Export the certificate with private key to a PFX file
$certPath = "C:\Cert\AppCertificate.pfx"
$certPassword = ConvertTo-SecureString -String "Password" -Force -AsPlainText
Export-PfxCertificate -Cert $cert -FilePath $certPath -Password $certPassword

# Export the public key in CER format
Export-Certificate -Cert $cert -FilePath 

Once that is done, you can see the certificate is configured in your development environment

Next, navigate to your App registration in the Azure portal and go to the Certificates & secrets section. There, upload the .cer certificate to associate it with your application.


You need to obtain the Tenant ID and Client ID of your App registration. You can find both in the Overview tab of the App registration.


Then we need to navigate to the Key Vault instance and provide appropriate permissions. Since our application needs to read secrets from Azure Key Vault, the appropriate role to assign is Key Vault Secrets User.


That completes the required configuration. Now, let's move to our console application and set up the connection to Azure Key Vault.

We need to consume following NuGet packages. Let's install them first.

dotnet add package Azure.Identity
dotnet add package Azure.Security.KeyVault.Secrets

Below is a sample code snippet to retrieve a secret from Azure Key Vault. In my Key Vault, I have a secret named "food-auth-client-id", and the following program demonstrates how to access this credential securely within on-premises environment.


using System.Security.Cryptography.X509Certificates;
using Azure.Identity;
using Azure.Security.KeyVault.Secrets;


string keyVaultUrl = "https://test-fedora-01.vault.azure.net/";
string clientId = "xxxx-cab5-4b32-8380-a9e76c063677";
string tenantId = "xxxx-xxx-xxx-xxx-xxxx";
string certificateThumbprint = "xxxxA03B2697CDA8D58ABB32DCB48B6995F7994D";

// Retrieve the certificate from the local certificate store
var store = new X509Store(StoreLocation.CurrentUser);
store.Open(OpenFlags.ReadOnly);
var certificate = store.Certificates.Find(X509FindType.FindByThumbprint, certificateThumbprint, validOnly: false)[0];

// Authenticate using ClientCertificateCredential
var credential = new ClientCertificateCredential(tenantId, clientId, certificate);
var client = new SecretClient(new Uri(keyVaultUrl), credential);

// Retrieve the secret
KeyVaultSecret secret = await client.GetSecretAsync("food-auth-client-id");
string foodAuthClientId = secret.Value;

// Use the connection string in your application
Console.WriteLine($"Retrieved the key: {foodAuthClientId}");

I was able to retrieve the secret as shown below