Wednesday, November 20, 2024

Securely Access Azure Key Vault Secrets from an On-Premises Application: A First Step in Cloud Migration

Cloud adoption and modernization are often complex processes. Consequently, organizations typically migrate their workloads to the cloud in phases. To maximize business value, it is crucial to identify the most suitable use case. One promising candidate is migrating valuable secrets to the cloud, where robust security measures have been proven effective. You can emphasize this as a security enhancement and an improvement in compliance adherence.

In this article, I’ll explain how to keep your applications within your on-premises environment while securely migrating credentials, such as database connection strings and encryption keys to an Azure Key Vault instance.

Following would be the design we follow


For this example, I will use a simple C# console application to represent an enterprise application. Additionally, I will use a self-signed certificate to illustrate the process. However, when implementing this in your organization, you should use a properly issued certificate to ensure security and compliance.

Following are the steps I followed:

Navigate to your Entra ID instance and create a new App registration. Provide default values for parameters.


Next, generate a self-signed certificate for this example. If your organization already has an issued certificate, you may reuse that. We will generate both a .pfx file (containing the private key) and a .cer file (containing the public key). The .pfx file can be securely stored in Azure Key Vault.

# Generate the self-signed certificate
$cert = New-SelfSignedCertificate -CertStoreLocation Cert:\CurrentUser\My -Subject "CN=ConsoleKeyVault" -KeySpec KeyExchange

# Export the certificate with private key to a PFX file
$certPath = "C:\Cert\AppCertificate.pfx"
$certPassword = ConvertTo-SecureString -String "Password" -Force -AsPlainText
Export-PfxCertificate -Cert $cert -FilePath $certPath -Password $certPassword

# Export the public key in CER format
Export-Certificate -Cert $cert -FilePath 

Once that is done, you can see the certificate is configured in your development environment

Next, navigate to your App registration in the Azure portal and go to the Certificates & secrets section. There, upload the .cer certificate to associate it with your application.


You need to obtain the Tenant ID and Client ID of your App registration. You can find both in the Overview tab of the App registration.


Then we need to navigate to the Key Vault instance and provide appropriate permissions. Since our application needs to read secrets from Azure Key Vault, the appropriate role to assign is Key Vault Secrets User.


That completes the required configuration. Now, let's move to our console application and set up the connection to Azure Key Vault.

We need to consume following NuGet packages. Let's install them first.

dotnet add package Azure.Identity
dotnet add package Azure.Security.KeyVault.Secrets

Below is a sample code snippet to retrieve a secret from Azure Key Vault. In my Key Vault, I have a secret named "food-auth-client-id", and the following program demonstrates how to access this credential securely within on-premises environment.


using System.Security.Cryptography.X509Certificates;
using Azure.Identity;
using Azure.Security.KeyVault.Secrets;


string keyVaultUrl = "https://test-fedora-01.vault.azure.net/";
string clientId = "xxxx-cab5-4b32-8380-a9e76c063677";
string tenantId = "xxxx-xxx-xxx-xxx-xxxx";
string certificateThumbprint = "xxxxA03B2697CDA8D58ABB32DCB48B6995F7994D";

// Retrieve the certificate from the local certificate store
var store = new X509Store(StoreLocation.CurrentUser);
store.Open(OpenFlags.ReadOnly);
var certificate = store.Certificates.Find(X509FindType.FindByThumbprint, certificateThumbprint, validOnly: false)[0];

// Authenticate using ClientCertificateCredential
var credential = new ClientCertificateCredential(tenantId, clientId, certificate);
var client = new SecretClient(new Uri(keyVaultUrl), credential);

// Retrieve the secret
KeyVaultSecret secret = await client.GetSecretAsync("food-auth-client-id");
string foodAuthClientId = secret.Value;

// Use the connection string in your application
Console.WriteLine($"Retrieved the key: {foodAuthClientId}");

I was able to retrieve the secret as shown below


Wednesday, October 16, 2024

Optimizing Cost Management for Azure Functions: Planning, Control, and Best Practices

Azure Functions is a serverless, fully managed compute platform that enables seamless process automation. However, its rapid feature deployment can sometimes lead to governance misalignment, which may impact organizations in several ways, including increased costs.

In this article, I will share few strategies to help you effectively govern and optimize your costs.

1. Select the right hosting plan

There are many hosting plans you can select from.


Following is a very high level analysis.

Hosting Plan

Suitable Scenarios

Type

Cost

Flex Consumption  

Event-driven workloads, rapid scaling, VNET integration

Shared

Medium

Consumption

Cost effective serverless apps, infrequent & unpredictable workloads

Shared

Low

Functions Premium

High performance, longer execution times, VNET integration

Dedicated

High

App Service

Dedicated, integration with existing app service plans, VNET integration

Dedicated

High

Container Apps Environment

Containerized workloads, VNET integration

Dedicated

High


2. Optimize your code to minimize function execution time

Two major factors influencing your Azure Functions' costs are execution time and memory usage. Inefficient code can cause delays, leading to higher-than-expected expenses.

It is always recommended to test performance in your local development environment to identify inefficiencies early. Application Insights is a powerful tool for monitoring and analyzing performance, helping to pinpoint and optimize non-performing segments.


4. Optimize network traffic

It is highly recommended to monitor and manage outbound (egress) traffic from your Azure Functions. Here are some effective strategies to reduce egress costs:

  • If possible consume resources within the same region.
  • Cache & compress external API calls
  • Aggregate & batch data processing where possible

5. Monitor & analyze cost using Azure Cost Management

Regularly monitor Azure Cost Management & Billing to track and optimize your spending. Here are some effective strategies you can implement:

  • Create budgets in Azure Cost Management
  • Setup alerts

Tuesday, October 15, 2024

How to debug issues easily with Application Insights - How to see only my code

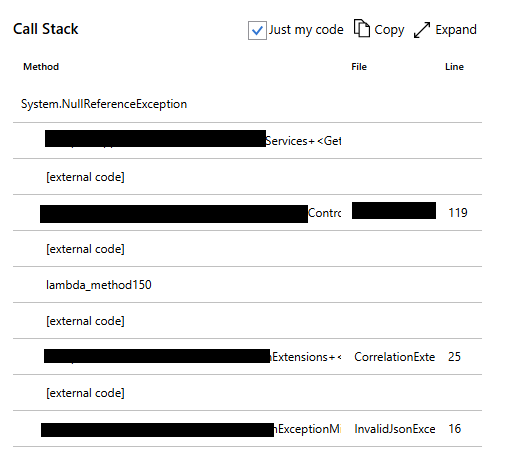
Let's assume we have a complex solution with multiple external integrations. Identifying issues can be challenging, as error messages are often intricate and difficult to interpret.

Consider the following example, where multiple integrations are in place.


How can I check only my code to focus on what I can control? It’s simple—just select the "Just My Code" checkbox.


Once I do that, I can identify the specific points in my code that triggered the error.


Now, I understand the root cause of the problem and can explore possible solutions.

Dynamically Modify API Responses Based on Subscription Tier with Azure API Management Policies

Azure API Management (APIM) provides more than just API Gateway features; it offers a comprehensive suite of capabilities that strengthen the entire API ecosystem.

Here are some key features provided by Azure API Management:
  • API Gateway
  • Developer Portal
  • Policy Management
  • Analytics and Monitoring
  • Security Features
  • Multi-Cloud and Hybrid Support
  • Versioning and Revisioning
  • Scalability
  • Integration
  • Custom Domains and Branding
  • Products & Subscriptions
We can combine multiple features from these categories based on our specific requirements.

In this article, I will illustrate how to combine Policy Management features with Product & Subscription features to implement a specific use case. 

Following is my business case

I want to offer my COVID data API in two product tiers. Users who subscribed to the premium product would see the entire response including the death count. But, the users who subscribed to the basic product would see the response without the death count

Here is the approach I used to implement the solution:

First we need to create two products within our Azure API Management instance:
  • Starter – A basic plan where customers would see only a subset of the response
  • Unlimited – A premium plan where the customers would see the full response


Then let's create two subscriptions for those products using Subscriptions section


Let's navigate to your API and enable access for both the Starter and Unlimited products.


Next, navigate to the Outbound Processing section of the API operation and open the Policy Editor to enforce a conditional response based on the subscribed product.


Here is the policy snippet I used:
    <outbound>
        <base />
        <choose>
            <when condition="@(context.Response.StatusCode == 200 && context.Product?.Name != "Unlimited")">
                <set-body>@{
                        var response = context.Response.Body.As<JObject>();
                        var rawData = response["rawData"] as JArray;
                        if (rawData != null) {
                            foreach (var record in rawData) {
                                record["Deaths"]?.Parent.Remove();
                            }
                        }

                        return response.ToString();
                    }</set-body>
            </when>
        </choose>
        <cache-store duration="15" />
    </outbound>
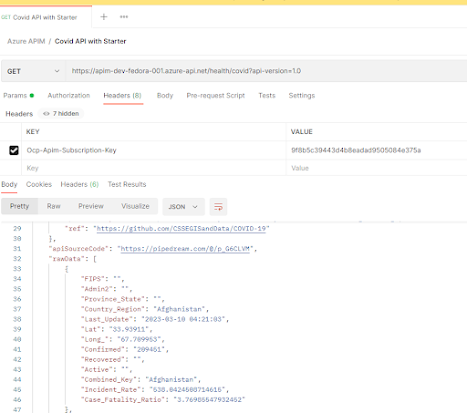
Let's test this with the Postman client. 

Let's first try with the Starter product. We will use the subscription key associated with the Starter product. As you can see, the Deaths property is not included within the rawData collection.


Now, let's check the same request using the Unlimited product. This time, the Deaths property is included in the response.


Thursday, September 19, 2024

Performing URL-Based Load Testing with Azure Load Testing

Load testing is a crucial practice for enterprise APIs to ensure optimal performance under varying traffic conditions. Azure Load Testing, a fully managed service, helps evaluate the performance, scalability, and capacity of your applications, particularly APIs. It enables you to simulate high-scale traffic, uncover performance bottlenecks, and optimize system resilience.

Azure Load Testing allows you to create sophisticated load tests using tools like Apache JMeter while also offering the flexibility to perform URL-based load testing without the need for external tools.

In this article, I will demonstrate how to perform URL-based load testing for an API exposed through the Azure API Management service using Azure Load Testing. 

Configuration of Load Test

Go to your Azure Load Testing instance, click on "Test", and then select "Create a URL-based test" to begin setting up your load test.


Specify Test details


In Test plan section click on Add request


Enter the details of your API, including the endpoint URL and request method. Since my API retrieves Star Wars characters by their ID, I configured the id parameter as a variable, allowing the test to simulate different requests dynamically.


Next, I created a CSV file containing multiple rows with different id values to be injected into the id parameter of my API. To simulate an error scenario, I intentionally included an id value of 1500, which does not exist in my API. This helps evaluate how the system handles unexpected inputs and errors under load.


In the Load section, I configured key parameters such as the number of engine instances, concurrent users, and test duration. Since this test is for demonstration purposes only, I selected the minimum values to keep the load minimal while still assessing the API’s response behavior.


For monitoring purposes, I added relevant resources to my load test, allowing me to analyze their performance directly from the load test dashboard. Since my API Management instance and Application Insights are crucial for this test, I included them to gain deeper insights into API performance, request handling, and potential bottlenecks.


Next, I navigated to the Test Criteria section, where I defined success and failure conditions based on key performance metrics. I set the test to fail if:
  • The 90th percentile response time exceeds 1000ms
  • The error percentage is greater than 5%


Execution of Load Test

With the Load Test configuration complete, it's time to execute the test and analyze the results.


Here are the results I received from the load test.


I got following key statistics
  • Load
  • Duration
  • Response time
  • Error percentage
  • Throughput

The Load Test has failed because it didn’t meet the test criteria I set. Specifically, the error percentage surpassed the 5% limit.

Analysis of error requests using related resources

Since we've integrated Application Insights as a related resource, we can dive deeper into the analysis. Let's focus on the Failed Requests chart, which will provide insights into the specific requests that failed during the load test, helping us identify potential issues or bottlenecks in the API.


To further investigate, click on the Failed Requests chart in Application Insights, then select Drill into Logs and navigate to Failures.


The failure dashboard reveals that there were 9 "Not Found" (404) errors during the load test.


It tells me that there are no Star Wars characters with 1500 as the id


Tuesday, September 10, 2024

Debugging API Startup Errors Using Kudu in Azure App Service

Recently, I had to debug a .NET API hosted in an Azure Web App. The API failed to bootstrap and returned only a generic error message, which provided little insight into the issue.

Unfortunately, the application lacked Application Insights integration, making the troubleshooting process even more challenging.

Following is the approach I took.

I navigated to the Development Tools section of the App Service and accessed Advanced Tools to investigate further.


From there, I navigated to Kudu and accessed the Debug Console to further analyze the issue.


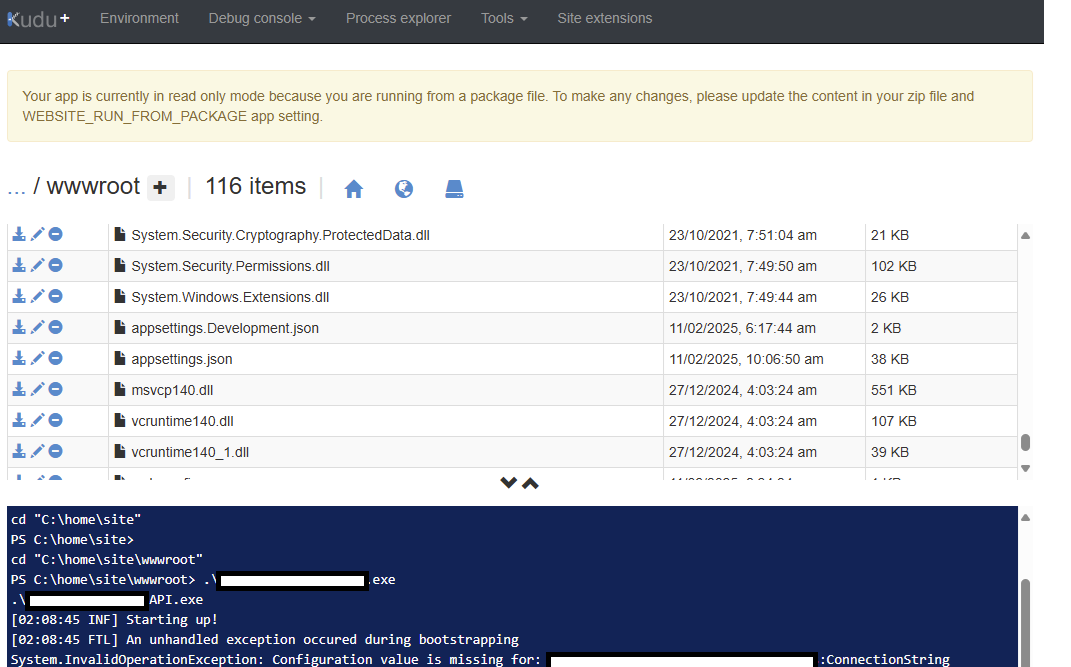
Navigate to wwwroot location and locate the particular exe of your API


I executed the .exe file directly in the Debug Console to capture the specific error message and identify the root cause of the issue.


By running the .exe file, I was able to see the detailed error message, which revealed that a required configuration item was missing for the application.

Saturday, September 7, 2024

Configuring Postman to Retrieve an OAuth 2.0 Token from Entra ID for Calling an API via APIM

This article is the second part of a two-part series. Below are the different parts of this article series.


In this article, I will guide you through configuring your Postman client to retrieve an access token from Entra ID, enabling you to call an API exposed via APIM.

For better organization, I have grouped related APIs into a collection.


Navigate to Authorization section and provide following details


You can obtain most of the required details from your client App Registration. These parameters are readily available in the Endpoints view of your client application. We covered how to create and configure a client App Registration in our previous blog post.


Following are some important parameters

#Auth URL
OAuth 2.0 authorization endpoint (v2) in the Endpoints view of your client app registration

#Access Token URL
OAuth 2.0 token endpoint (v2) in the Endpoints view of your client app registration

#Client ID
Client ID of your client app registration

#Client Secret
#Client ID
Client secret you generated within your client app registration

#Callback URL
Redirect URL from the Authentication section (Shown in below diagram)


That completes the configuration. You can now click the Get New Access Token button to interactively retrieve an access token.


Next, ensure that your API is configured to retrieve the token from the parent as shown below.


Then, you can successfully retrieve response with valid access token