Tuesday, October 12, 2021

Azure Advisor : Your assistant in Cloud

You can have multiple workloads in your cloud. When time goes on you might find it difficult to manually check each and every resource. Most of the time Cloud housekeeping is neglected.

May be your resources are not provisioned with the best practices. Or may be you have security vulnerabilities. Furthermore your resources are not right sized, causing your cost to go up.

Azure Advisor is the centralized service which scans each and every workload and recommend you with best practices to optimize.


You get recommendations on following categories

  • Cost
  • Security
  • Reliability
  • Operational excellence
  • Performance
We will check few examples from each section

Let's first check on Cost section

As you can see I have two high impact recommendations


Let's first check the quick fix


This VM is not being used at all. We can shut down the VM and reduce our cost.

Let's check Security section

We have multiple security vulnerabilities there


Let's see Reliability findings

It'll show the improvements I can introduce to improve the reliability


Let's find out performance suggestions

Following are some suggestions


Wednesday, September 8, 2021

Azure Privileged Identity Management (PIM) to grant Just in Time (JIT) access to resources

We always want to follow the least privilege security principle when granting permissions. Is role based access control alone sufficient to achieve this?

There are several challenges

  • If permission given indefinitely without an expiry, it will cause a risk
    • Such users may leave the organization
    • Projects may end
  • Having higher permission without a need at the moment is also a risk
    • Credentials can be compromised at any moment
    • You may do mistakes with higher permissions
Privileged Identity Management (PIM) is the solution for this. Microsoft Azure also provides a PIM facility which is an Azure AD premium (P2) feature. This article will provide an overview of Azure PIM features.

Azure PIM allows you to grant users and groups elevated privileges to Azure AD and Azure resources whenever necessary.

We will take a scenario to explain the concept.

Lat's take Contoso, which is a Financial organization which has its workloads in Microsoft Azure. John is a systems engineer who works in the same organization. Time to time the business requires to build new VM workloads and to modify existing VM resources. John should not have permanent contribute access due to prevailing audit and compliance requirements. What would be the solution?

What we can do is to use PIM, and assign John as eligible for VM Contribute role. As per this solution John will not have permanent access to the resource. Whenever he needs the access, John would navigate to PIM console and requests for the desired access. He might be asked to provide a strong authentication (MFA) and approval might also be required. After the granted time window is elapsed his elevated privilege will be revoked.

Existing privileges

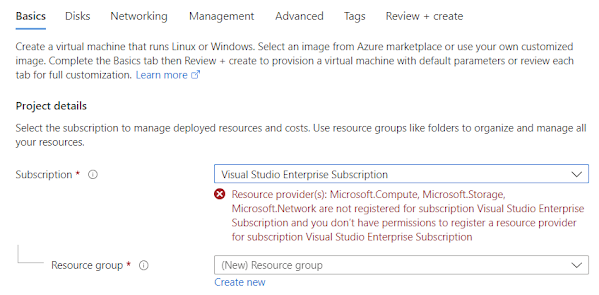
Currently John has read permission to the subscription. When he navigate to create a VM he will get following error message


Steps to gain Just in Time (JIT) privileges to perform desired actions

Step 1 : Administrator would log into  PIM and click on Azure Resources


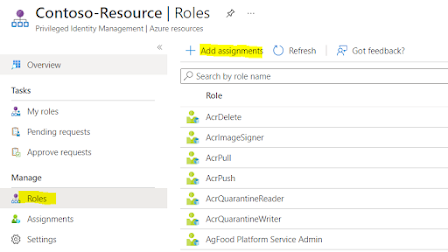
Step 2 : Click on Roles and click on add assignments


Step 3 : Select the role and select the user


Let's login to the PIM as John.

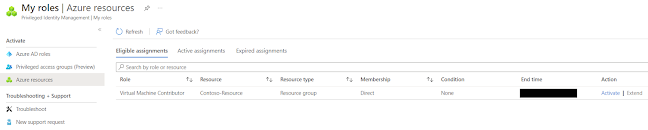
Step 1 : Navigate to My roles and Azure resources


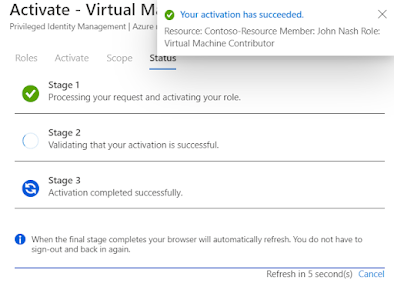
Step 2 : John will activate the privilege for 1 hour


Step 3 : Navigate to Active assignments in Azure resources blade in PIM


Now John should have access to VM resources, Let's see whether if he can create a VM.


Great!! Now we don't get the previous error. John's access will be revoked automatically after the expiry date or he can manually deactivate the elevated access.

Thursday, August 5, 2021

Application Insights - Transaction trend over time and analyze further

This article is related to the previous one I wrote about Application Insights - Investigate performance

From the previous article, I explained how to investigate performance of a specific operation and monitor end-to-end transaction. I will continue where I stopped and I will use the same operation to illustrate.

In order to access the trend of specific request over the time, need to click on following link


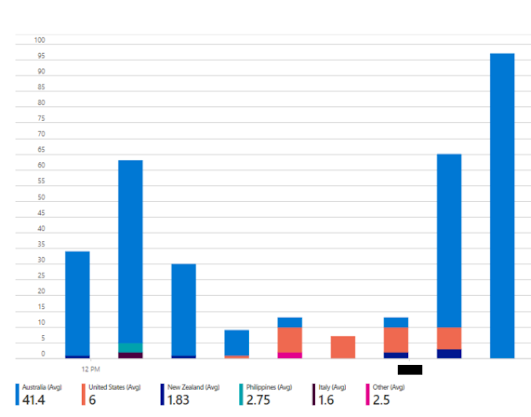
It will load events chart as below. In order to properly identify a pattern I will select last 48 hours history. You can observe that there is a peak starting from 1.30PM and gradually reducing everyday


We can further analyze the same chart by splitting each bar with other parameters. As an example I use Performance parameter to split bars.


I'll Zoom into a specific area. You can see there are some calls which took around 1-3 seconds (Shown in green color) 


I will split bars with another parameter. This time I'll use Country or Region

Tuesday, August 3, 2021

Azure Application Insights - Investigate Performance

Azure Application Insights provide great features to dig deep into application calls. We can identify performance issues and areas for improvements by working with given insights. 

I investigated performance of a live application using this feature, and I'll guide you through the process using this article.

Following are the steps I used to analyze an operation

1. Navigate to Application Insights instance and click on Application Map. Select a call that you need to analyze further


2. Click on Investigate Performance button. It'll show API calls in a time series. From the below image we can see that highest time consuming operation is /connect/token.


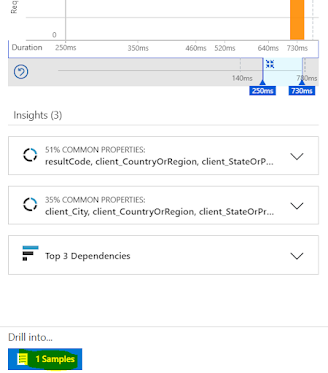
By clicking on connect/token operation, we can further analyze it. Distribution of duration graph will scope to selected operation and you can see it in the top right side. Since there are some calls which took more than 500ms, we can select that time range to further study.


3. Click on the samples button to see actual calls and dependencies


4. It'll load samples and we can select specific sample to analyze


By looking at the call stack, we can see there are around 30 separate calls to a specific SQL Server instance from this single operation.

There may be an opportunity to optimize further. May be we can reduce some calls if they are duplicate by a developer mistake. Or we might combine few calls together and send via a single operation.

Sunday, August 1, 2021

Azure Application Insights - Debug API failures to database level using Application Map

Application Insights is a rich Application Performance Management (APM) feature provided in Microsoft Azure to monitor live applications. It allows you to evaluate real time analytics of your applications

Following are the key options provided.


Application Map

Application map allows you to check interactions among your application components and to drill down to any failures or performance concerns. In this post I'll summarize how to see API failures and drill down to a specific issue.

I have a live application which is hosted in Azure and I've configured it for Application Insights. Following is the component interaction map of my application.


Some arrows are colored in red, where those are the items we need to focus on.

I thought of drilling further into one specific interaction. You can do it by clicking on a information title embedded in an arrow (in this instance I clicked on the point with 702ms | 0.1%)

  • Average response time is 702ms
  • Failure percentage is 0.1%


This will open up a summary with failures, which I'm concerned about. I can see there are 2, 547 error instances. Lets dive deeper. In order to further debug, let's click on Investigate failures button.


In this view I can see when those erroneous transactions occur in a timeline and in the next tab I can see overall failures where I can further drilldown by clicking on the error instances. Here, I have to click on the number 2. It'll open up another blade where it shows the error description


Now click on the blue arrow to see further details

Now click on [show more] to see the detailed error message
By using the Application Map feature, we can drill down to the database level to debug issues


Thursday, July 22, 2021

Azure Identity Protection to protect your credentials

With Azure Identity Protection (Azure AD P2 feature), Azure provides necessary precautions to protect and safeguard identities. 

Some of the common risks with identities are

  • Leaked credentials
  • Malware linked IP addresses
  • Unfamiliar sign-in properties
  • and many more,
As you can assume, it is very difficult to manually monitor each and every corner of the internet to check our credentials are compromised.

As a remedy Microsoft provides us with Identity Protection feature which has an automated detection of identity based risks. 

Identity Protection will provide remediation using different policies. We have two main policies to support us.


User risk policy
Azure will identity user accounts that may have compromised credentials. Policies will define what actions to be performed for such accounts

Based on the severity of the user risk, Azure will classify the riskiness as low, medium and high.

Following is the approach to configure User risk policy

Step 1 : Select target users


Step 2 : Select the risk level


Microsoft recommends to put the threshold to High.


Step 3 : Select the control


According to this setting in above diagram, user access will be blocked.


Sign-in risk policy
Azure will identify suspicious sign-in attempts of users. Policies will define what actions to be performed for such accounts

Based on the severity of the user risk, Azure will classify the riskiness as low, medium and high.

Following is the approach to configure Sign-in risk policy

Step 1: Select target users


Step 2 : Select the risk level


Microsoft recommends to put the threshold to Medium and Above.


Step 3 : Select the control


According to this setting in above diagram, user access will be blocked

After policies are set, administrators can refer various reports to obtain further insights.


Wednesday, July 21, 2021

Resolving the error: The directory currently selected differs from this key vault's directory

Recently after a migration, I could see a warning message in one of my Azure Key Vaults. It says,

The directory <Logged in directory> currently selected differs from this key vault's directory. Some actions will be disabled. Click for more details


If you can see, the directory name is empty. And the directory id is also different. We need to map the Key Vault to the correct tenant. How can we do it?

It is very easy. Use Azure Cloud Shell and execute following statements.

az account set --subscription "Visual Studio Enterprise Subscription"
$tenantId=$(az account show --query tenantId)                               
az keyvault update -n  --remove Properties.accessPolicies 
az keyvault update -n  --set Properties.tenantId=$tenantId

This resolved the issue.