It has the following scaffolding

You can clone it from this repository
LB Finance Core Finance System was awarded the Gold, by National Best Quality Software Awards (NBQSA) 2022.
This is the second consecutive award received for LBF Core Finance System called Eclipse.


The platform uses state of the art Microsoft and related tooling to bring the excellence.
Recently I did a presentation on Future of Collaboration with Microsoft 365. Collaboration is a key part of Future of Work
Following are the steps to enable Synapse resource provider
1. Navigate to your subscription


2. Navigate to Resource Providers

3. Search for Synapse and click on Register

That's all you have to do. This works for other service registrations as well
In this short article I'll show how to embed appsettings for remote Azure Function app
You can have various application settings in your local.settings.json file

So how can you ensure these settings are available in your remote Function App as well (may be with different values)
Click on publish

In your publish profile, provide necessary credentials and desired Function App. Then go to the Hosting section.
Click on Manage Azure App Service Settings

You can specify remote app settings there

That's all you need to do. Remote settings will be available in Azure Function App

Recently I was invited to conduct a technical session for CINEC Campus. Glad to see a large enthusiastic crowd.

Following is the structure for code to write Azure Policy as a Code. You can specify policy initiatives, definitions and assignments as you wish
//Parameters
//Variables

//Policy initiative
resource PolicyInitiative 'Microsoft.Authorization/policySetDefinitions@2020-09-01' = {
  properties: {
    policyType: 'Custom'
    displayName: initiativeName
    description: 'Custom Policy Initiative'
    metadata: {
      category: policyCategory
      source: policySource
      version: '0.1.0'
    }
    parameters: {
      //Your custom parameters
    }
    policyDefinitions: [
      //Selected policy definitions based on existing Microsoft policy definitions
    ]
  }
}

//Policy assignment
resource PolicyAssignment 'Microsoft.Authorization/policyAssignments@2020-09-01' = {
  name: assignmentName
  properties: {
    displayName: assignmentName
    description: 'Custom Policy Assignment'
    enforcementMode: assignmentEnforcementMode
    metadata: {
      source: policySource
      version: '0.1.0'
    }
    policyDefinitionId: PolicyInitiative.id
    parameters: {
      //Your parameters
    }
  }
}
We encounter Cross-Origin Resource Sharing (CORS) errors when we call an API from another domain if proper policies are not allowed.

In order to resolve the issue we need to allow the calling domain in our API. In this instance it is an Azure Function.
Following are the steps to resolve the error
1. Navigate to Azure Function and navigate to the CORS blade in API section

2. Then specify the calling application URL in Allowed Origins section. In this instance it is the Azure static web app I'm using.

.
Now I'm able to connect to the API which is an azure function app with SignalR output binding
In this article I'll introduce Well-architected framework, Azure advisor and Advisor score. More importantly I'll illustrate how they are interconnected and how can we use them together to achieve cloud excellence.
Azure well-architected framework
Microsoft Azure has a large collection of features categorized into IaaS, PaaS and SaaS. It is very difficult for us to gain expertise on each workload.
As a solution, Microsoft has introduced the well-architected framework which guides us on implementing Azure services with best practices. Furthermore, it assists us on operating and governing services those are already implemented in our tenant.
The Well-architected framework is built with five pillars. When implementing or operating Azure services we should always consult following pillars. The detailed documentation is available here
1. Cost optimization
Most of the cloud offerings are delivered as pay-as-you-go modal. So we need to be very careful on picking right workloads as you need to select the most cost effective solution. Furthermore when and where to use our resources. Some guidelines are given below
2. Performance efficiency
This is discusses how can your workloads meet varying demands in an efficient way. You should consider about
Azure advisor
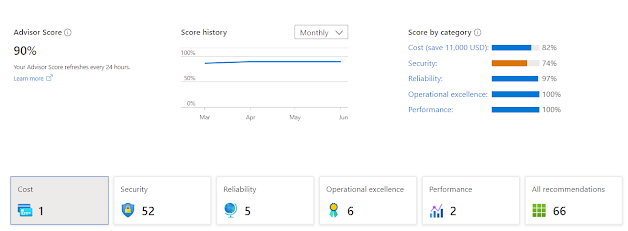
Azure advisor is your personal assistant in the cloud.
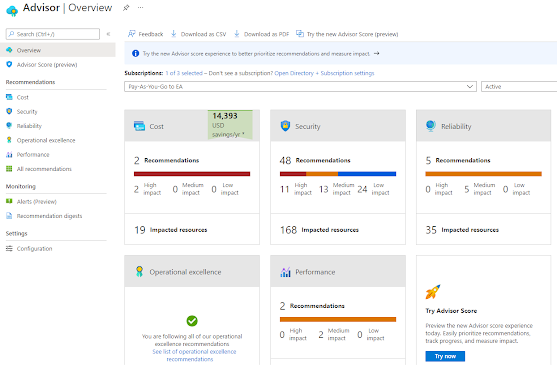
It provides you with recommendations and corrective actions improve your cloud workloads. It provides feedback on following areas
Advisor score
Azure advisor score is the consolidated figure calculated based on your progress towards achieving the excellence in your cloud.
You can have the current score as the baseline and set an improved figure as the target. Then you can follow recommended actions to achieve the target score,
Summary
Well-architected framework is a great tool to achieve the excellence in Azure cloud. You don't need to reinvent the wheel.
You can use Azure advisor and advisor score to keep your tenant complied with the well-architected framework.
Cloud Adoption Framework (CAF) guides you to implement your cloud workloads in Azure with best practices. We encounter the concept of Landing Zones at the latter part of CAF.
I will briefly describe the concept of Landing Zones in this article. You can access the official documentation via this link
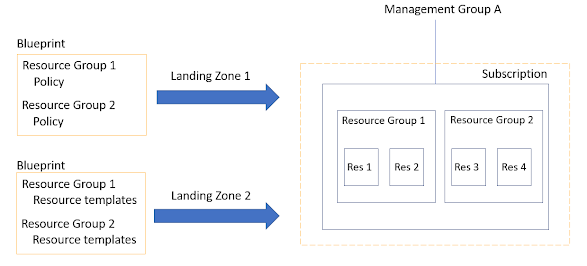
Landing Zones allow us to implement resources within subscriptions declaratively. It will commission the foundation of our cloud tenant with best practices and guidelines.
Why do we need landing zones? What is the problem with GUI/Wizard based provisioning via the beloved portal?
Landing zones are built with code to provision workloads in our tenant. Since it is written in code, we can version our cloud infrastructure in a source code repository. As we have the code, we can scale our cloud environment as we wish and we can repeatedly execute this in many environments.
Furthermore, landing zones are built in declarative manner where our resources are idempotent. Landing zones are structured in a modular manner where we can execute another landing zone in our environment on top of an existing zone.
Following are the key takeaways :)
There are mainly two ways that we can implement the our landing zones
1. Small Scale (Forever small or starting small)
Let's assume that we have only a single subscription or we want to start very small and gradually progress to enterprise level. Then the small scale landing zone model would be the preferred design choice.
We can develop small scale landing zone with ARM templates, Azure Policy and Azure Blueprint.
Azure provides kick-start packages where we can start our small scale landing zone journey.
Since landing zones are modular in nature, we can first apply the foundation blueprint and later add the migration blueprint to the same subscription.
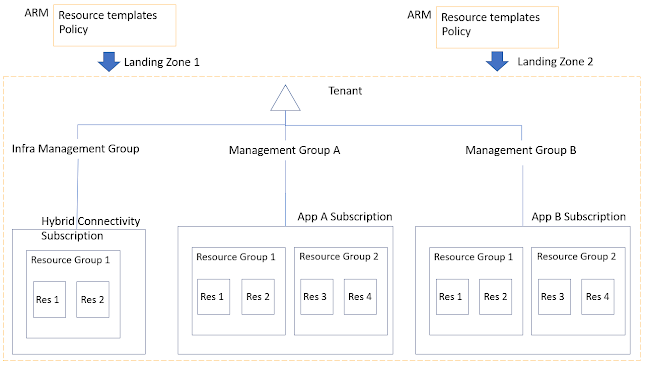
2. Enterprise Scale
This is where you design and build your tenant at enterprise level. The tenant might contain multiple subscriptions with their own dedicated workloads.
Why do we need multiple subscriptions in my tenant? can't I use a single subscription to house all my workloads?
Yes you can. But that's not the best practice. The idea is to separate and contain interests within specific boundaries.
For an example you can have a subscription to contain specific application and relevant components. You can secure and govern it with firewalls and policies. You should not mix this with unrelated Virtual Machine workloads that cater a separate business function. Ideally those workloads should reside in a separate subscription.
We can develop enterprise scale landing zones with ARM templates and Azure policies.
Azure provides following kick-start packages for enterprise
Recently I did a session on building data solutions with Microsoft Azure for the students of Faculty of Technology, University of Ruhuna.
This is a continuation of my previous session.
IOT is very common these days. We can solve many business problems with IOT and related tooling.
How we can easily listen to live telemetry feed and present a real-time dashboard?
In this article I will show, how we can achieve it with Azure IOT Hub, Azure Functions and Azure SignalR
I will use an existing setup I used in this example I wrote previously. I have used Raspberry Pi Azure IoT Online Simulator to simulate as an IOT device and connected it to my IOT hub. Let's start from there.

I will break this exercise into three parts
01. Azure Function with IOT Hub trigger
Step 01: Create a Function App

Step 02: Select IOT Hub as the trigger

Step 03: Navigate to IOT Hub and locate the ConnectionString. Specify the ConnectionString in local.settings.json file


Step 04: Change the function
[FunctionName("GetIoTEventData")]
public static async Task Run(
[IoTHubTrigger("messages/events", Connection = "ConnectionString")]EventData message,
ILogger log)
    {
        log.LogInformation($"C# IoT Hub trigger function processed a message: {Encoding.UTF8.GetString(message.Body.Array)}");
    }
Step 05: Let's try out by running the function locally and starting the raspberry Pi simulator

I can see the function is executed when telemetry generated
Great! now the first part of our exercise is completed!
02. Integrate Azure SignalR to the Azure Function
Step 01: Create Azure SignalR service

Step 02: Get SignalR ConnectionString and update it in local.settings.json file


{
  "IsEncrypted": false,
  "Values": {
    "AzureWebJobsStorage": "",
    "FUNCTIONS_WORKER_RUNTIME": "dotnet",
    "ConnectionString":"",
    "AzureSignalRConnectionString": ""
  },
  "Host": {
    "LocalHttpPort": 7072,
    "CORS": "*"
  }
}
Step 03: Let's add SignalR package
dotnet add package Microsoft.Azure.WebJobs.Extensions.SignalRService
Step 04: Add the negotiate endpoint
[FunctionName("negotiate")]
public static SignalRConnectionInfo Negotiate(
    [HttpTrigger(AuthorizationLevel.Anonymous)] HttpRequest req,
    [SignalRConnectionInfo(HubName = "IOTHub")] SignalRConnectionInfo connectionInfo)
{
    return connectionInfo;
}
Step 05: Create a new class to hold the telemetry information
public class Telemetry{
    public int messageId {get; set;}
    public string deviceId {get; set;}
    public long temperature {get; set;}
    public long humidity {get; set;}
}
Step 06: Let's modify the main function
[FunctionName("GetIoTEventData")]
public static async Task Run([
    IoTHubTrigger("messages/events", Connection = "ConnectionString")]EventData message,
    [SignalR(HubName = "IOTHub")]IAsyncCollector signalRMessages,
    ILogger log)
{

    Telemetry telemetry = JsonConvert.DeserializeObject(Encoding.UTF8.GetString(message.Body.Array));

    await signalRMessages.AddAsync(
    new SignalRMessage
    {
        Target = "iotClient",
        Arguments = new[] { telemetry.temperature.ToString() }
    })
    .ConfigureAwait(false);
}
03. Consume real-time data in a client application and plot data in a graph
Step 01: I use the JavaScript SDK for SignalR. We need to refer the following URL
https://cdnjs.cloudflare.com/ajax/libs/microsoft-signalr/3.1.7/signalr.min.js"
Step 02: Following is the code we use to plot the graph
        google.charts.load("current", {
            packages: ["corechart", "line"]
        });

        google.charts.setOnLoadCallback(drawChart);
        function drawChart() {

            let data = google.visualization.arrayToDataTable([
                ["Second", "Temperature"],
                [0, 0]
            ]);

            let options = {
                title: "Device Temperature",
                hAxis: {
                    title: "Time"
                },
                vAxis: {
                    title: "Temperature"
                }
            };

            let chart = new google.visualization.LineChart(
                document.getElementById("chart_div")
            );
            chart.draw(data, options);

            let index = 0;

            const apiBaseUrl = window.location.origin;
            const connection = new signalR.HubConnectionBuilder()
                .withUrl(apiBaseUrl + '/api')
                .configureLogging(signalR.LogLevel.Information)
                .build();
            connection.on('iotClient', (message) => {
                data.addRow([index, parseInt(message)]);
                chart.draw(data, options);
                index++;
            });

            connection.start()
                .catch(console.error);
        }
That's it!. Following is the end result
I have pushed the code to GitHub

In this article I'll explain how to achieve that using Azure Conditional Access Policies and Defender for Cloud Apps policies
Steps in Conditional Access Policies
Step 01: Navigate to Azure AD and then to Security Section

Step 02: Navigate to Conditional Access Policies

Step 03: Create a new policy

Step 04: Assign Users. I've assigned all users

Step 05: Select SharePoint Online

Step 06: Navigate to Session section and select Use conditional access app control and use custom policy option

Then I will click on configure custom policy section. It will bring me to Microsoft Defender for Cloud Apps application.
Steps in Microsoft Defender for Cloud Apps
Step 01: You can see SharePoint online in conditional access app control apps section, we created this in previous step in Azure AD

Step 02: Navigate to Control, Policies and create a new policy

Step 03: We will set Control file upload in Session control type drop down

Step 04: We will provide SharePoint Online as the Activity source

Step 05: Add a filter for the policy

Step 06: We will provide Block option in Actions section with a proper message

That's all we have to do. Let's try this out

Let's take Contoso, which sells sunglasses. They have a mobile application where customers can check sunglasses online. I need to ensure that, when they try out their new glasses, they should be properly placed on their eyes, Whatever the way they take their pictures!!


Toggle1.Value


ClearCollect(facePic,Camera1.Photo);
Set(fileName,Concatenate(Rand(),".png"));

First(facePic).Url

azimage
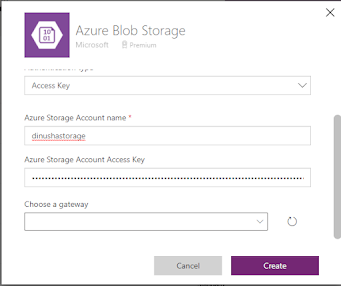
AzureBlobStorage.CreateFile("/image2",fileName,First(facePic).Url);
Set(azimage, AzureBlobStorage.GetFileContentByPath("image2/"&fileName));
ClearCollect(faceLand,First(FaceAPI.Detect("https://dinushastorage.blob.core.windows.net/image2/"&fileName)).faceLandmarks);

glassImage

Set(glassImage,'Sun-02');
(First(faceLand).eyeLeftOuter.y - First(faceLand).eyebrowLeftOuter.y) + 100
(First(faceLand).eyebrowRightOuter.x - First(faceLand).eyebrowLeftOuter.x) + 40
First(faceLand).eyebrowLeftOuter.x-20
452+ First(faceLand).eyeLeftBottom.y -60