I wanted to try out Face API features with Power Apps and thought of following use case.
Let's take Contoso, which sells sunglasses. They have a mobile application where customers can check sunglasses online. I need to ensure that, when they try out their new glasses, they should be properly placed on their eyes, Whatever the way they take their pictures!!
Can we do this with Face API?
Following is the expected result
Let me explain how I did this. Since this is a long post I will break the work in to following segments
- Prepare the controls of Power App
- Configure Azure Blob storage container and create connection
- Configure Azure Face API instance and create connection
- Script the application
Prepare the controls of Power App
Step 01: Create a new Power App from blank template
Step 02: Add a camera control
Step 03: Add a image control to show the picture taken from camera
Step 04: Add a toggle control switch between front camera and the back camera
Step 5: Add a button to upload image to Azure Blob Storage and to send the same image to Azure Face API
Step 6: Add another image control to place the image from Azure Blob storage and later overlay the sunglass image.
Step 7: Let's upload some images of sunglasses with transparent background. Later we will create three image controls and assign each image as the source
Configure Azure Blob storage container and create connection
Step 1: Create a blob container. we will make the container anonymous to keep it simple
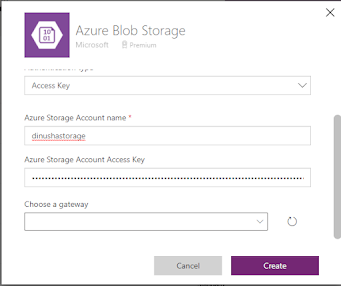
Step 2: Create Azure Blob Storage connector in Power Apps
Configure Face API instance and create connection
Step 1: Create a Face API instance. I selected the free pricing tier
Step 2: Copy API key and endpoint URL
Step 3: Create the Face API connector
Step 4: Navigate to Power App and connect the data source we just created
Now all the configurations are done!. Let's move to the functions.
Script the application
Step 1: When we deploy the application to mobile devices, we need to select the front facing camera. We will use the toggle control to switch cameras.
Select the camera control that we have added to the screen and change the Camera property
Toggle1.Value
Step 2: Using the OnSelect event in Camera control, place the photo in a collection. and initialize the fileName variable. This will be used later when saving the file in Blob storage
ClearCollect(facePic,Camera1.Photo);
Set(fileName,Concatenate(Rand(),".png"));
That's it for the Camera control.
Step 3: We will now do necessary changes in preview image control. We need to set the image source to the picture we took in previous step. We will initialize the Image property,
First(facePic).Url
Step 4: Let's initialize the Image value of our Image control which will be used to place the picture from Azure Blob storage. We will set the value when we click the action button.
azimage
Step 5: Let's do the configuration for the action button. There are two steps. First, we need to upload the image to Azure Blob storage.
AzureBlobStorage.CreateFile("/image2",fileName,First(facePic).Url);
Set(azimage, AzureBlobStorage.GetFileContentByPath("image2/"&fileName));
Then we will call the Detect operation in FaceAPI connector to get relevant landmarks
ClearCollect(faceLand,First(FaceAPI.Detect("https://dinushastorage.blob.core.windows.net/image2/"&fileName)).faceLandmarks);
Step 6: Now we can add the functionality for our sunglass image. We will initialize a variable for the Image property.
glassImage
Step 7: Now we will set the actual image for our sunglass. We have 3 images. in each control we have this code at OnSelect event.
Set(glassImage,'Sun-02');
Step 8: Let's place the sunglass image we have selected on top of my eyes. We will use face Landmarks to do the adjustment. Do following changes in sunglass image
Height
(First(faceLand).eyeLeftOuter.y - First(faceLand).eyebrowLeftOuter.y) + 100
Width
(First(faceLand).eyebrowRightOuter.x - First(faceLand).eyebrowLeftOuter.x) + 40
X
First(faceLand).eyebrowLeftOuter.x-20
Y
452+ First(faceLand).eyeLeftBottom.y -60
That's all we need to do. Your intelligent sunglass app is ready :)