In this video I explained how Azure Face API can be used with Microsoft Power Apps
Thursday, February 24, 2022

Sunday, February 20, 2022
Azure Face API and Power Apps to try out your next sunglasses
I wanted to try out Face API features with Power Apps and thought of following use case.

Let me explain how I did this. Since this is a long post I will break the work in to following segments









Let's take Contoso, which sells sunglasses. They have a mobile application where customers can check sunglasses online. I need to ensure that, when they try out their new glasses, they should be properly placed on their eyes, Whatever the way they take their pictures!!
Can we do this with Face API?
Following is the expected result
- Prepare the controls of Power App
- Configure Azure Blob storage container and create connection
- Configure Azure Face API instance and create connection
- Script the application
Prepare the controls of Power App
Step 01: Create a new Power App from blank template
Step 02: Add a camera control
Step 03: Add a image control to show the picture taken from camera
Step 04: Add a toggle control switch between front camera and the back camera
Step 5: Add a button to upload image to Azure Blob Storage and to send the same image to Azure Face API
Step 6: Add another image control to place the image from Azure Blob storage and later overlay the sunglass image.
Step 7: Let's upload some images of sunglasses with transparent background. Later we will create three image controls and assign each image as the source
Configure Azure Blob storage container and create connection
Step 1: Create a blob container. we will make the container anonymous to keep it simple
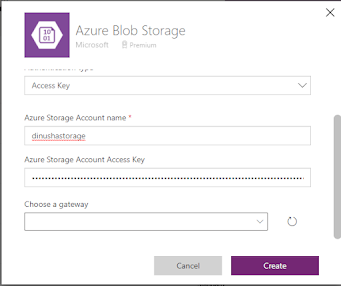
Step 2: Create Azure Blob Storage connector in Power Apps
Configure Face API instance and create connection
Step 1: Create a Face API instance. I selected the free pricing tier
Step 2: Copy API key and endpoint URL
Step 3: Create the Face API connector
Step 4: Navigate to Power App and connect the data source we just created
Now all the configurations are done!. Let's move to the functions.
Script the application
Step 1: When we deploy the application to mobile devices, we need to select the front facing camera. We will use the toggle control to switch cameras.
Select the camera control that we have added to the screen and change the Camera property
Toggle1.Value
Step 2: Using the OnSelect event in Camera control, place the photo in a collection. and initialize the fileName variable. This will be used later when saving the file in Blob storage
ClearCollect(facePic,Camera1.Photo);
Set(fileName,Concatenate(Rand(),".png"));
That's it for the Camera control.
Step 3: We will now do necessary changes in preview image control. We need to set the image source to the picture we took in previous step. We will initialize the Image property,
First(facePic).Url
Step 4: Let's initialize the Image value of our Image control which will be used to place the picture from Azure Blob storage. We will set the value when we click the action button.
azimage
Step 5: Let's do the configuration for the action button. There are two steps. First, we need to upload the image to Azure Blob storage.
AzureBlobStorage.CreateFile("/image2",fileName,First(facePic).Url);
Set(azimage, AzureBlobStorage.GetFileContentByPath("image2/"&fileName));
Then we will call the Detect operation in FaceAPI connector to get relevant landmarks
ClearCollect(faceLand,First(FaceAPI.Detect("https://dinushastorage.blob.core.windows.net/image2/"&fileName)).faceLandmarks);
Step 6: Now we can add the functionality for our sunglass image. We will initialize a variable for the Image property.
glassImage
Step 7: Now we will set the actual image for our sunglass. We have 3 images. in each control we have this code at OnSelect event.
Set(glassImage,'Sun-02');
Step 8: Let's place the sunglass image we have selected on top of my eyes. We will use face Landmarks to do the adjustment. Do following changes in sunglass image
Height
(First(faceLand).eyeLeftOuter.y - First(faceLand).eyebrowLeftOuter.y) + 100
Width
(First(faceLand).eyebrowRightOuter.x - First(faceLand).eyebrowLeftOuter.x) + 40
X
First(faceLand).eyebrowLeftOuter.x-20
Y
452+ First(faceLand).eyeLeftBottom.y -60
That's all we need to do. Your intelligent sunglass app is ready :)
Friday, February 18, 2022
Video - Azure Active Directory and Role Based Access Control (RBAC)
In this video I explained identity, scopes and roles concepts in Azure Active Directory. I demonstrated Azure AD Roles as well as Azure Roles.
Following is the presentation
Thursday, February 10, 2022
Video - End to end IoT Solution with Azure IoT Hub, Event Grid and Logic Apps
In this video I explained how we can connect to IoT devices with IoT Hub and respond to telemetry with Event Grid and Logic Apps.
Following are the related blog articles I did recently
Friday, January 28, 2022
NBQSA Sri Lanka - LB Finance Credit Appraisal System awarded highest in the in-house category
LB Finance Credit Appraisal system was awarded the highest award in in-house category competing with the giants in Sri Lanka at prestigious NBQSA award night.


The Credit Appraisal Module of Eclipse core finance system played a vital role in providing a perfect contactless solution during the pandemic which enabled transactions with minimal human interactions. The system was developed by ISO 27001:2013 certified IT Department and Center for Innovation and Technology (CIT)
Eclipse core finance system is developed using latest technologies and considering latest trends in FinTech landscape.
Following is a very high level and intentionally scoped component sketch of the platform

I am privileged to lead the highly talented team of experts who delivered the solution. The technical team at CIT consists of around 30 software development professionals, 15 quality assurance professionals and 10 professionals to analyze business requirements.

I wish this platform will be the pioneer for the Finance industry of the country.
Update: Recent press article on this award
Thursday, January 27, 2022
Azure Identity and Access Management - Technical session at LB Finance PLC
Recently I did a technical session for LB Finance PLC. This is the continuation of my previous session
Glad to see a large audience and interactive participation

Friday, January 14, 2022
Step into Cloud - Technical session at LB Finance PLC
Recently I conducted a technical training session for the development team at LB Finance PLC. This is the first episode of a series of cloud computing (Focusing on Microsoft Azure) sessions which will occur every week
Glad to see a large audience and interactive participation

Subscribe to:
Posts (Atom)