Wednesday, August 21, 2024

Using Azure's Diagnose & Solve Problems Feature to Troubleshoot Cloud Issues

You might encounter errors in your Azure cloud workloads and take various measures to resolve them. However, Azure provides built-in assistance through the Diagnose & resolve problems feature.

The Diagnose & solve problems feature in Azure is an intelligent troubleshooting tool designed to help users identify and resolve issues.

Here is an instance where I used this feature to troubleshoot a connectivity issue with an Azure Storage Account firewall.

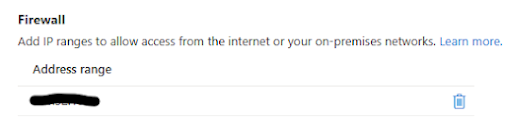
I enabled the firewall on my storage account to restrict access to a specific public IP address.


And I have whitelisted my public IP address as shown below


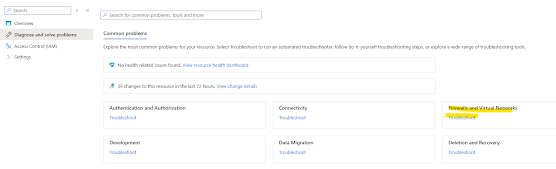
Despite configuring it as mentioned above, I still encountered the following error when I tried to access the container. This is when I used the Diagnose & solve problems feature.


I selected Firewalls & Virtual Networks section


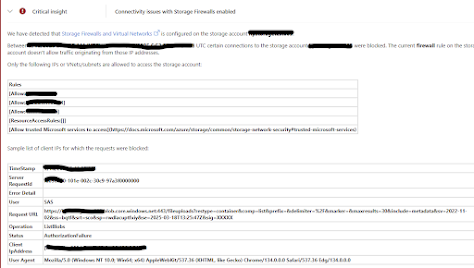
Next I selected Connectivity issues after enabling storage firewall


Here is the final response I received, which revealed that I had whitelisted the wrong IP address.


This allowed me to resolve the issue very quickly

Tuesday, August 13, 2024

Securing Backend API Using OAuth2 with Entra ID and Azure API Management

In this article, I will demonstrate how to use Azure API Management (APIM) features to secure an API that lacks authentication or authorization. 

This article is the first part of a two-part series. Below are the different parts of this article series.

Legacy APIs often do not have built-in security mechanisms, and updating them may be either impractical or too costly. In such cases, securing them through Azure API Management provides an effective solution.

The solution consist of four steps:
  1. Configuration of Entra ID App Registrations
  2. Configuration of APIM OAuth2 service
  3. Configuration of OAuth 2 settings within the API in APIM
  4. Test using the Test console
1.Configuration of Entra ID App Registrations

App registrations in Microsoft Entra ID are a way to register applications so they can integrate with Microsoft's identity platform. This process establishes a trust relationship between the application and the identity provider, enabling secure authentication and authorization.

We need to create two App Registrations in Azure Active Directory:
  • One for the backend API that we are securing.
  • Another for the client that will call our API, which could be the APIM Developer Portal or Postman.
In the next article, I will provide a detailed walkthrough on how to connect the client App Registration with Postman for authentication and testing.

Here is the process I followed:

Use default options to create App registrations. Keep the redirect URL blank


Next, navigate to the backend app registration  and add a scope under the Expose an API section. This defines the permissions that clients must request to access the API securely.


Next, navigate to the client app registration and assign the previously created scope under the API permissions section. 


After adding the permission, grant admin consent to ensure the client can request and use the assigned scope when calling the API.


Next, within the client app registration, navigate to the Certificates & secrets section and create a client secret. Once generated, be sure to copy and securely store the secret, as it won’t be visible again. Using Azure Key Vault is a recommended approach for securely storing and managing the client secret.


We need to configure the callback URL in our client app registration. But first, we must generate this URL within the OAuth 2.0 service in APIM. Once generated, this URL should be added to the Redirect URIs section in the client app registration. We will discuss that within the next section.

2.Configuration of APIM OAuth2 service

In our API Management instance, we need to create an OAuth 2.0 service, which will interact with our App Registrations to retrieve an access token. This service acts as the bridge between API Management and Azure Active Directory, enabling secure authentication and authorization for API requests.

Navigate to our API Management instance and select OAuth 2.0 + OpenID Connect section under the developer portal.


Following is the format of configuration parameters.

#Authorization endpoint URL
https://login.microsoftonline.com/<Tenant ID>/oauth2/v2.0/authorize

#Token endpoint URL
https://login.microsoftonline.com/<Tenant ID>/oauth2/v2.0/token

You can get these values from your client app registration


Copy the Authorization Code Grant flow URL generated in the OAuth2 service within API Management, and paste it into the Redirect URI section of the client app registration . This ensures that after successful authentication, Azure AD can redirect the authorization response back to API Management

APIM OAuth 2.0 service Redirect URL is shown below


Authentication section in client app registration is shown below


3.Configuration of OAuth 2 settings within the API in APIM

Go to the Settings section of your API within API Management (APIM) and select the OAuth 2.0 service you previously created. This associates the API with the authentication flow.


This completes the basic OAuth 2.0 configuration. However, to enhance security, we can take an additional step by adding token validation in our API operation using an APIM policy.

Navigate to the Inbound processing section and open policy code editor
    <inbound>
        <base />
        <validate-jwt header-name="Authorization" failed-validation-httpcode="401" failed-validation-error-message="Unauthorized. Access token is missing or invalid.">
            <openid-config url="https://login.microsoftonline.com/<YOURTENANTID>/v2.0/.well-known/openid-configuration" />
            <required-claims>
                <claim name="aud">
                    <value>319aa8ca-f607-45c3-ac83-e3a510666883</value>
                </claim>
            </required-claims>
        </validate-jwt>
    </inbound>

4.Test using the Test console

You can now test the OAuth 2.0 flow within the Test Console or the Developer Portal. In the Test Console, add the Authorization header and provide a valid access token to simulate an authenticated API request.






Sunday, August 4, 2024

Presentation - API Security: Essential Practices for Developers

Recently I did a presentation for a local community on how to implement secure APIs. Following is the presentation I conducted


Tuesday, July 30, 2024

Mentorship - Mentoring Circle for Microsoft Data & AI Bootcamp

I had the privilege of participating in the mentorship circle for the Microsoft Data & AI Bootcamp on July 12th. The students were incredibly enthusiastic and eager to learn new technologies


Monday, June 10, 2024

Presentation - Securely expose backend services with Azure API Management

Recently I did a session on Azure API Management services for Microsoft Zero to Hero community. Azure API Management Azure API Management allows you to securely expose backend services to deliver business value.

Following is the event


Following is the presentation I did


Following is the recording of that session

Sunday, April 21, 2024

Presentation - Implementing Zero Trust strategy with Azure

I recently conducted a session on addressing modern security challenges and implementing the zero-trust model at Global Azure 2024, hosted by Microsoft in Perth.

It was an enlightening event with a wealth of technical content presented.

If you're new to zero trust with Microsoft solutions, here are some great starting points to consider

Following is the presentation I did at the event.


Following are few snaps from the event


Monday, February 26, 2024

Understand your Azure spending: Harnessing Power BI to analyze monthly expenditure

Cloud cost management, a component of FinOps, presents a complex challenging exercise. Azure, being a public cloud, hosts diverse workloads across different service tiers and regions, making cost management a difficult task.

In this article, I will demonstrate how I developed a Power BI dashboard to delve into and analyze the costs associated with my usage

There are several methods to access usage and associated costs. While utilizing the Azure cost management API is one approach, for this article, I will opt for the monthly usage file, which offers a more convenient solution.

As the first step we need to navigate to the subscription and navigate to the invoices section.


Afterward, proceed to the 'More Options' section and download the usage file in CSV format for a designated billing period

Next, upload the CSV file to your Power BI environment. Once uploaded, you'll be able to view the schema in the data pane.


Let's begin creating our dashboard. Firstly, we'll analyze the cost by each resource type. To do this, drag the 'Cost' and 'MeterCategory' columns onto the canvas. Then, convert the visualization to a Pie Chart.


Now, let's proceed to our second visualization. This visualization will enable us to analyze the cost of each service based on the plan or tier. To achieve this, we will create a table displaying the 'Cost', 'MeterSubCategory', and 'MeterName'.


We've already gained some valuable insights! However, let's continue to delve deeper. We can examine the daily costs for specific resources. To do this, add another table displaying 'Cost', 'Date', and 'MeterName' as indicated below.


Moving on to our final chart, let's visualize the usage pattern for specific services over time. To accomplish this, we'll create a line chart incorporating the 'Cost', 'Date', and 'MeterName' fields.


Now, let's enhance the visual appeal by adding titles and formatting


Let's analyze a specific resource. If I want to analyze my costs and usage specifically on Cognitive Services, I can select that service from the first chart (Cost by Resource Type), and the other charts will filter accordingly.


I notice that I've spent more on GPT4 prompt tokens. To analyze further, I can navigate to my second chart (Cost by Resource Plan/Tier) and click on the relevant item.


This process helps me identify cost patterns and gain a better understanding of how Azure costing operates.