Thursday, September 14, 2023

Resolve Azure Data Explorer error - Principal 'aaduser=xxx' is not authorized to perform operation 'VersionShowCommand'

When provisioning a new Azure Data Explorer cluster and navigating to the query section, you may receive an error message stating that the principal 'aaduser=xxx' is not authorized to perform the operation 'VersionShowCommand'.


To resolve the issue, you must grant the necessary permissions to the user principal referenced in the error message.

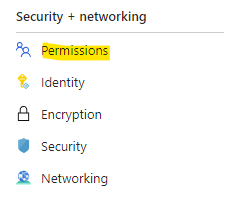
Begin by navigating to the Security + Networking section and selecting the Permissions menu.


Then, choose either AllDatabasesAdmin or AllDatabasesViewer based on your specific requirements.


Next, assign the user principal mentioned in the error message to grant the desired permission.


That's all you need to do. Now you can access the cluster


Tuesday, September 5, 2023

Designing an active/passive solution using Azure Front Door with priority based traffic routing

Suppose we aim to implement a solution in Azure while ensuring disaster recovery is effectively managed. In such cases, it's often necessary to deploy one instance of the solution as primary and another instance as the standby.

Remember, our objective is not to balance the load but to establish a disaster recovery solution.

The following diagram illustrates how to implement both load balancing and disaster recovery.


We can utilize Azure Front Door to implement the active/standby topology that we are interested in. Azure Front Door enables traffic routing based on latency, priority, round robin, and weighted round robin.

By employing priority-based traffic routing, we can establish an active/standby topology, which is ideal for disaster recovery implementation. According to the provided design, we should assign the same priority (e.g., 1) in the load balancing solution and a different priority (e.g., 2) for the disaster recovery solution.


To achieve this, you need to update the route you are interested in. You can apply a priority by changing the origin (represents an application server) of an origin group (represents application server collection/farm).


That's all you need to do. The secondary origin will receive the traffic when the primary origin is offline.

Tuesday, August 15, 2023

Secure Azure app services behind Azure Front Door using private link

When an Azure App Service is exposed through Azure Front Door, it utilizes the public address and directs the traffic over the public network. However, we can leverage Azure Front Door as the gateway and restrict all public traffic to our origin (Azure App Service app) by utilizing the Private Link integration feature available in Azure Front Door Premium.

Private Link integration enables Front Door to connect with your origin using the Private Link service. This approach eliminates the necessity for your origin to be accessed over the public internet. Instead, it permits Front Door to access the origin using Microsoft's backbone network.


This process establishes the Private Link connection for the origin and necessitates your approval at the origin.


Tuesday, August 1, 2023

Configure SonarQube in Azure Container Instances and connect with Azure DevOps pipelines for Static Application Security Testing (SAST)

Static Application Security Testing (SAST) is a type of security testing that analyzes the source code of an application for security vulnerabilities. SonarQube is a popular platform for SAST that provides powerful code analysis tools for identifying security issues in software code.

SAST is an essential part of a DevSecOps process. DevSecOps aims to integrate security into the development process to identify and fix security issues early in the software development lifecycle.

In this article I will illustrate how we can configure SonarQube in Azure and connect it in Azure DevOps pipeline to detect vulnerabilities early in the development stage. 

To organize this article, I will break the workload into two sections.
  1. Configure SonarQube community edition as a container in Azure Container Instances (ACI) with backend as Azure SQL instance
  2. Configure SonarQube in Azure DevOps
Let's start.

Step 1 - Configure Azure SQL database and SoarQube image in ACI

I found this article very useful in configuring with Azure CLI
# Login to Azure environment and select the subscription
az login
az account set --subscription "My Demos"


# Create SQL instance and firewall rules
az sql server create --name srv-sql-sonarqube --resource-group rg-sonarqube --location australiaeast --admin-user sonar --admin-password [Password]
az sql server firewall-rule create --resource-group rg-sonarqube --server srv-sql-sonarqube -n AzureServices --start-ip-address 0.0.0.0 --end-ip-address 0.0.0.0

# Create the database in SQL instance
az sql db create --resource-group rg-sonarqube --server srv-sql-sonarqube --name sonarqubeDb --service-objective S0 --collation SQL_Latin1_General_CP1_CS_AS
   
# Create a container instance with offical SonarQube image
az container create --resource-group rg-sonarqube --location australiaeast  --name sonarqube --cpu 2 --memory 3.5 --image sonarqube:7.7-community --os-type Linux --ip-address Public --environment-variables 'SONARQUBE_JDBC_USERNAME'='sonar' 'SONARQUBE_JDBC_PASSWORD'='[Password]' 'SONARQUBE_JDBC_URL'='jdbc:sqlserver://srv-sql-sonarqube.database.windows.net:1433;database=sonarqubeDb;user=sonar@srv-sql-sonarqube;password=[Password];encrypt=true;trustServerCertificate=false;hostNameInCertificate=*.database.windows.net;loginTimeout=30' --ports 9000 --protocol TCP
    
Once it is deployed, test your ACI instance as below


You can connect to SonarQube instance with admin/admin as default credentials and port 9000.

Now you need to generate a token which will be used when configuring this with Azure DevOps pipeline. For that, navigate to My Account and click on Security.


Step 2 - Configure SonarQube in Azure DevOps

Navigate to Organization Settings and Extensions. Then select the SonarQube from Marketplace


Install SonarQube extension


Then navigate to specific project that you want pipeline to be defined and select project settings. Then select Service connections.


Create new service connection and select SonarQube from the list


Specify properties according to your SonarQube instance. Use the token we generated in step 1


Now your configuration is completed. You can use the SonarQube instance to perform Static Application Security Testing (SAST).

Wednesday, July 12, 2023

Send email with exchange email using Azure service principal

Following is a generic method to send email with attachments using Azure service principle with Mail.Send permission.

This approach is more secure than classic SmtpClient.SendEmail method. Service principal approach allows you to authenticate using Azure Active Directory, which provides a more secure way of authenticating than using a username and password.

You need to supply Client ID, Tenant ID and Client Secret as parameters.


public async Task<bool> SendGraphEmailAsync(Email email,string clientId, string tenantId, string clientSecret)
{
	bool result = false;
	var clientSecretCredential = new ClientSecretCredential(tenantId, clientId, clientSecret);

	BlobService blobService = new BlobService();
	SharePointRepository sharePointRepository = new SharePointRepository();

	//method to get email template from blob storage template container
	var emailTemplate = await blobService.ReadFileFromBlob("Email-Template.html", "template");

	//method to get attachment from sharepoint
	var csvAttachment = await sharePointRepository.GetAttachmentFromSharePointAsBiyes(email.CSVName);

	var message = new Message
	{
		Subject = email.Subject,
		Body = new ItemBody
		{
			ContentType = BodyType.Html,
			Content = emailTemplate.ToString()
		},
		From = new Recipient
		{
			EmailAddress = new EmailAddress
			{
				Address = email.From
			}
		},
		CcRecipients = new List<recipient>
		{
			new Recipient
			{
				EmailAddress = new EmailAddress
				{
					Address = email.SingleCC
				}
			}
		},
		ToRecipients = new List<recipient>
		{
			new Recipient
			{
				EmailAddress = new EmailAddress
				{
					Address = email.SingleTo
				}
			}
		},
		Attachments = new List<microsoft .graph.models.attachment="">
		{
			new FileAttachment
			{
				OdataType = "#microsoft.graph.fileAttachment",
				Name = email.CSVName.Split('/').Last(),
				ContentType = "text/csv",
				ContentBytes = csvAttachment,
			}
		},
	};

	Microsoft.Graph.Users.Item.SendMail
	.SendMailPostRequestBody requestbody = new()
	{
		Message = message,
		SaveToSentItems = false
	};
	var scopes = new[] { "https://graph.microsoft.com/.default" };

	var graphClient = new GraphServiceClient(clientSecretCredential, scopes);

	try
	{
	   await graphClient.Users[email.From]
		.SendMail
		.PostAsync(requestbody);
		return result;
	}
	catch (Microsoft.Graph.ServiceException)
	{
		throw;
	}           
}

Hope that helps 

Wednesday, June 21, 2023

Apply Azure DevOps variable groups to Azure App Service deployment slot scope

In enterprise application development, we typically have multiple release environments such as Development (Dev), Testing (Test), User Acceptance Testing (UAT), Pre-Production (Pre-Prod), and Production. When deploying to these environments using CI/CD pipelines, we often need to transform variables to match the the target environment.

In Azure DevOps, we utilize variable groups to carry out the variable transformation process.

If we are utilizing Azure App Services with the deployment slot option enabled, it's essential to apply the configuration transformation for the slot as well.

How can we ensure that the deployment slot release stage has the transformed configurations?

Following are the steps we can use.

Navigate to release pipeline and click on the variables section


Then click on more options and select Change scope


Ensure your slot is selected


Friday, June 9, 2023

Queue triggered Azure Function - Take only one message from queue at a time

I encountered a situation where my queue-triggered function didn't consistently behave as expected. The issue stemmed from the function's execution order not aligning with my expectations.

The root cause of this problem lies in the unpredictability of message ingestion order within a storage queue when executing queue-triggered functions. While storage queues are designed to process messages in a first-in, first-out (FIFO) fashion, several factors can influence the actual order of message ingestion. For instance, when multiple instances of the function run concurrently, messages may be processed out of sequence. Furthermore, delays in message processing or variations in message priorities can also disrupt the expected order of ingestion.

If your objective is to maintain a strict order of message ingestion and you are utilizing a storage queue, you'll need to address this concern within your code. Alternatively, you can consider migrating to a more dependable solution, such as Azure Service Bus Queue, which offers greater control over message ordering.

However, if your problem can be resolved by dequeuing one message at a time, you can implement the following adjustments to your host.json file within your Azure Function App.


    "extensions": {
    "queues": {
      "batchSize": 1,
      "newBatchThreshold": 0,
      "maxDequeueCount": 1
    }
  }
  

This helped my application to function as expected.